
Payroll management #
The ACCUR8 features an integrated payroll management system that accurately calculates drivers’ or truck owners’ earnings, including allowances, deductions, and reimbursements. This system is designed to comply with tax regulations and legal requirements. Automating the payroll process enhances operational efficiency while still allowing you to maintain control over the entire procedure.
To get started, you’ll need to create a driver’s or truck’s profile in the system, as well as set up their payroll information.
Creating a new driver’s profile and setting him as available #
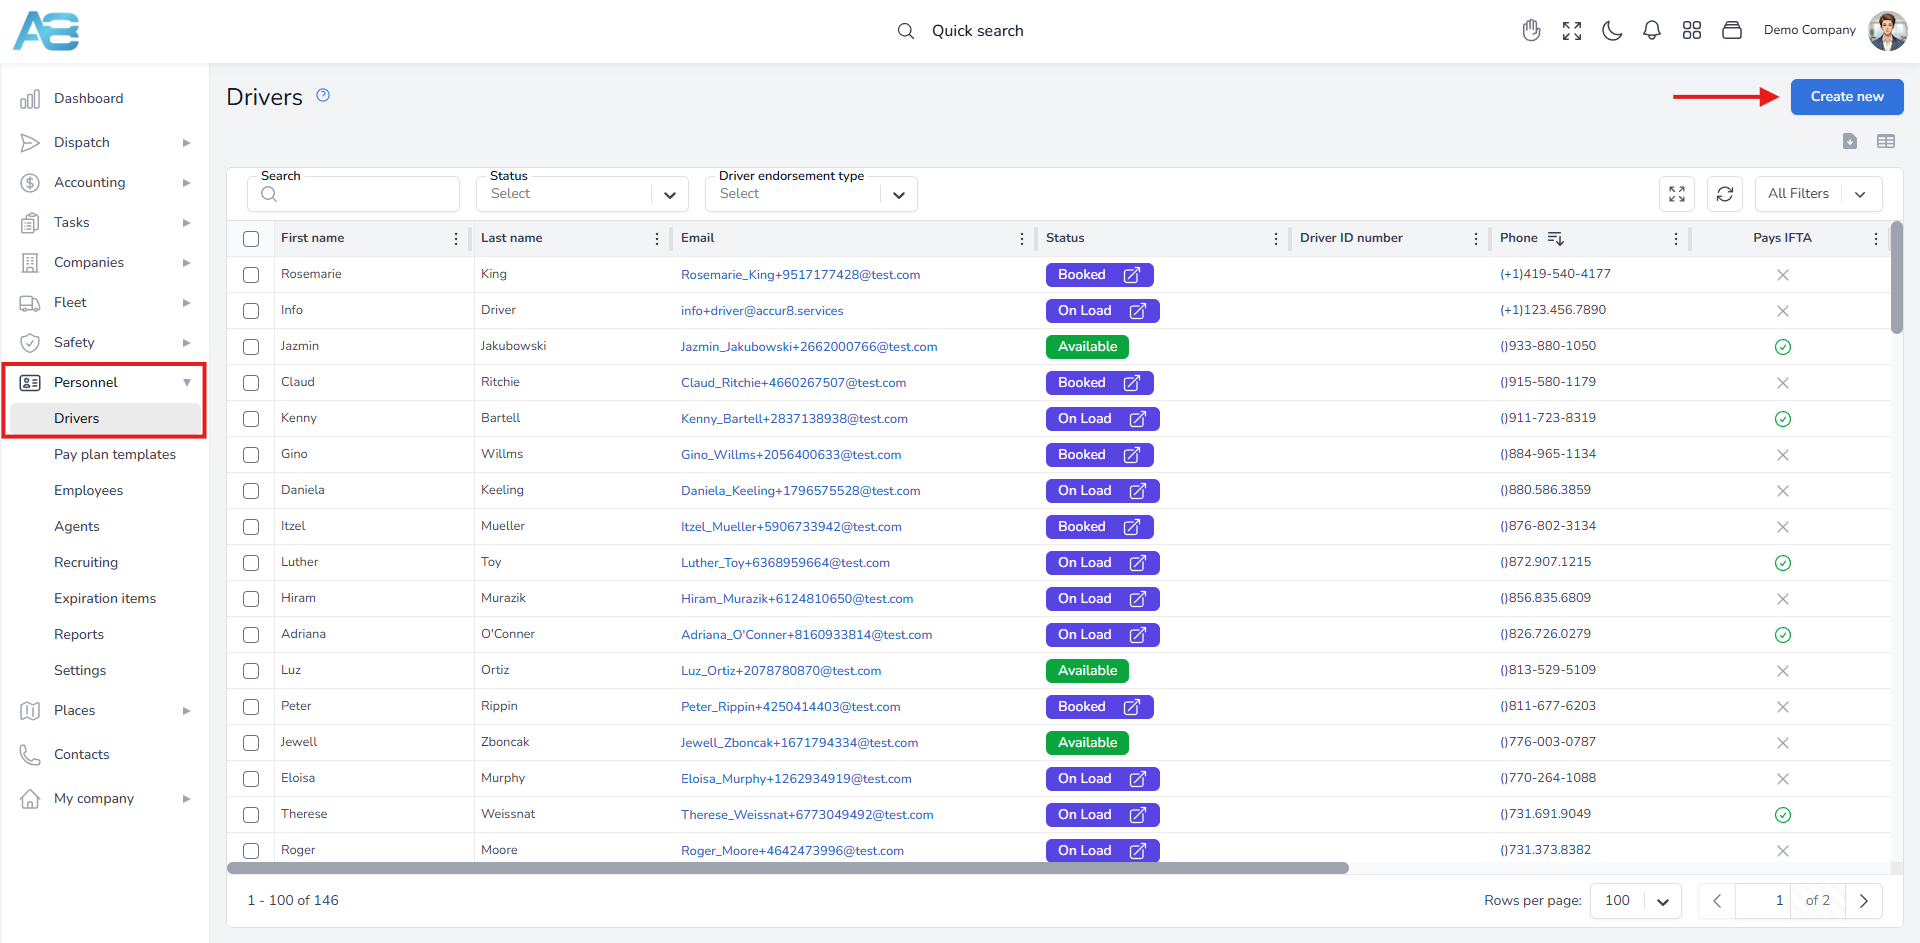
To create a driver’s profile, navigate to the left sidebar and click the Personnel section, then select Drivers. Next, click the Create New button in the top-right corner. This will open a new page with various sections.
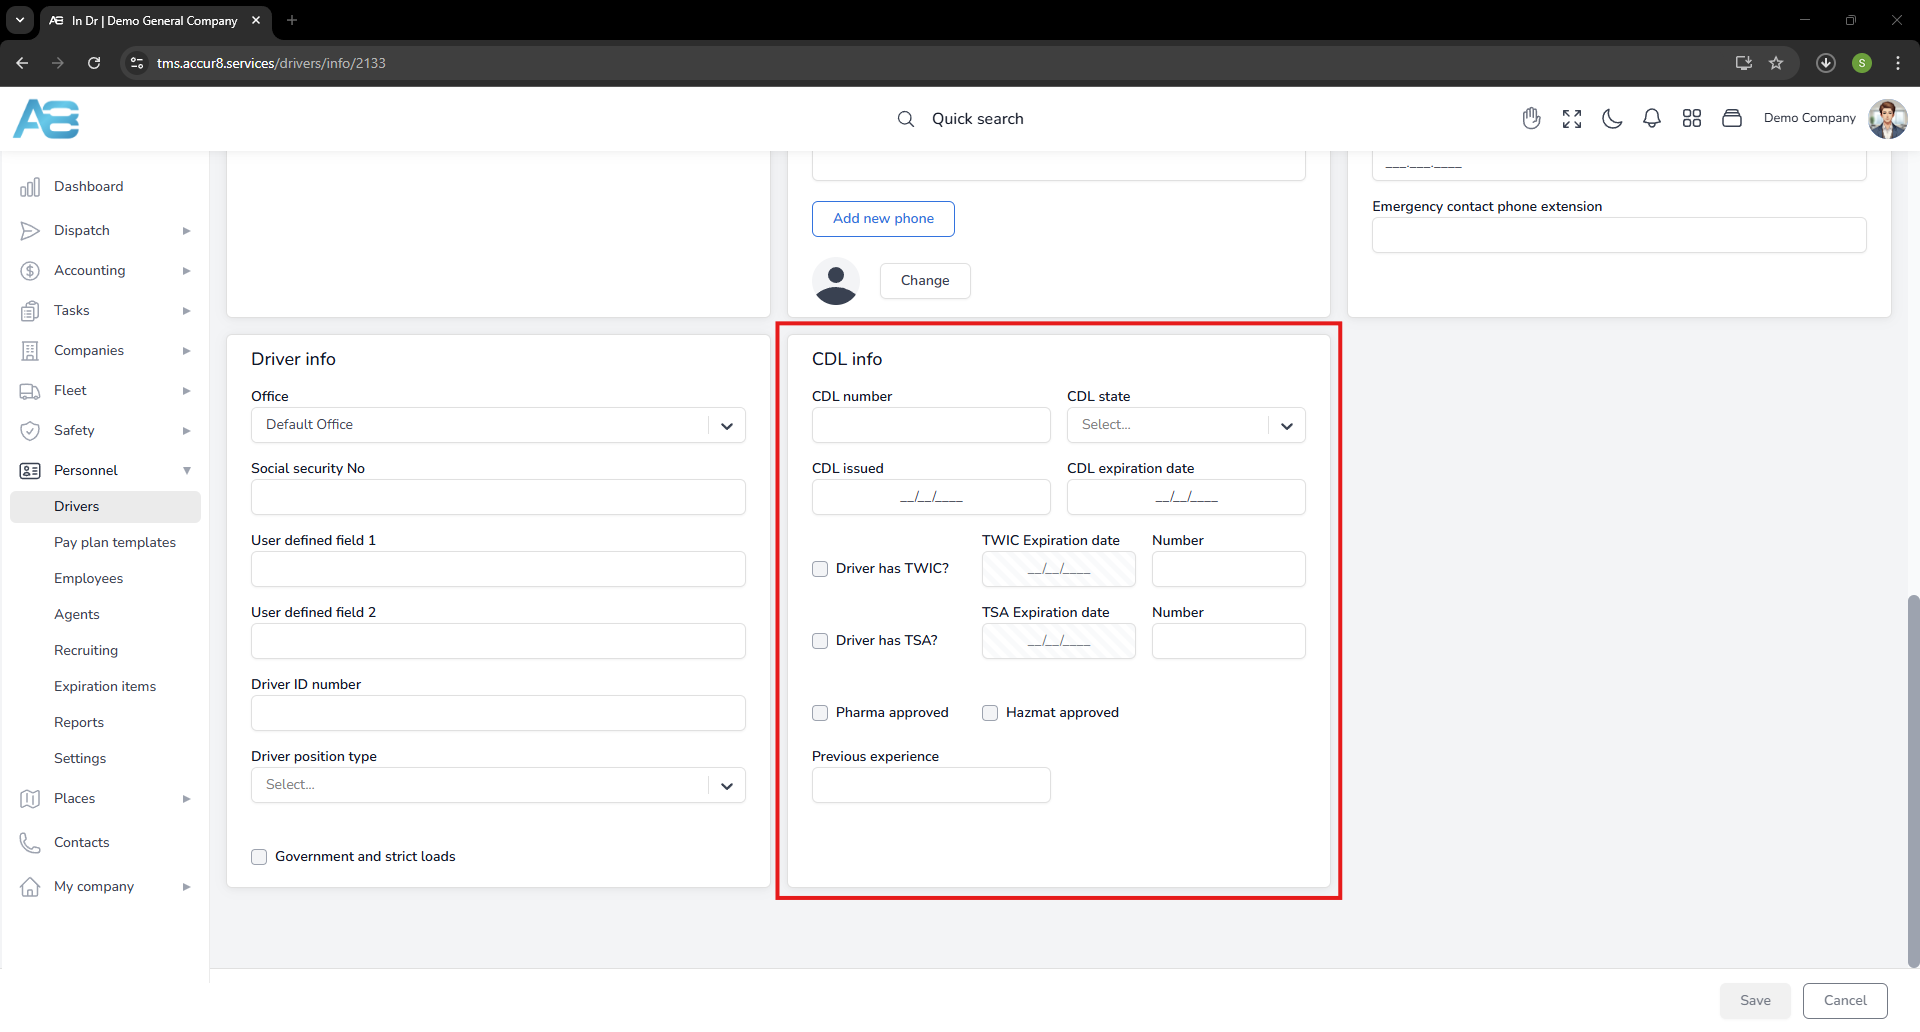
To add a new driver, you must fill in the required information. In the Contact Info section, provide the email address, first name, and last name. In the CDL Info section, enter the driver’s CDL details. These fields are mandatory and sufficient for creating a profile. If you wish, you can add additional information later. Please remember that the driver’s email address must be unique.
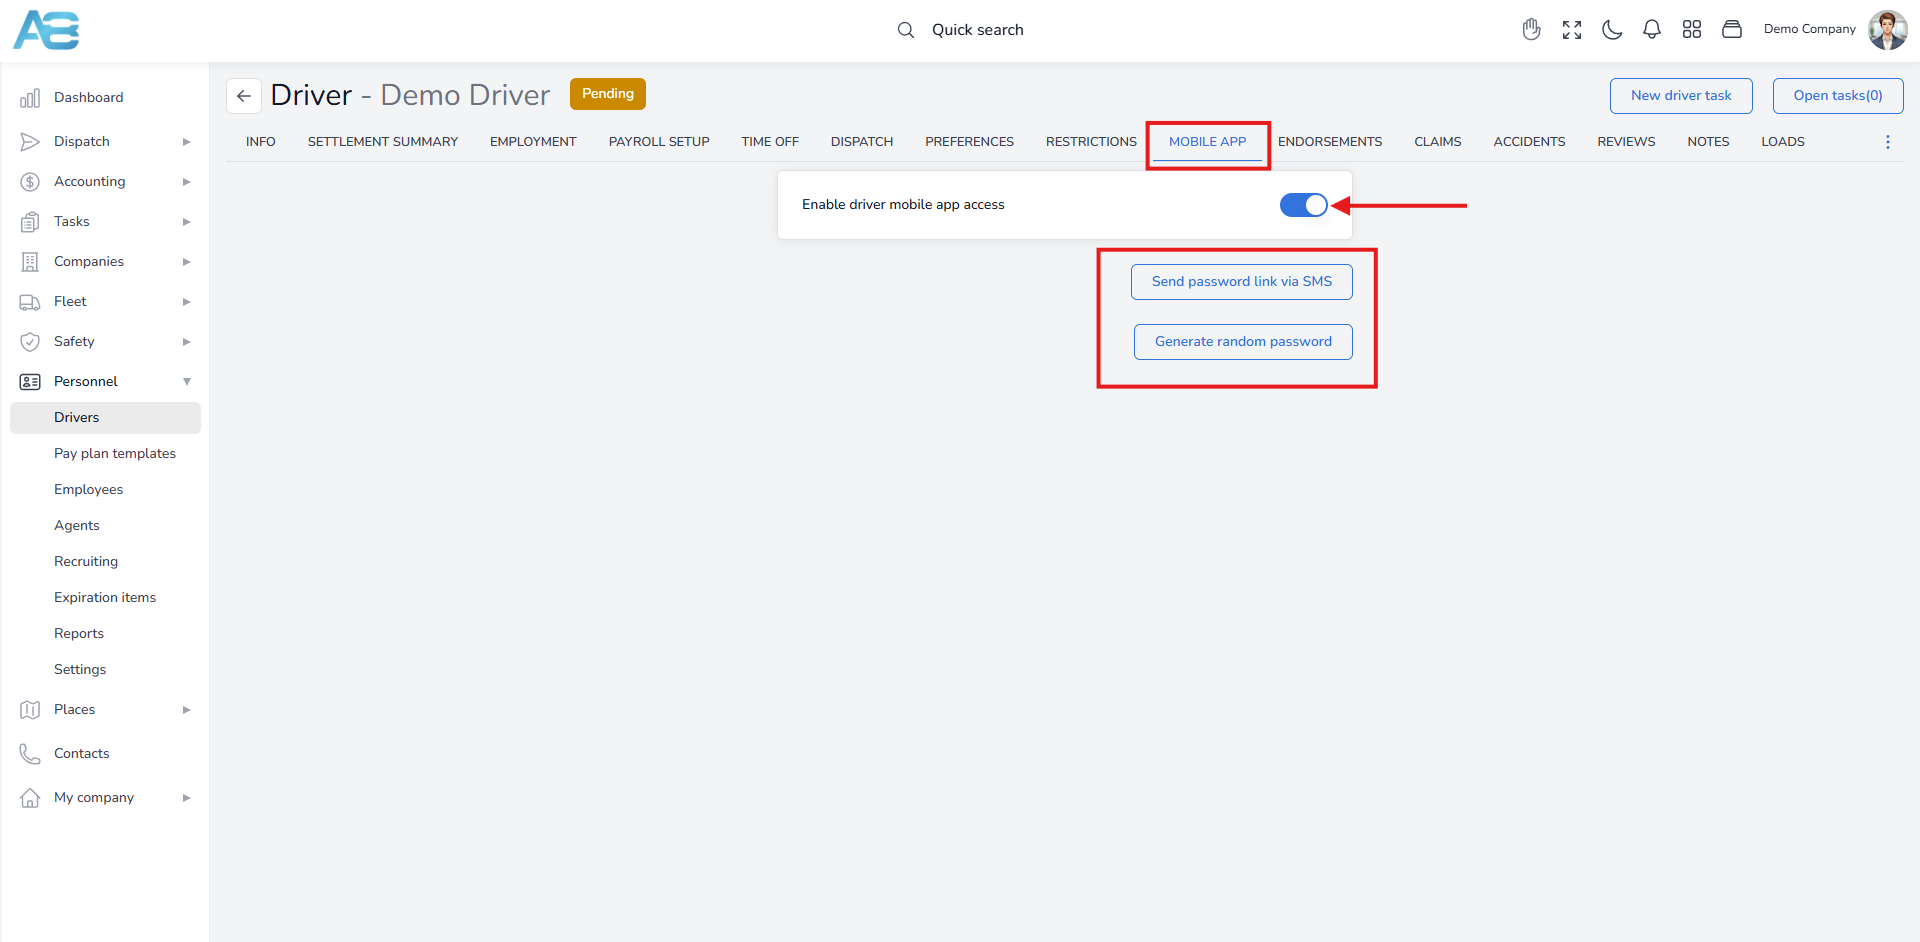
Also, under the Mobile App tab, you can enable driver mobile app access by clicking the toggle button and then the Send password link via SMS button.
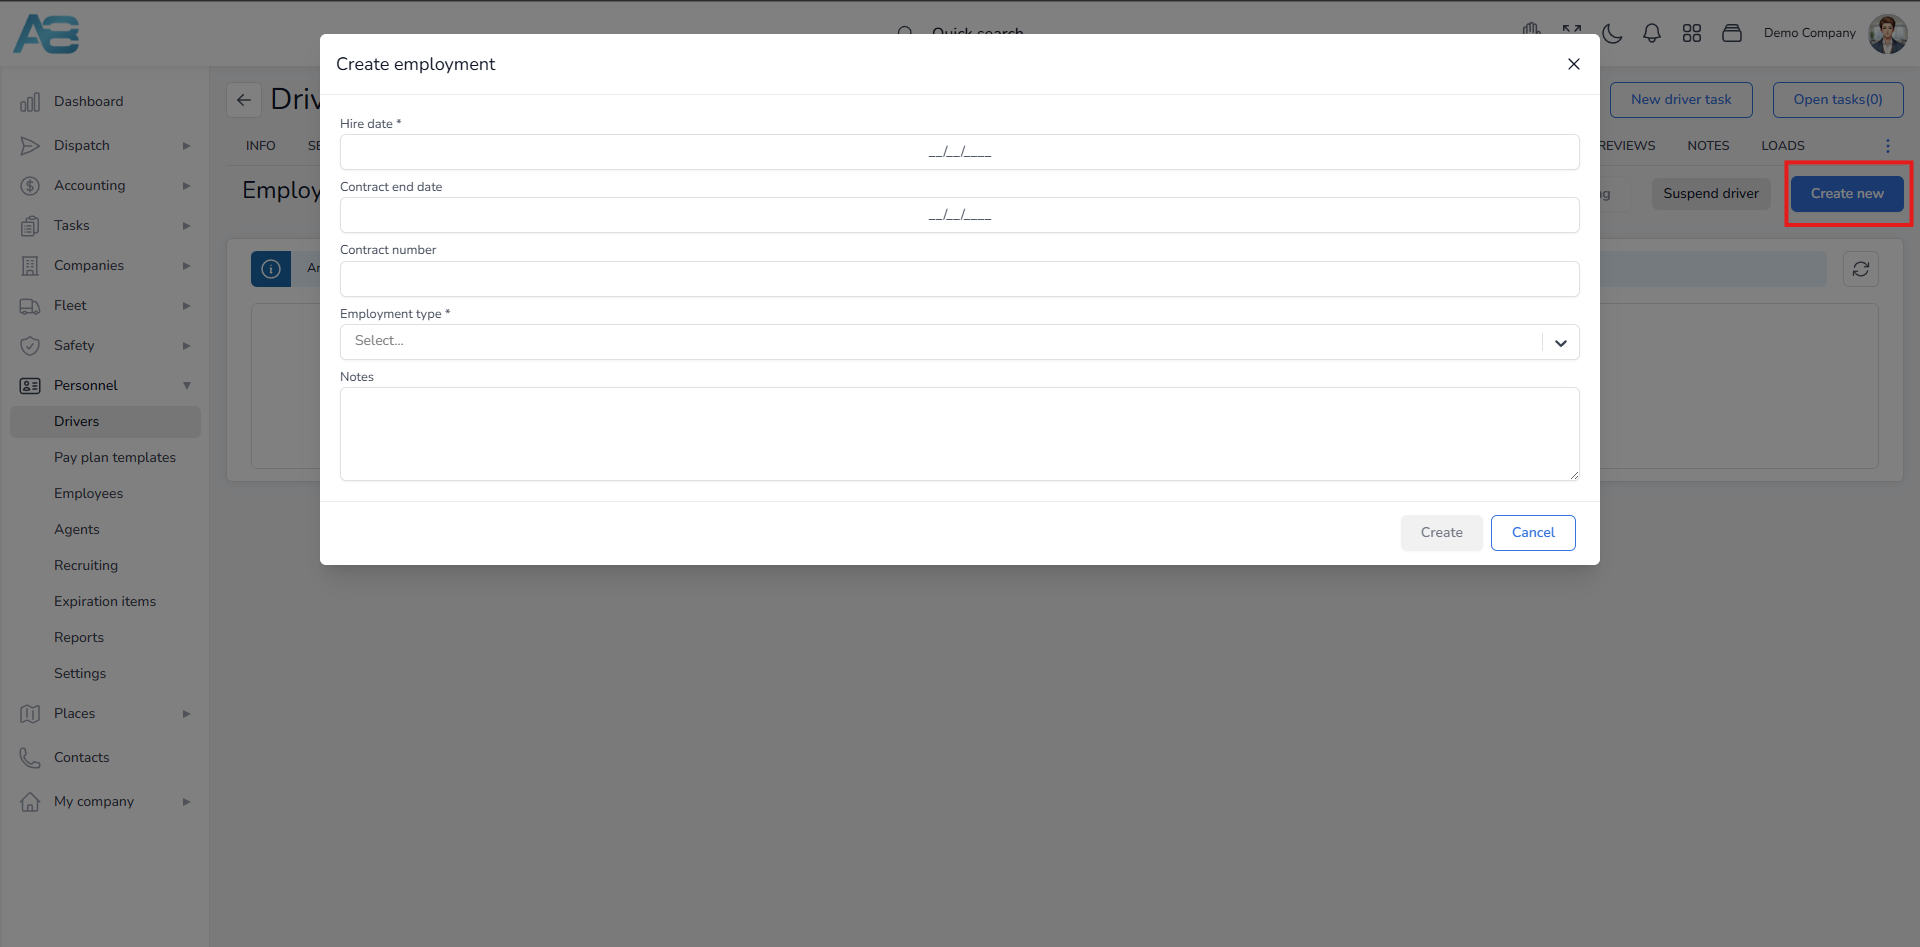
Once you have completed all the required fields, click the Save button. A pop-up window will appear, prompting you to choose your next step. To proceed to the driver’s page, select that option. Initially, the driver’s status in the system will be set to Pending. To set his status to Available, you need to add a contract by creating an employment profile for the driver. This can be done under the Employment tab on the driver’s page. By clicking the Create new button, a Create employment window will open. Here, you will need to enter the hire date and select the employment type. These two fields are mandatory to create a new entry, but you may also fill in any additional fields if desired. After clicking the Save button, the driver’s status will change to Available.
*Note: When the contract ends, the driver will be marked as inactive. The system allows you to extend the driver’s contract by creating a new one.
Initial Driver Payroll Setup #
After creating a new driver in the system, it is essential to add the appropriate Load payment plan to ensure accurate compensation and billing. This payment plan determines the default load pricing entry for the selected driver. Each time the driver is assigned to a load, the default entry with the specified values will be added to the load pricing record.
To access this option, please select Drivers from the left sidebar under the Personnel section. Clicking the Driver’s name from the list will take you to that Driver’s page. You can find this option under the Payroll Setup tab.
How to set up the Driver’s Initial Payroll? #
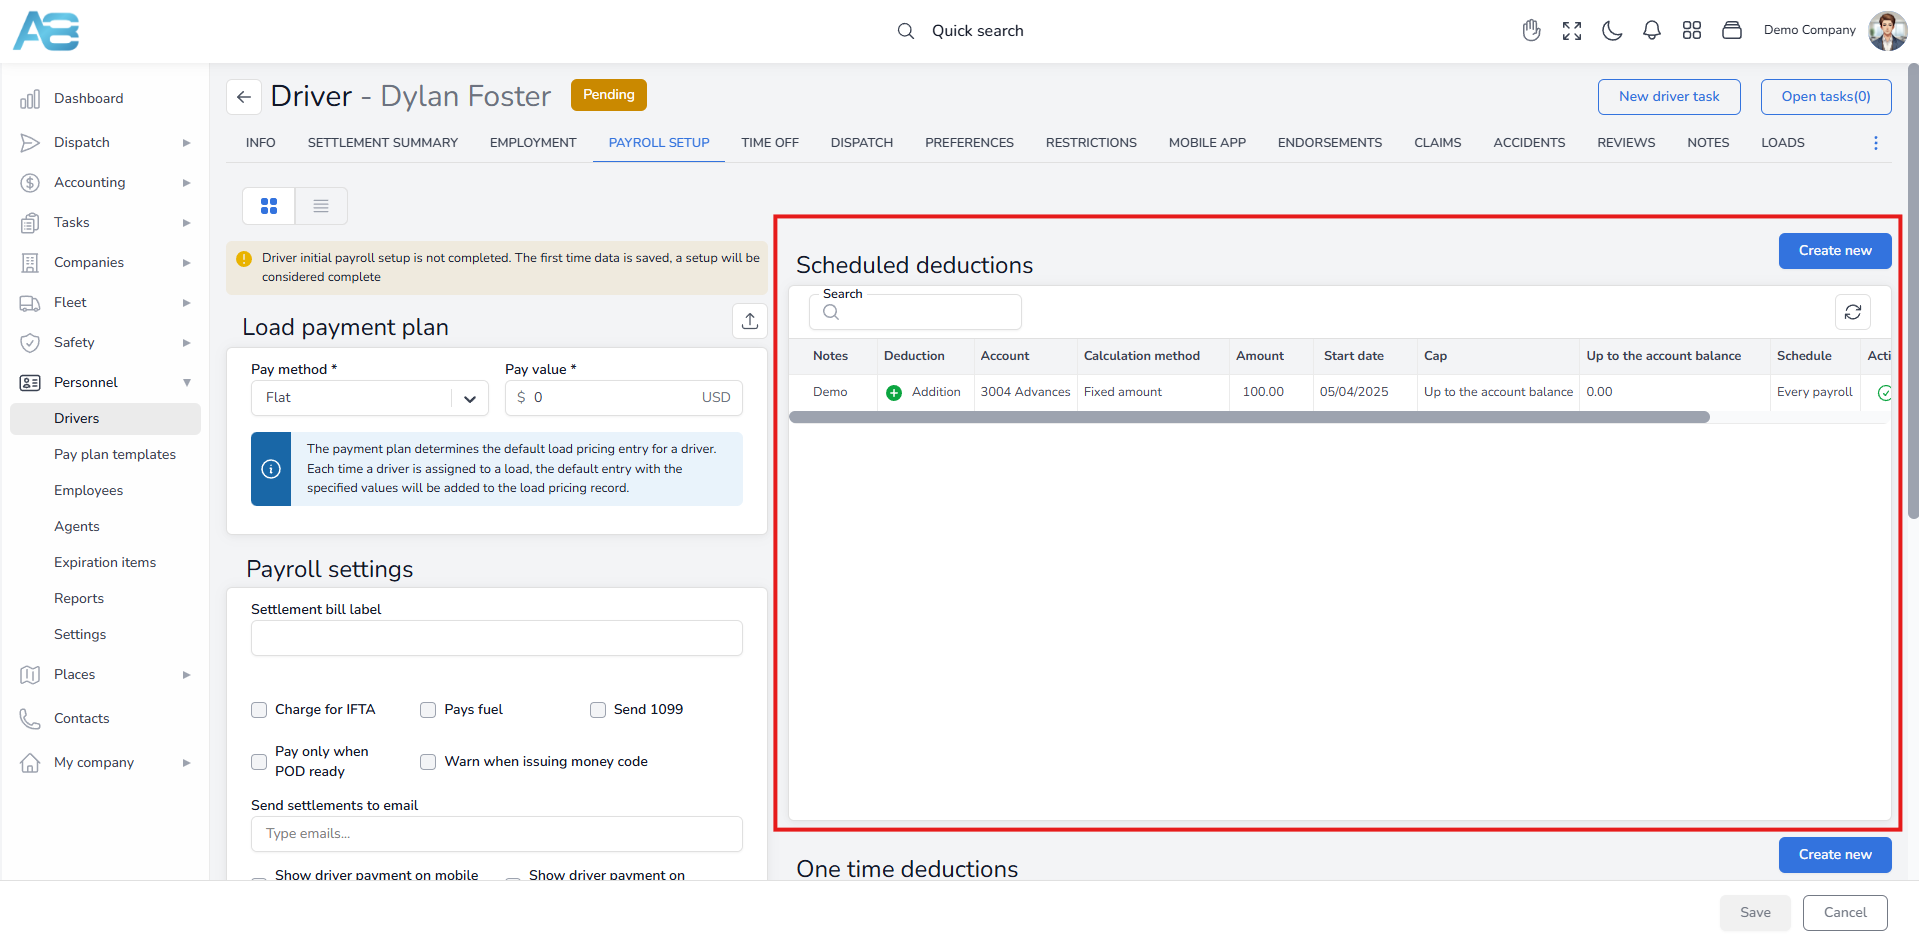
When you access the Driver Payroll Setup tab for the selected driver with an incomplete Load payment plan, a yellow warning message will appear at the top of the screen: “Driver initial payroll setup is not completed. The first time data is saved, a setup will be considered complete.”

This message indicates that the payroll setup is incomplete and will only be marked as complete once the required data is saved for the first time.
To set up a driver Load payment plan, select the appropriate Pay method, enter the Pay value, and save the payroll setup form without any issues. If you have already created templates for the driver Load payment plan, you can easily import them. Simply click the Import from Template button in the upper right corner and choose a template from the drop-down list.

After saving, the system will no longer display a yellow warning message, ensuring a smooth initial setup process.
Once created, the Load payment plan will, by default, appear in the Load’s Pricing tab under the Drivers/Trucks fee* section when you assign that driver to a load.
*Note: You can set up this option in the Load payment settings. To access it, in the left sidebar, under the Dispatch section, please select Settings. Scroll down to the Load payment settings, where you will choose whether load expenses will be associated with a driver, a truck, or both. You will also specify who will receive payments for loads by default.

Under the Payroll settings section, you can add a label that should be applied to the bill or specific items that will be charged to a driver and displayed on the payroll record. These items are optional and specify whether the resulting payroll bill is assigned to a driver or a company.
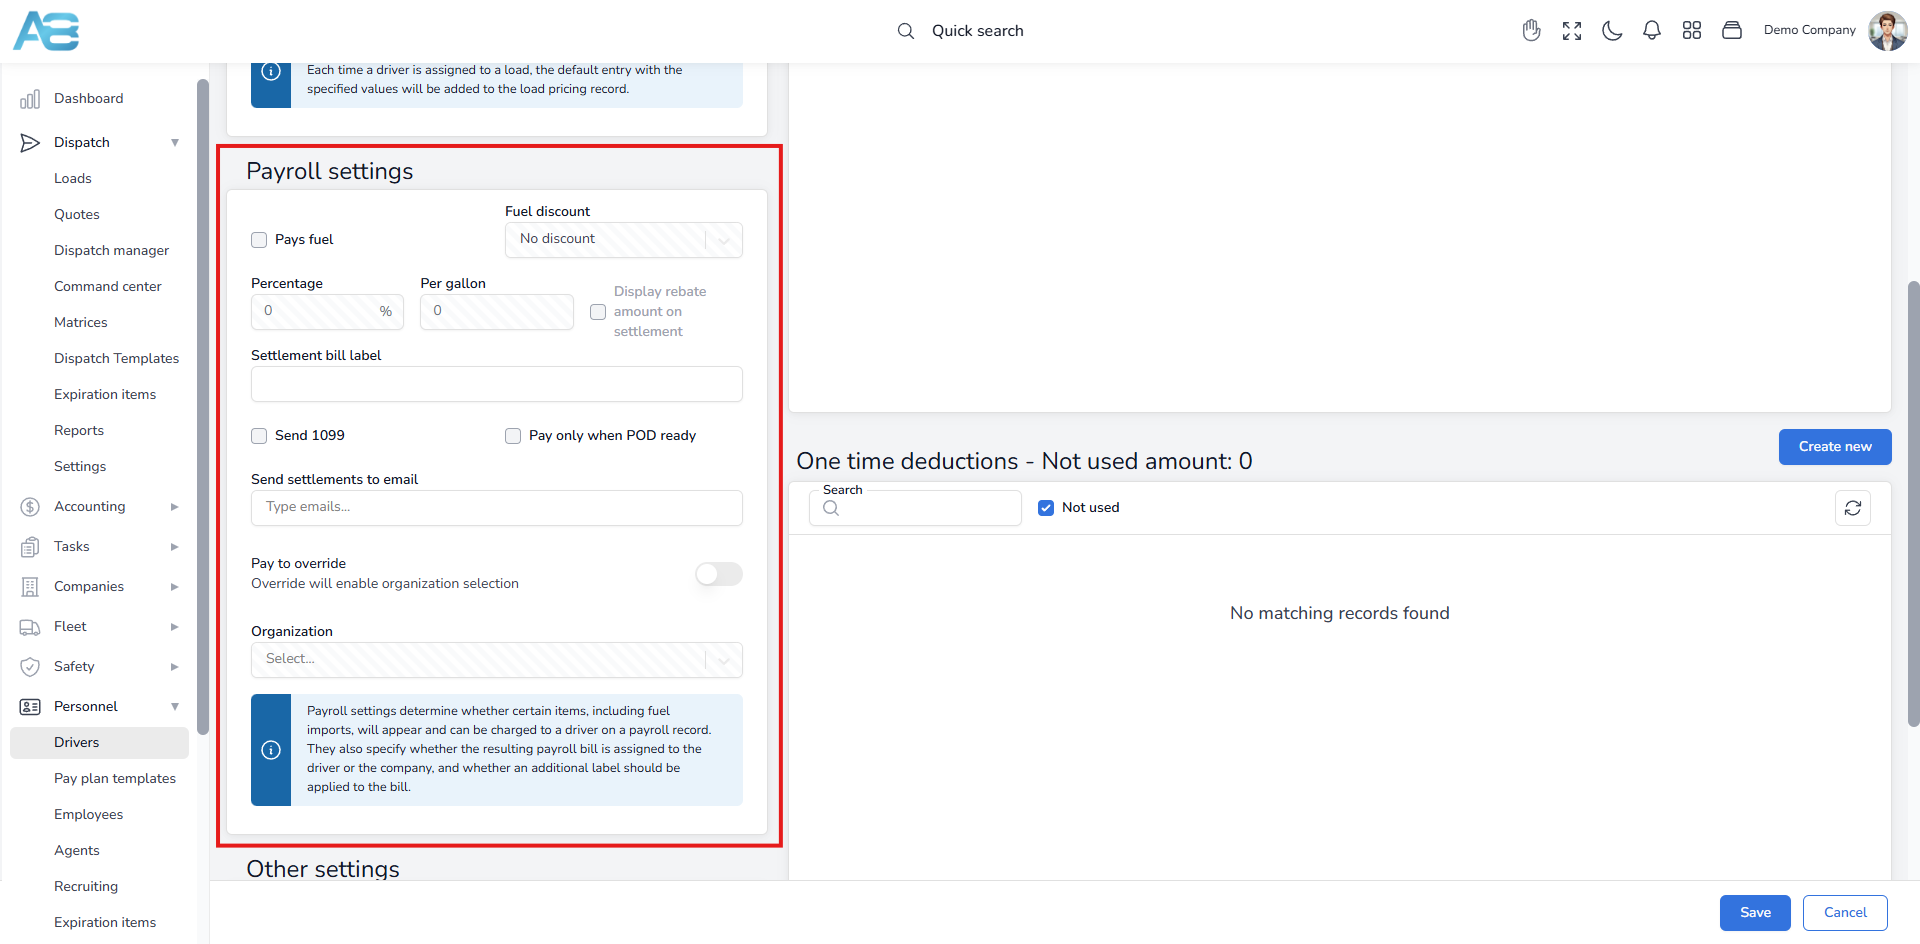
Settlement bill label – Adding a label to your settlement bill allows you to categorize your bills, making it easier to track expenses and reconcile your accounts. The label will be visible on the bill as well as in the label column of the expenses section.
You can add the option you need by marking the appropriate checkbox:
-Charge for IFTA – When the IFTA bill is created, costs will be assigned to the driver.
-Pays fuel – If this option is checked during the fuel import, costs will be assigned to the driver.
-Send 1099 – Check this option if the driver is an independent contractor.
-Pay only when POD ready – Payment will be made once the Proof of Delivery (POD) is added to the documents tab for the respective load. Also, when this option is checked, only loads with complete documents will appear on the payroll list.
-Warn when issuing Money Code – When the driver exceeds the Money Code limit, a message will be displayed: „Expressed code should not be issued for this driver. Check before proceeding. “ when opening driver quick view, or trying to issue money code via SMS
Send settlements to email – Entering an email in this field defines the default email to which settlements will be sent when you send them by email. Keep in mind that this is just a default value; you can change it when sending settlements from the settlement process dialog.
Show driver payment on mobile app and/or dispatch confirmation – By marking these checkboxes, you choose where the driver’s payment information will be displayed.
Pay to override – By enabling this option, you can select the company that will receive the driver’s salary from the drop-down menu. This option will also be used as a reference when generating a bill and for calculating 1099 reports later on.
Creating a new truck’s profile #
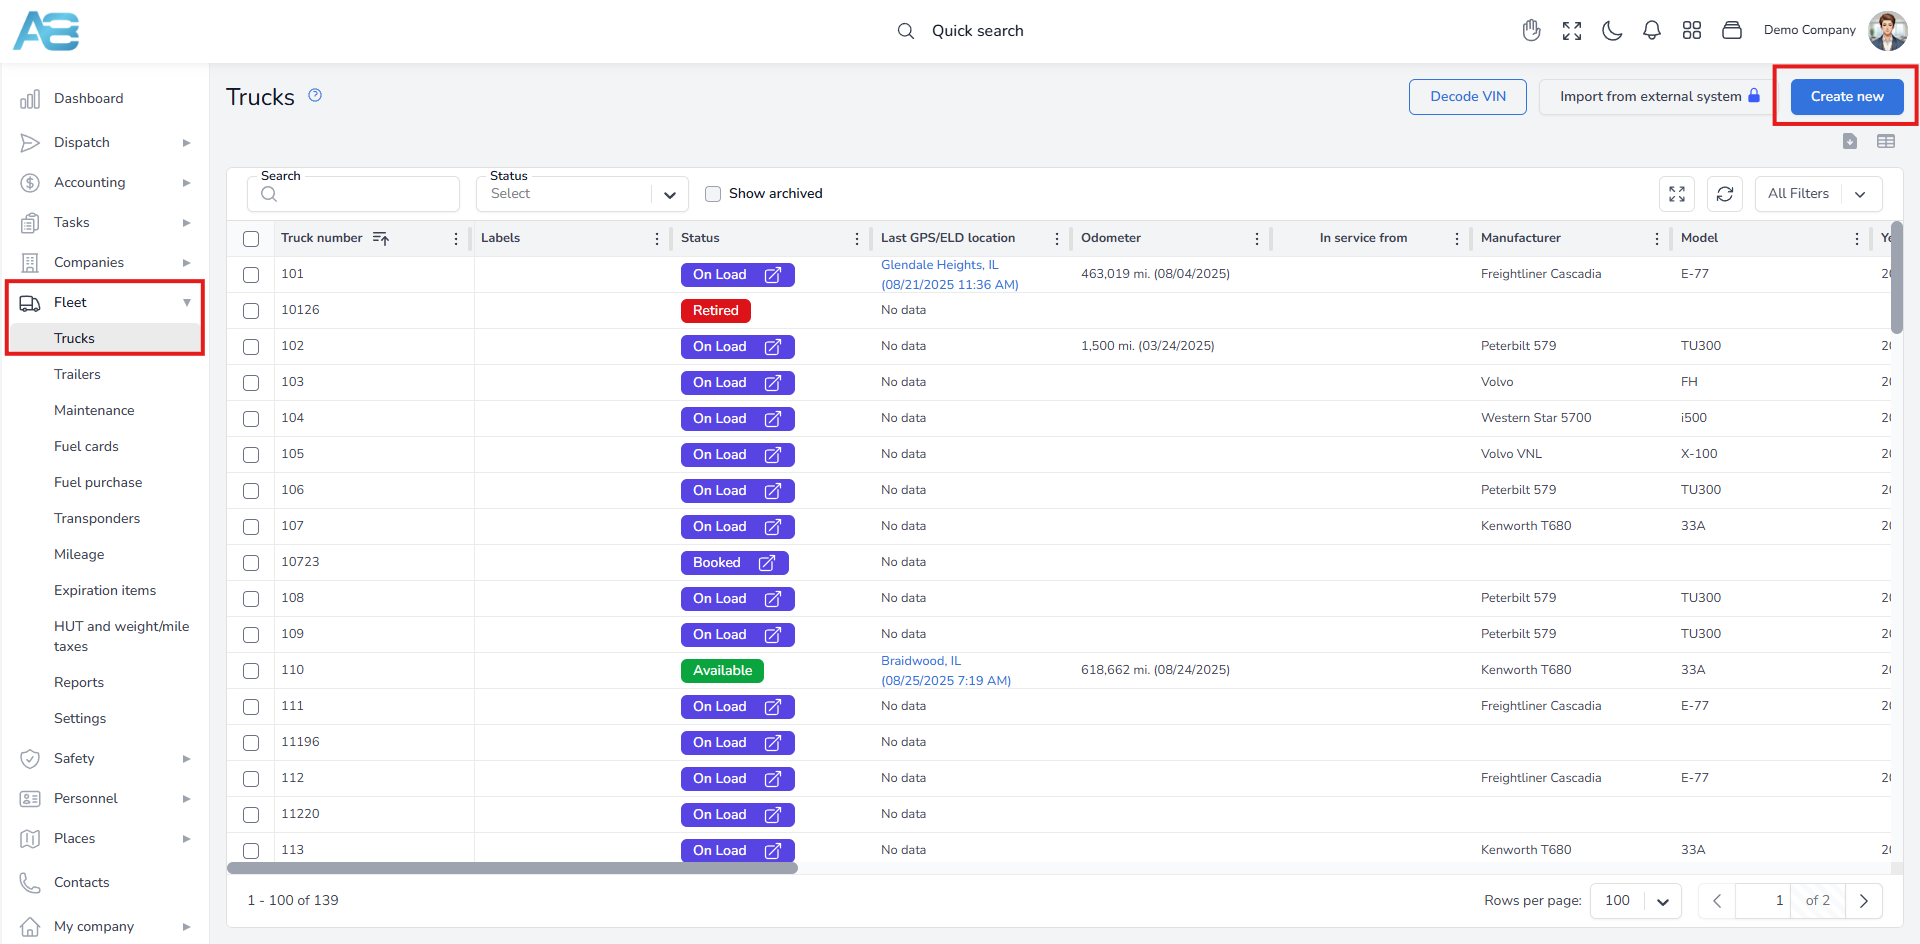
To create a truck’s profile, navigate to the left sidebar and click the Fleet section, then select Trucks. Next, click the Create New button in the top-right corner. This will open a new page with various sections.
To add a new truck, you must fill in the required information. In the Basic Info section, provide the truck number and VIN number, and select the Office and the Group/Department/Team from the corresponding drop-down menus. These fields are mandatory and sufficient for creating a profile. If you wish, you can add additional information later.
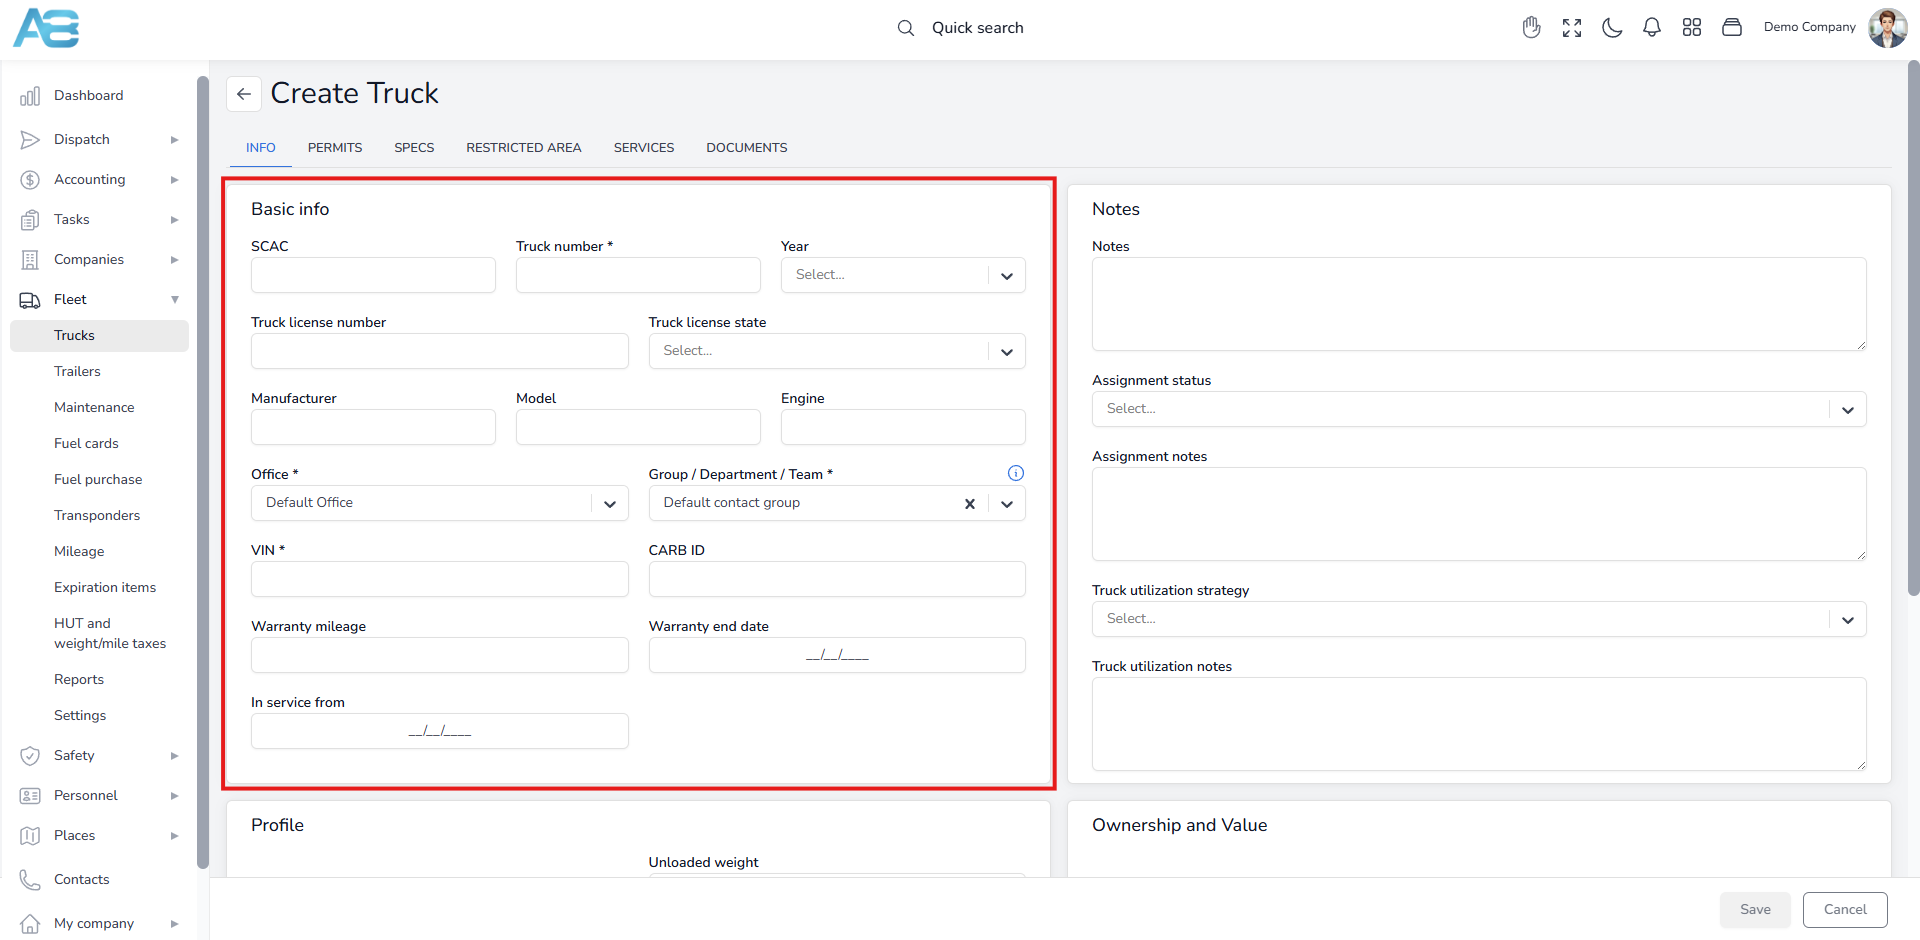
Once you have created the profile, the truck’s status in the system is set to Available.
Initial Truck Payroll Setup #
After creating a new truck profile in the system, it is essential to add the appropriate Load payment plan to ensure accurate compensation and billing. This payment plan determines the default load pricing entry for the selected truck. Each time the truck is assigned to a load, the default entry with the specified values will be added to the load pricing record.
To access this option, please select Trucks from the left sidebar under the Fleet section. Clicking the Truck’s name from the list will take you to that Truck’s page. You can find this option under the Payroll Setup tab.
How to set up the Truck’s Initial Payroll? #
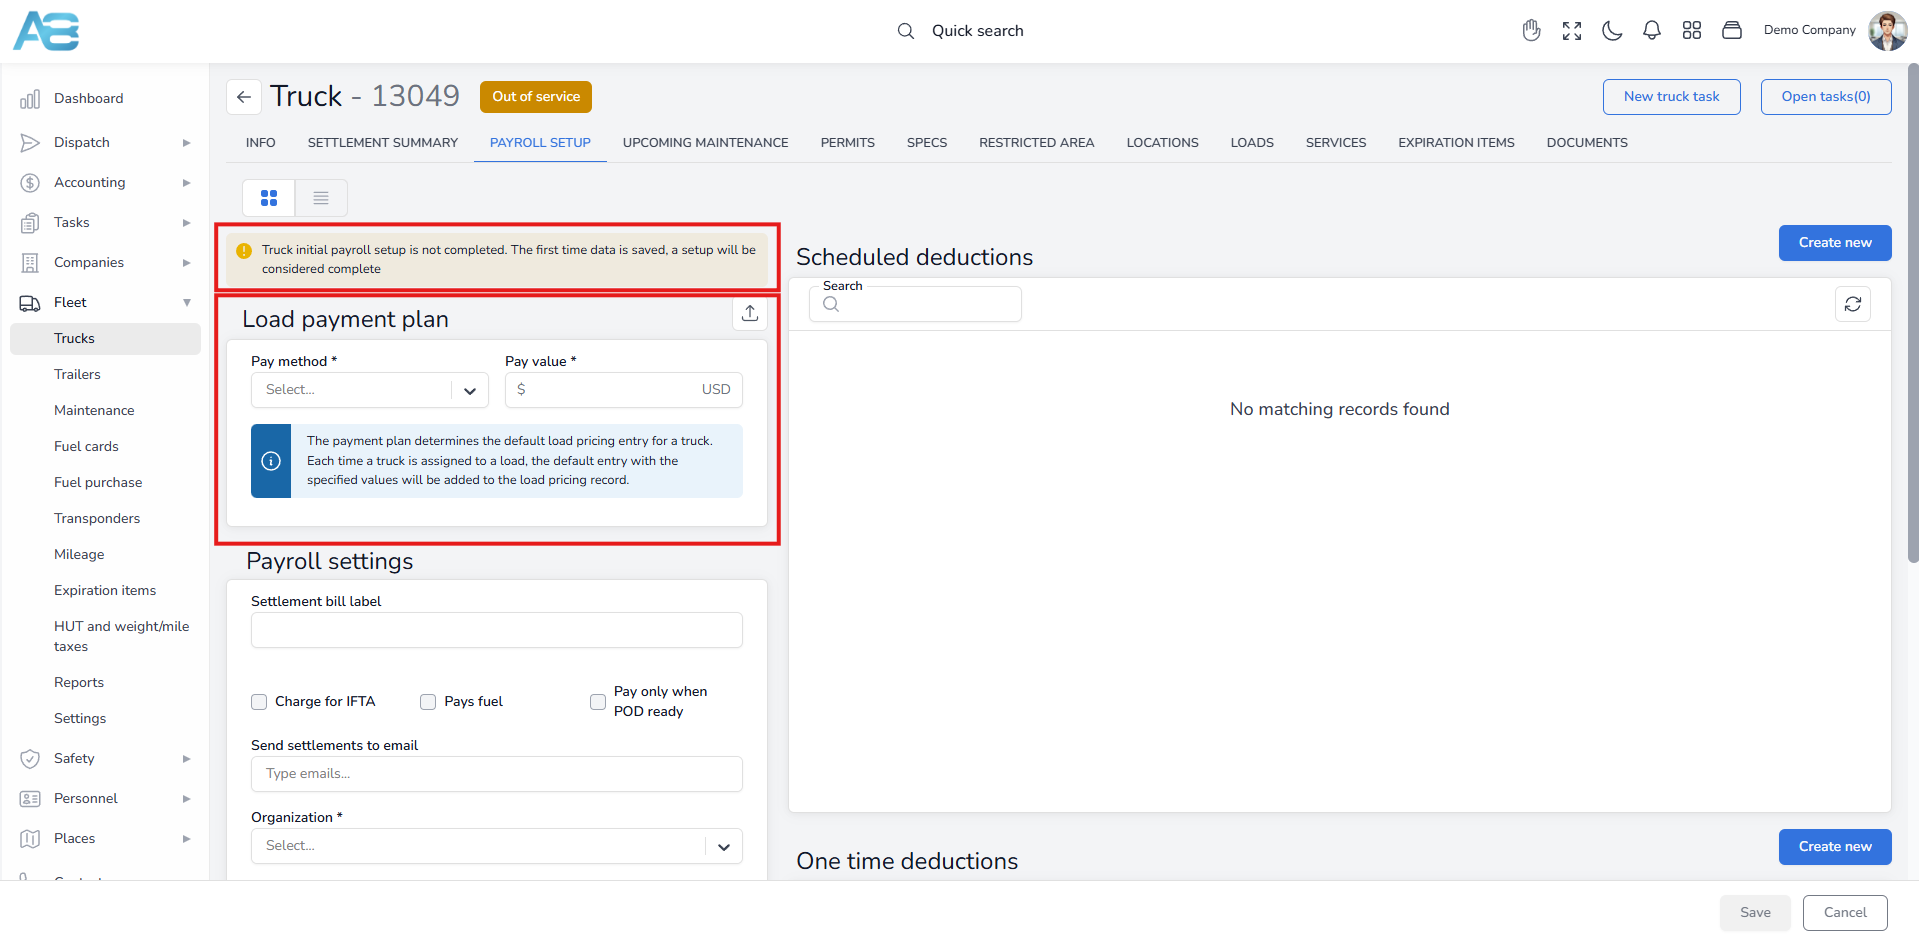
When you access the Truck Payroll Setup tab for the selected truck with an incomplete Load payment plan, a yellow warning message will appear at the top of the screen: “Truck initial payroll setup is not completed. The first time data is saved, a setup will be considered complete.”
This message indicates that the payroll setup is incomplete and will only be marked as complete once the required data is saved for the first time.
To set up a truck Load payment plan, navigate from the Truck’s page to the Truck Payroll Setup tab, select the appropriate Pay method, enter the Pay value, and save the payroll setup form without any issues. If you have already created templates for the truck load payment plan, you can easily import them. Simply click the Import from Template button in the upper right corner and choose a template from the drop-down list.
After saving, the system will no longer display a yellow warning message, ensuring a smooth initial setup process.
Once created, the Load payment plan, by default, will appear in the Load pricing tab under the Drivers/Trucks fee* when you assign that truck to a load.
*Note: You can set up this option under the Load payment settings. To access it, in the left sidebar, under the Dispatch section, please select Settings. Scroll down to the Load payment settings, where you will choose whether load expenses will be associated with a driver, a truck, or both. You will also specify who will receive payments for loads by default.
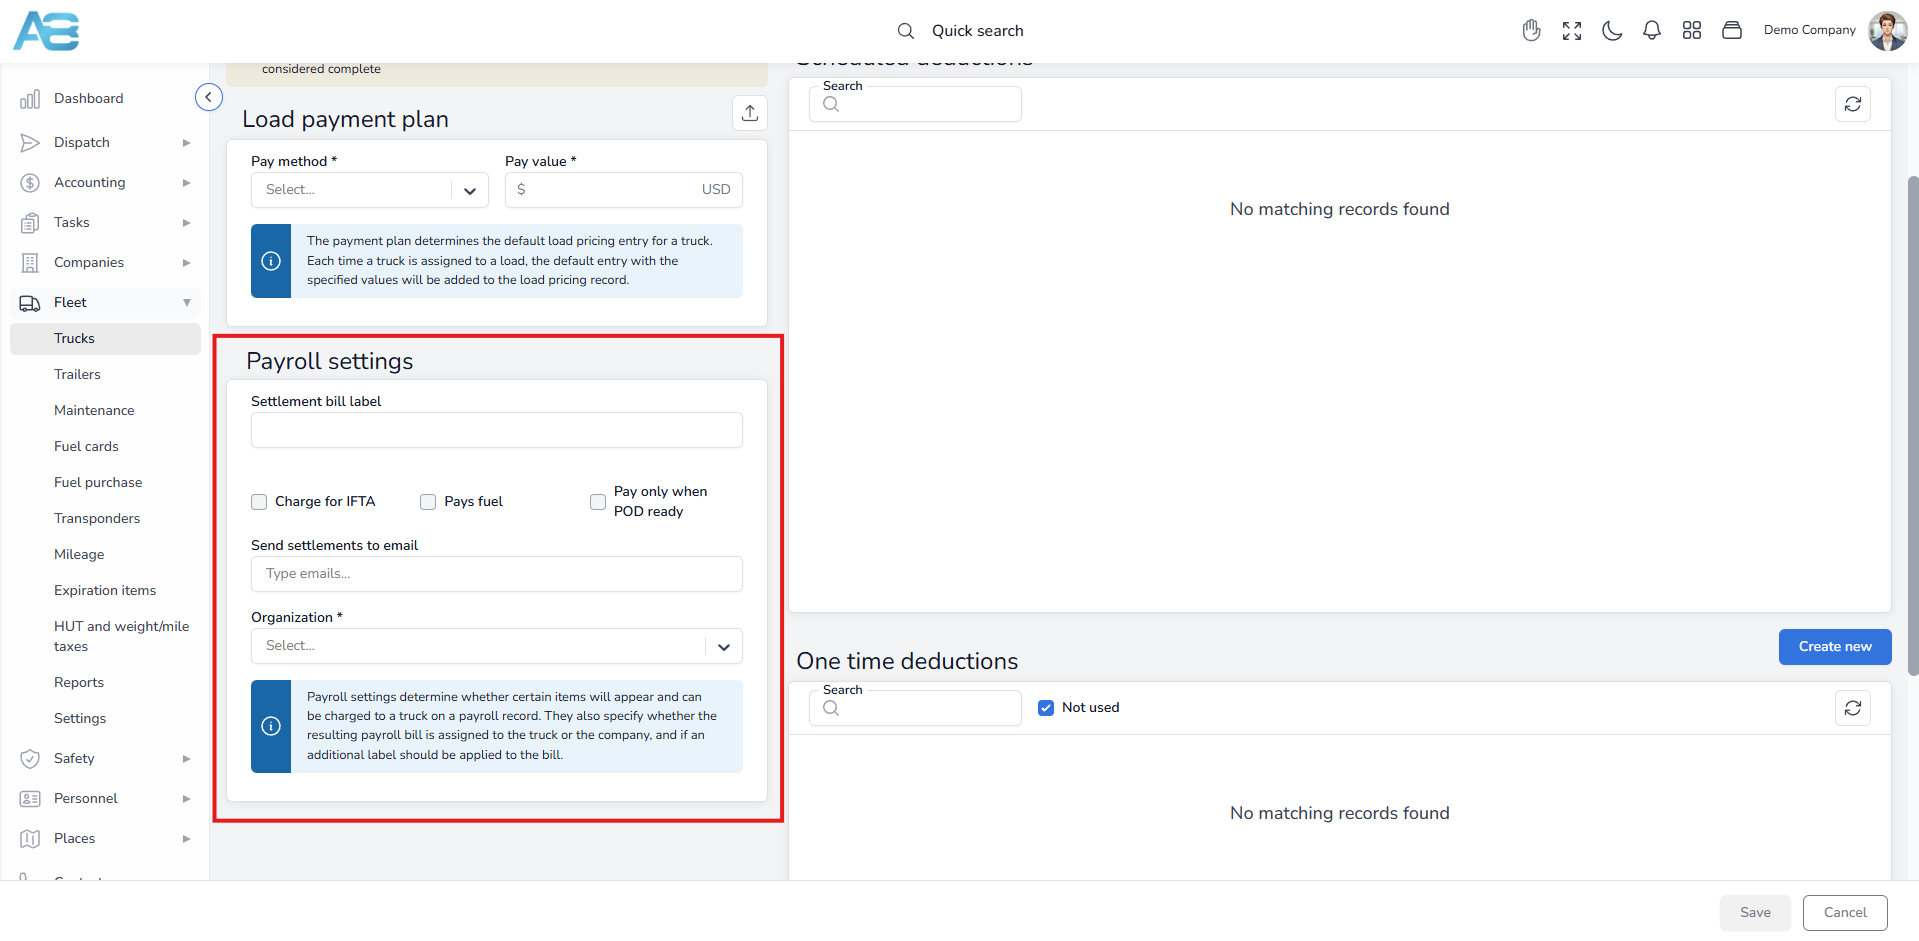
Under the Payroll settings section, you can add a label that should be applied to the bill or certain items that will be charged to a truck and displayed on its payroll record. These items are optional and specify whether the resulting payroll bill is assigned to a truck owner or a company.
Settlement bill label – Adding a label to your settlement bill allows you to categorize your bills, making it easier to track expenses and reconcile your accounts. The label will be visible on the bill as well as in the label column of the expenses section.
You can add the option you need by marking the appropriate checkbox:
-Charge for IFTA – When the IFTA bill is created, costs will be assigned to the truck.
-Pays fuel – When this option is checked during the fuel import, costs will be assigned to the truck.
-Pay only when POD ready – Payment will be made once the Proof of Delivery (POD) is added to the documents tab for the respective load. Also, when this option is checked, only loads with complete documents will appear on the payroll list.
Send settlements to email – Entering an email in this field defines the default email to which settlements will be sent when you send them by email. Keep in mind that this is just a default value; you can change it when sending settlements from the settlement process dialog.
Organization – In this field, you can select the company from the drop-down menu that will receive the payroll bill. This field is required to complete the payroll process.
Note: The following options apply equally to both drivers and truck owners.
Adding Scheduled Deductions #
In the Scheduled deductions section, you can add entries that will appear on every payroll record. These payroll adjustment entries can either be additions to or deductions from the driver’s or truck owner’s salary. To create a new payroll adjustment, click the Create new button in the upper right corner of this section.
A pop-up window will open where you will fill in all the required fields. First, add some Notes to explain the reason for the adjustment. Then, select whether it is an Addition or a Deduction, indicating whether you want to add the amount to the driver’s/truck owner’s salary or deduct it. In the Account field, choose a code for the adjustment, and below, select the calculation method – whether it will be a fixed amount, per mile, or per gallon. After that, enter the Amount, and specify a Start Day, i.e., the date from which the adjustments will be reflected in the payroll. Under the Cap section, you will select one of these options: Unlimited, Up to the account balance, or Until the account balance reaches zero. The Cap indicates how a limit on recurring charges or additions is set. If you choose the Up to the account balance option, you will need to enter the specific balance amount in the field provided below. Next, schedule your adjustment by selecting one of the following options: Every payroll, Monthly, or Weekly. For example, if you choose a monthly option, the payroll will reflect changes each month based on the entered start date. Finally, by checking the Active checkbox, you will mark this adjustment as active. If you do not want to process the payment for the adjustment immediately but still want to keep it in the system, leave the Active checkbox unchecked. You can later reactivate it using the edit adjustment option. After clicking the Save button, all these entries will be visible under the Payroll setup tab for the selected driver/truck. On the batch, this entry will be visible under the Scheduled adjustment section.
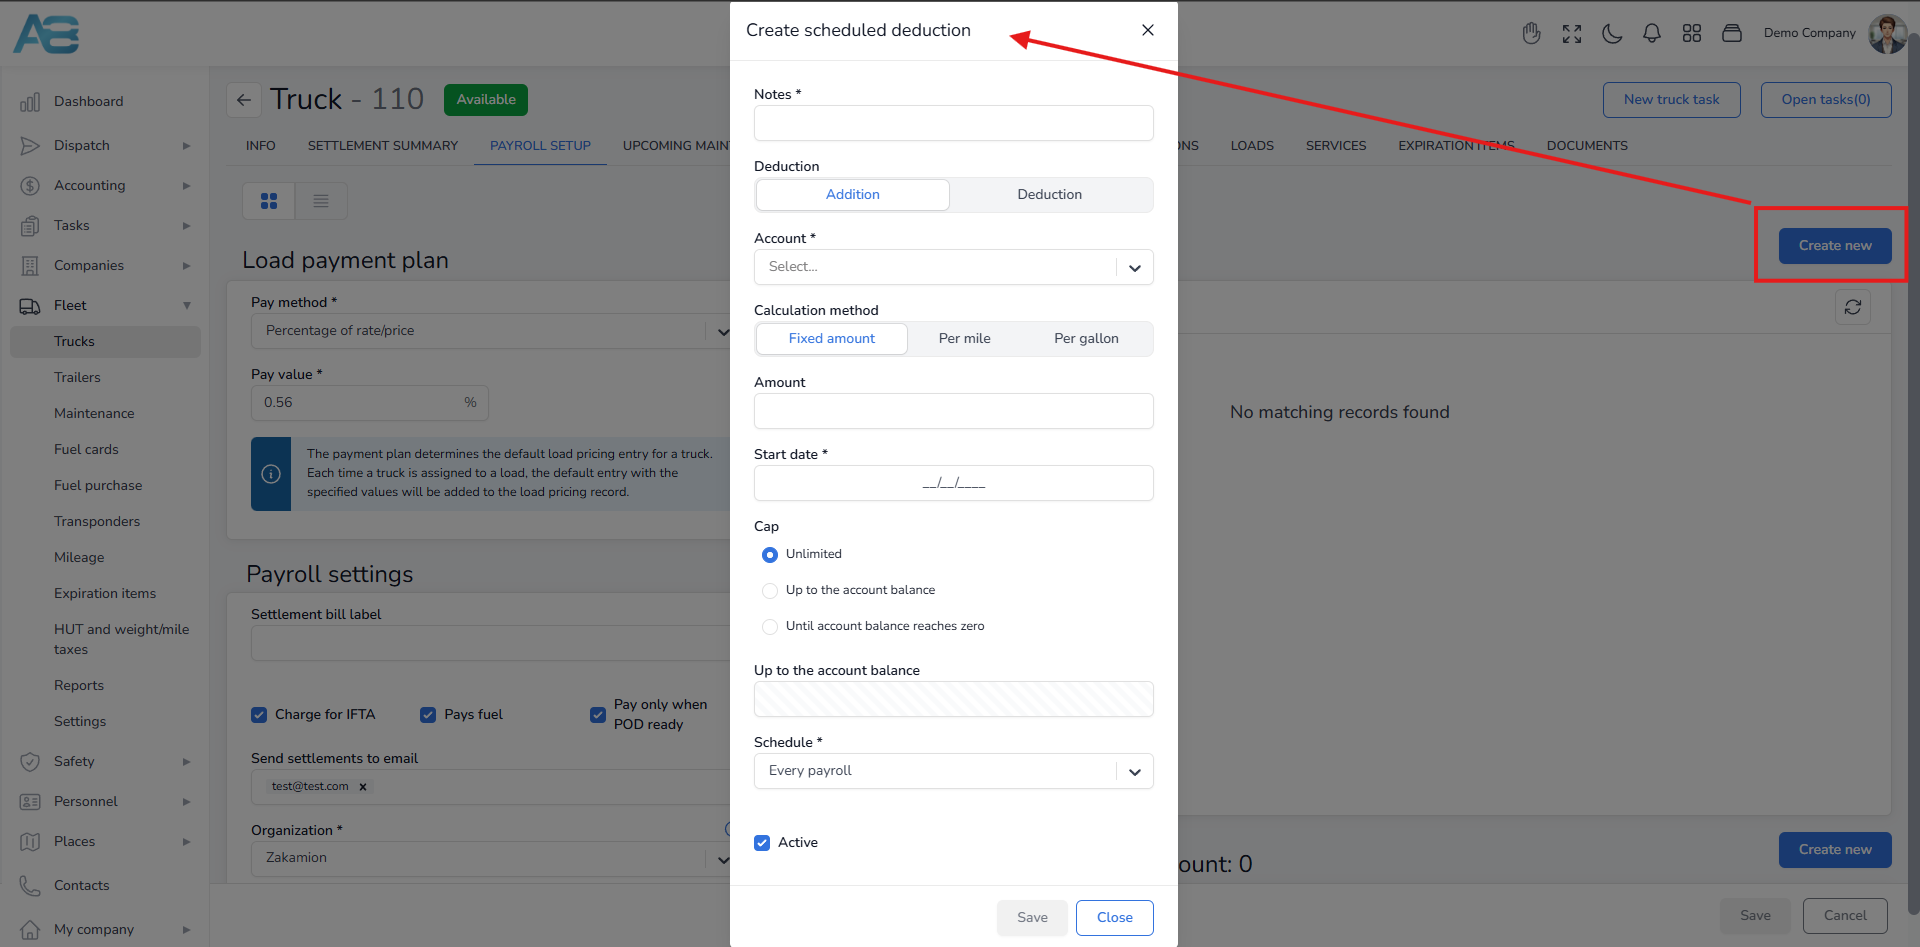
Please remember that these entries can be edited or selectively included in individual payroll records, as they serve as templates for recurring charges or additions.
Adding One-Time Deductions #
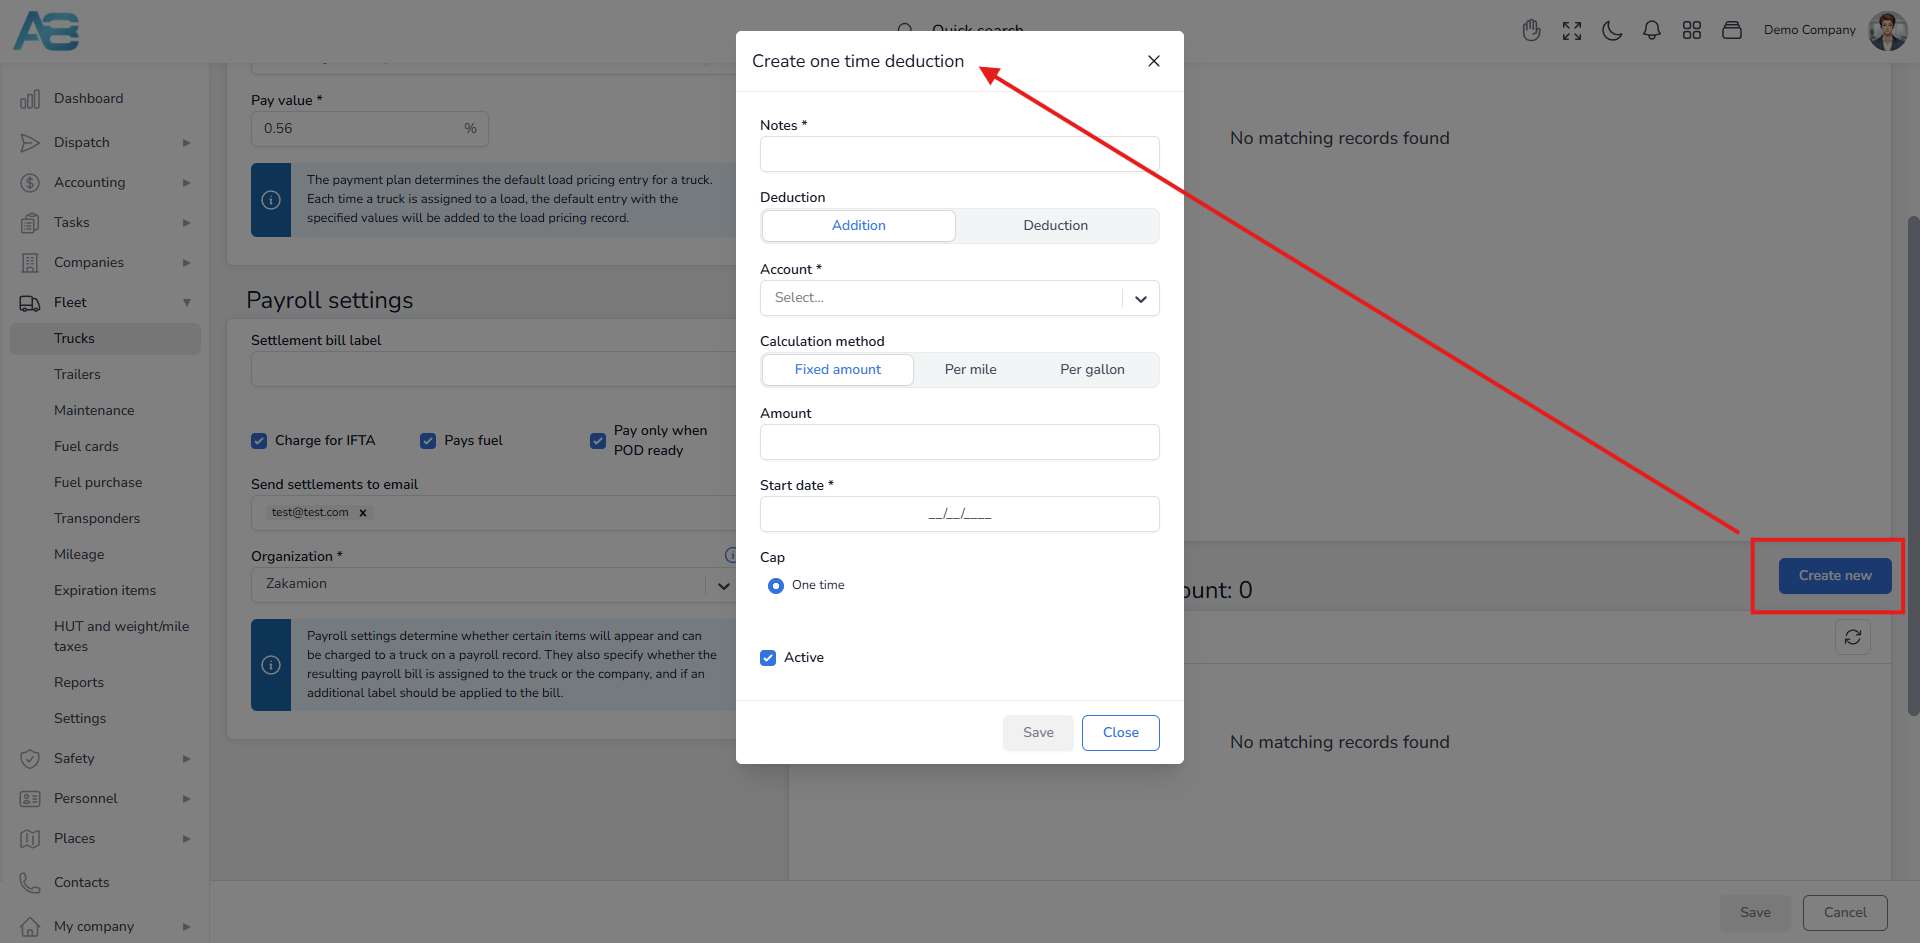
For one-time entries, use the One-Time Deductions section. To create a new entry, click the Create new button located in the upper right corner of that section.
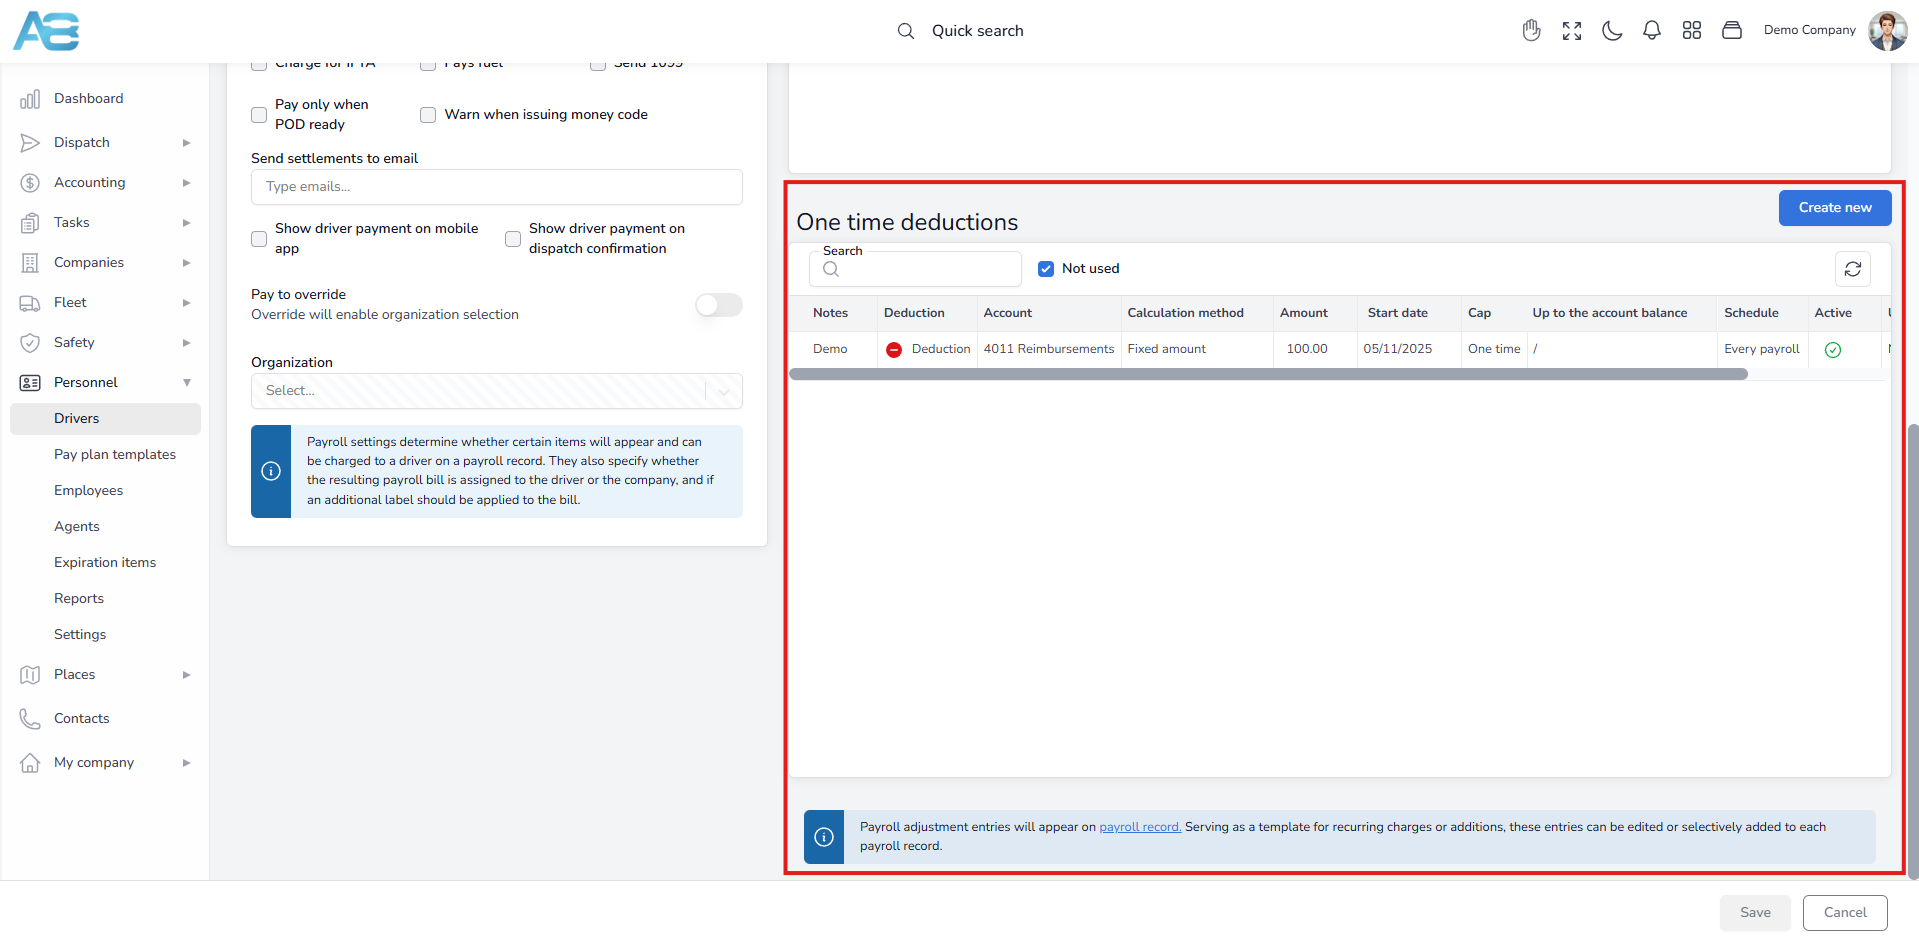
A form will appear for you to complete. This form has the same fields as the one used for creating Scheduled deductions, but there are two key differences:
1. In the Cap section, there will be only one option: One time, because this entry will affect the payroll record only once.
2. There will be no scheduling option, as this entry is intended for a single occurrence only.
Once you save your new entry, it will be reflected on the driver’s/truck owner’s payroll record. On the batch, this entry will be visible under the Pay adjustment section.
Note: After setting up the driver’s/truck’s initial payroll and creating the first load, you will see that the default payment for that driver/truck owner is automatically populated in the Customer Billing section under the Pricing tab.
If you need to add accessorial charges to that load, remember that you can specify the amount you will pay in the accessorials section on the left, while the amount that the owner-operator will pay can be entered in the accessorials section on the right.
Adding an advance to the bill/expense #
If you need to add an advance expense to your payroll, follow these steps:
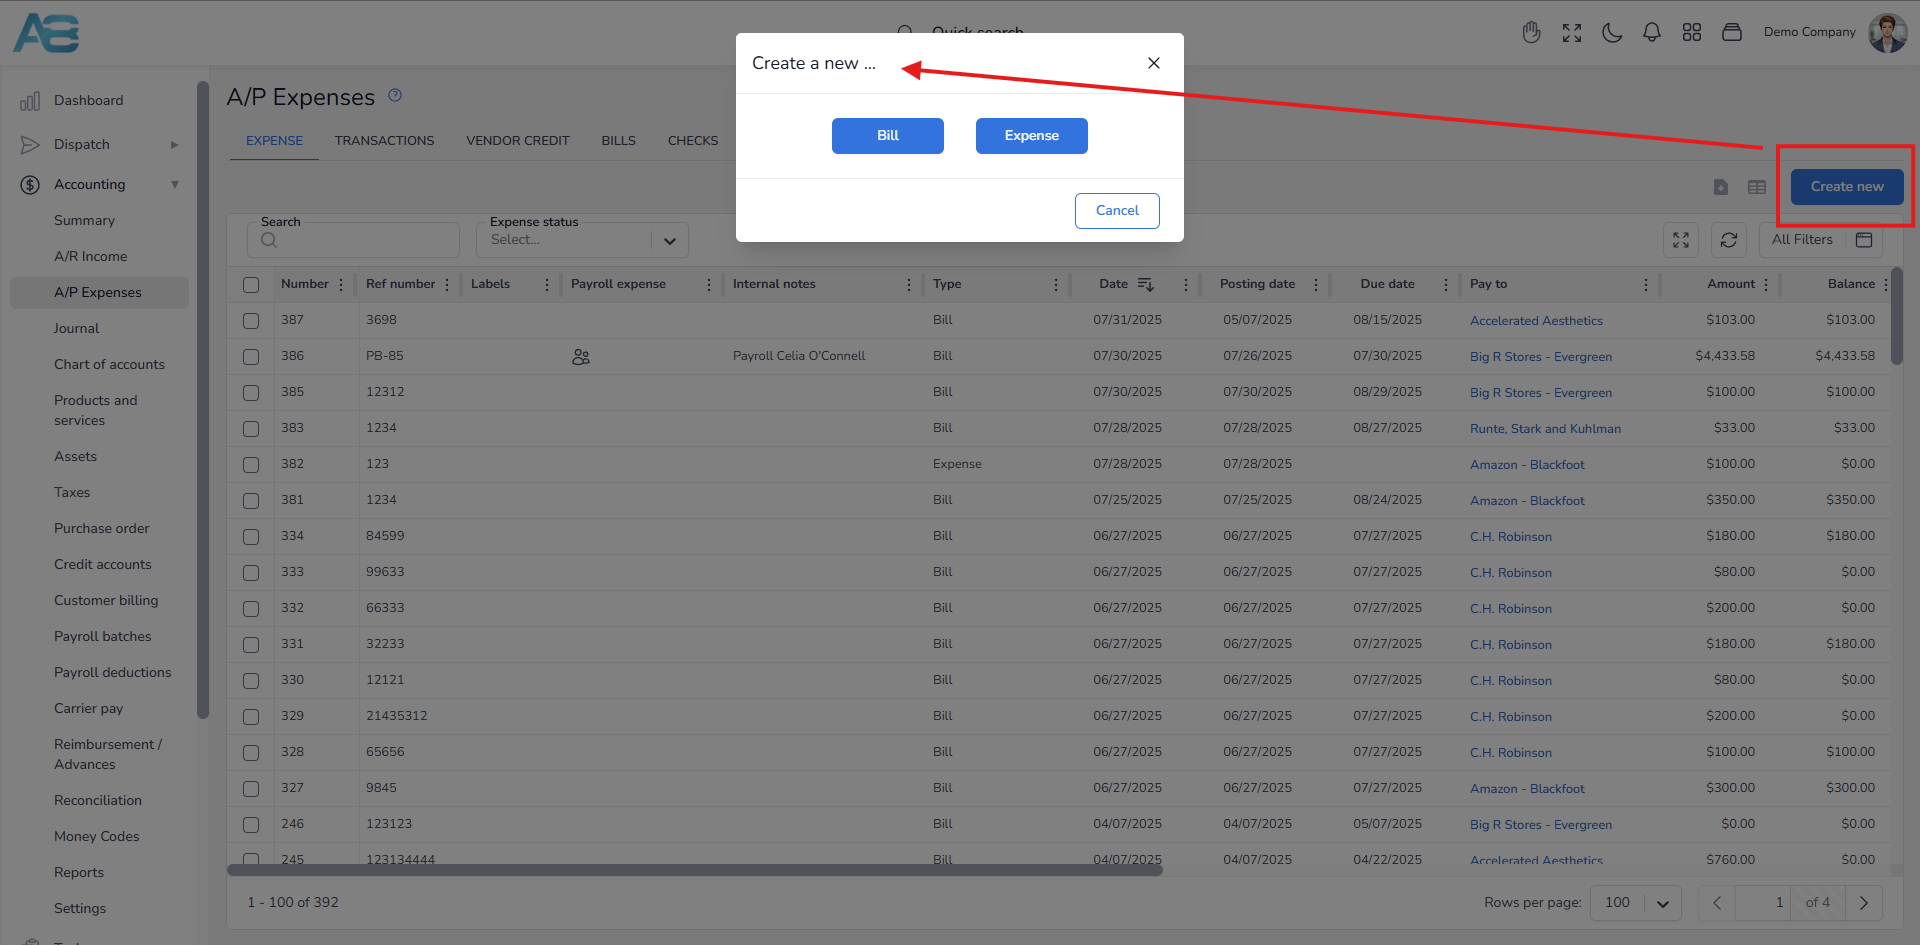
1. Navigate to the left sidebar, click the Accounting section, and select A/P Expenses. Next, click the Create New button at the top right corner.
2. A pop-up window will appear with two options: Bill and Expense. Click the appropriate button and fill in all required fields marked with an asterisk.
Note: Bill refers to the amount you will charge later, while Expense is for immediate payments (e.g., by card) for which you have received a receipt.
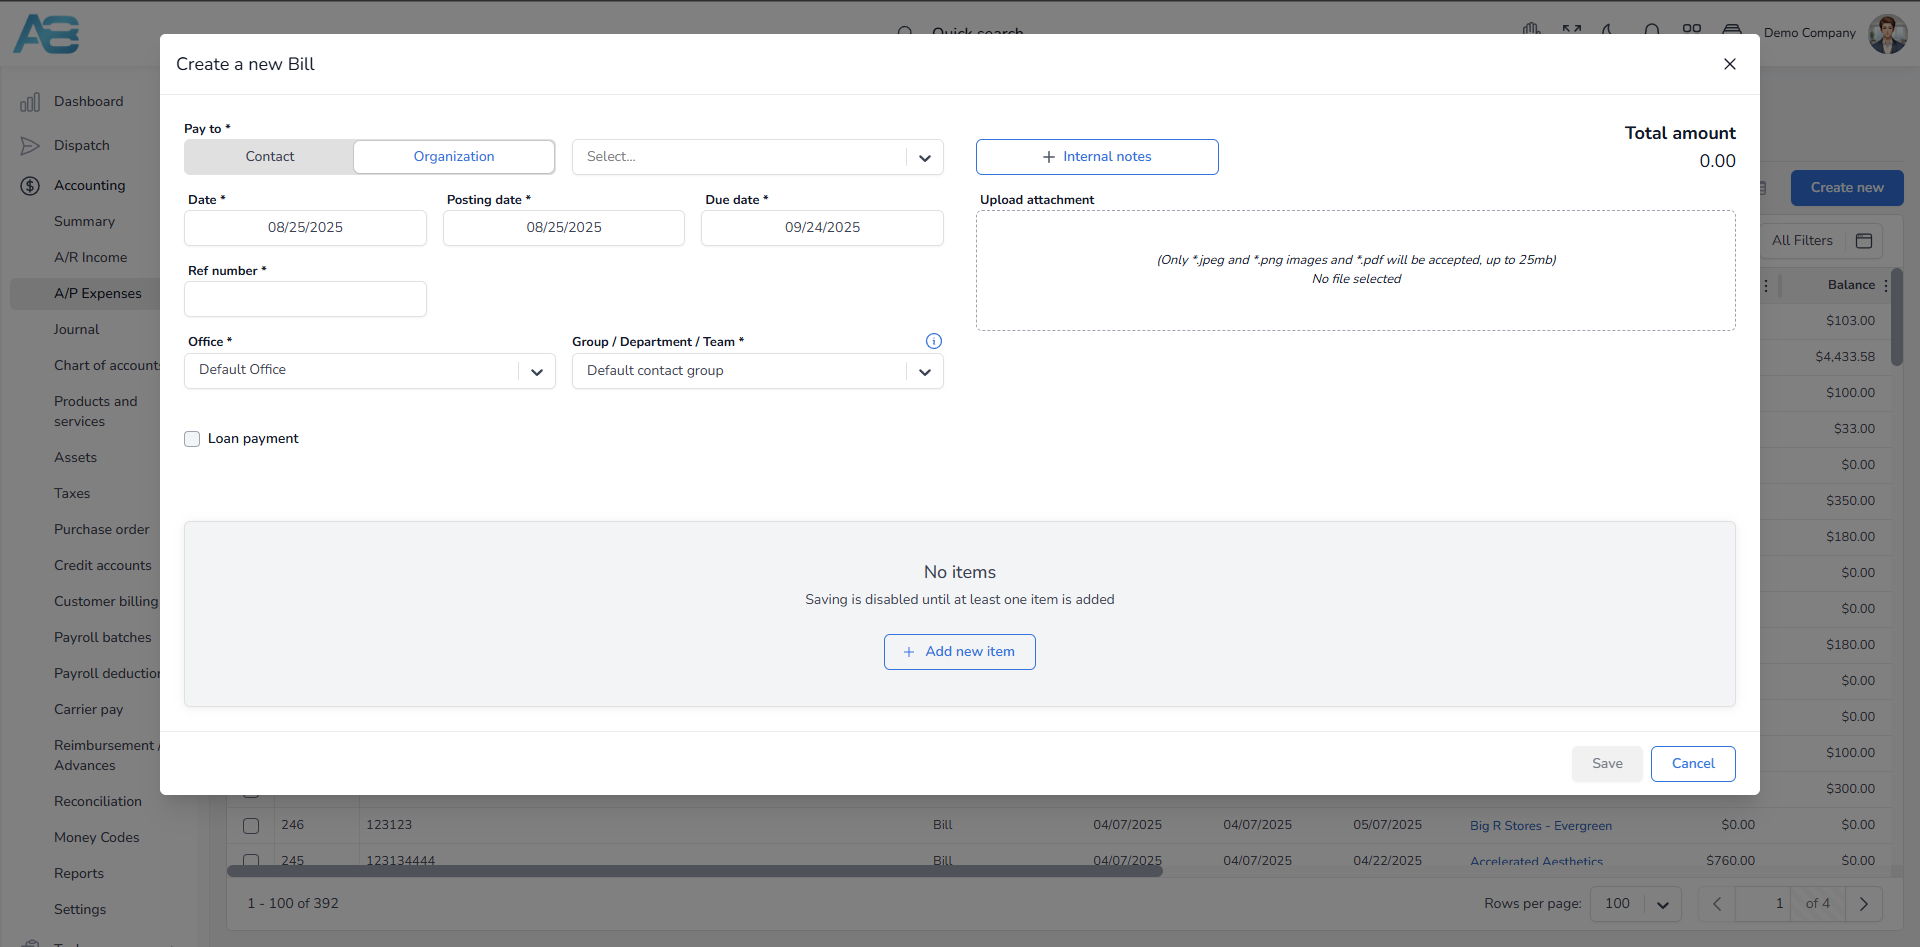
3. To create a Bill, first select to whom you will charge it under the Pay to option – either a Contact or an Organization. You can use the Select field to search for them more easily. After that, enter the Date, Posting date, Due date, and Reference number. Select the Office and Group/ Department/Team from the corresponding fields.
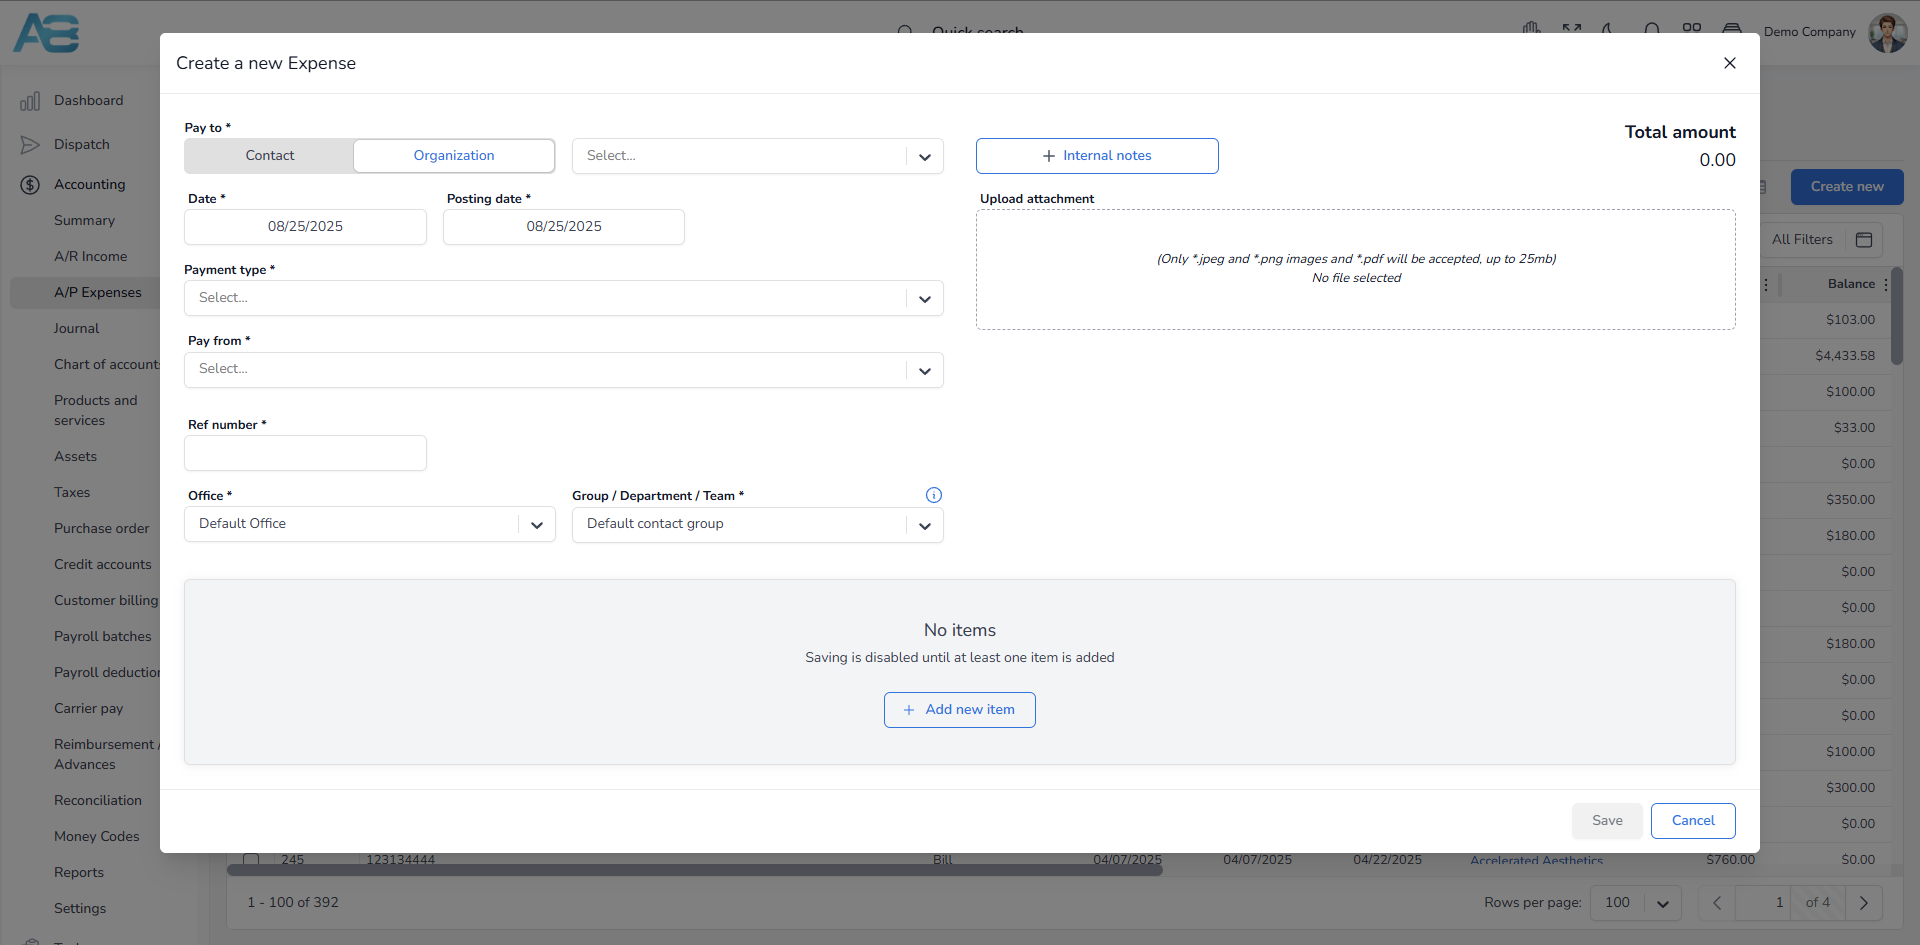
To create an Expense, select the recipient under the Pay to option – again, either a Contact or an Organization. Use the Select field to find them easily. Next, enter the Date and Posting date. Select the Payment type and Pay from options. Enter the Reference number and select the Office and Group/ Department/Team from the corresponding fields.
4. Next, click the Add new item button. In this window, you will also fill in all the necessary fields. Additionally, toggling the Advanced button enables you to select the additional charge options, specifying whether the expense should be charged to the driver or the truck. After entering the information, make sure to save your entry.
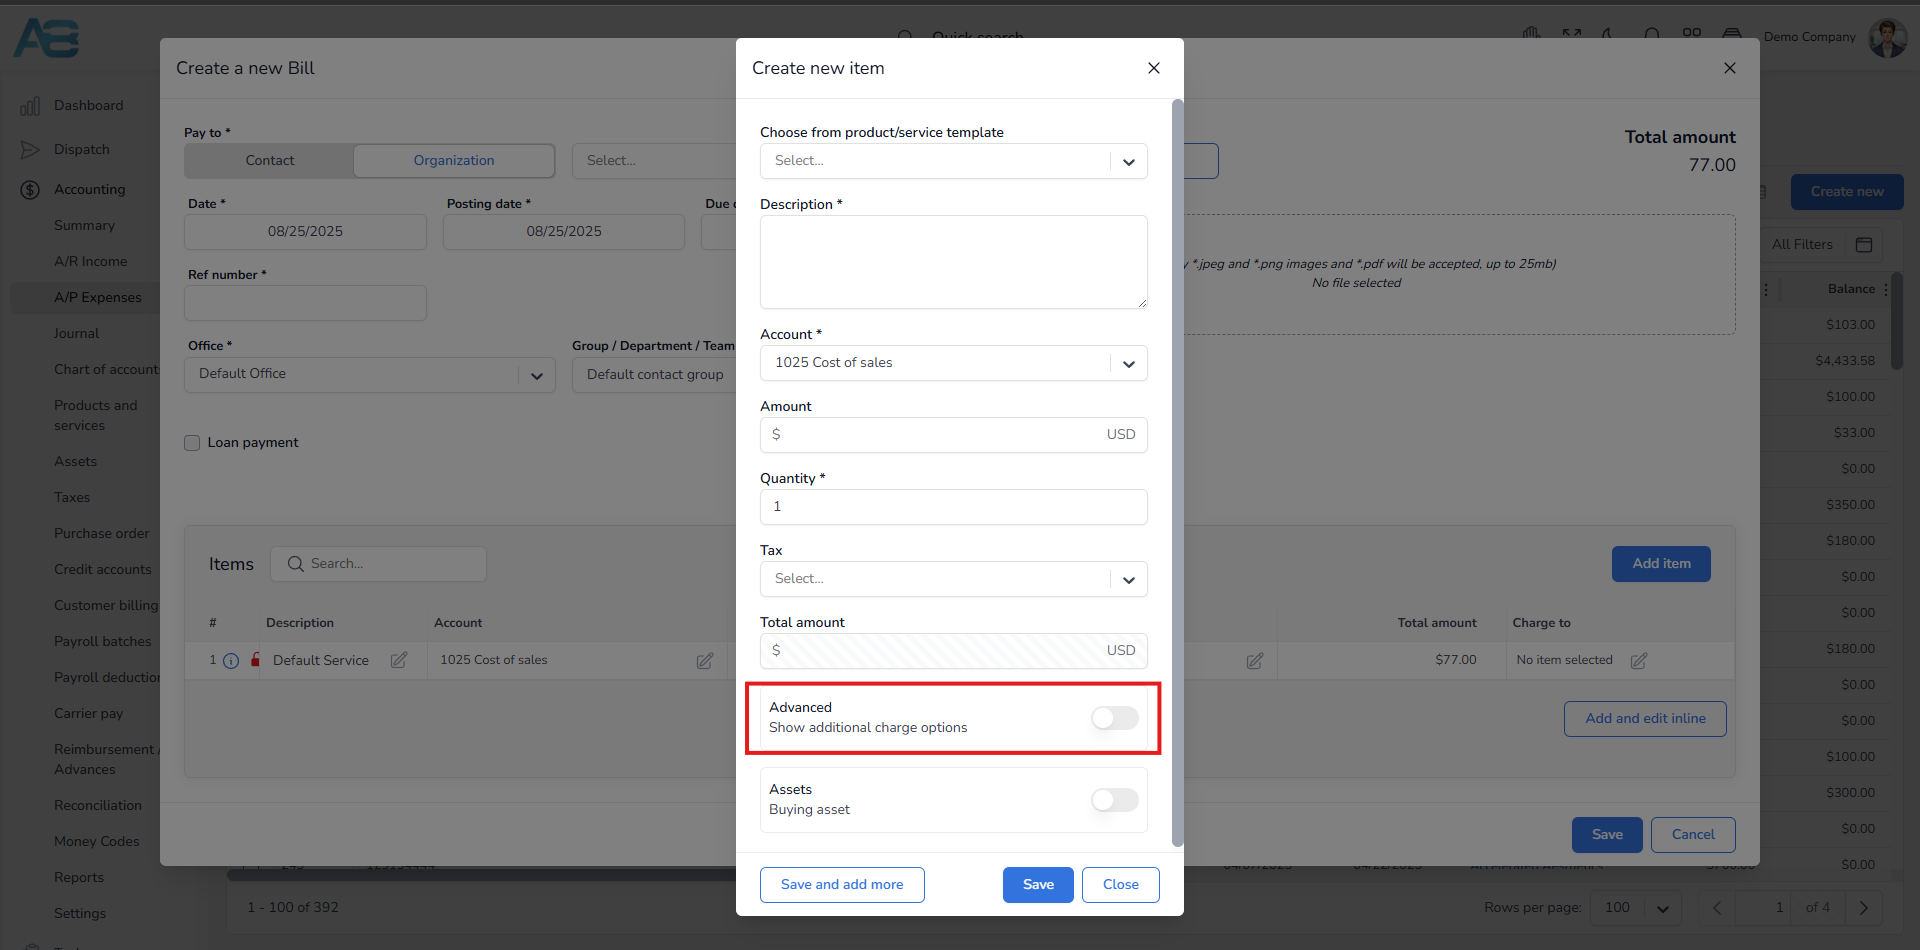
Note: If you have already added items, you can always add new ones by using the Add and edit inline option, then filling in the required information.

5. Click the Save button again to ensure your bill or expense will appear on the A/P Expenses list. Hover over your entry and click the Send payment button. A new window will open where you will select the payment type and account, then click the Send payment button.
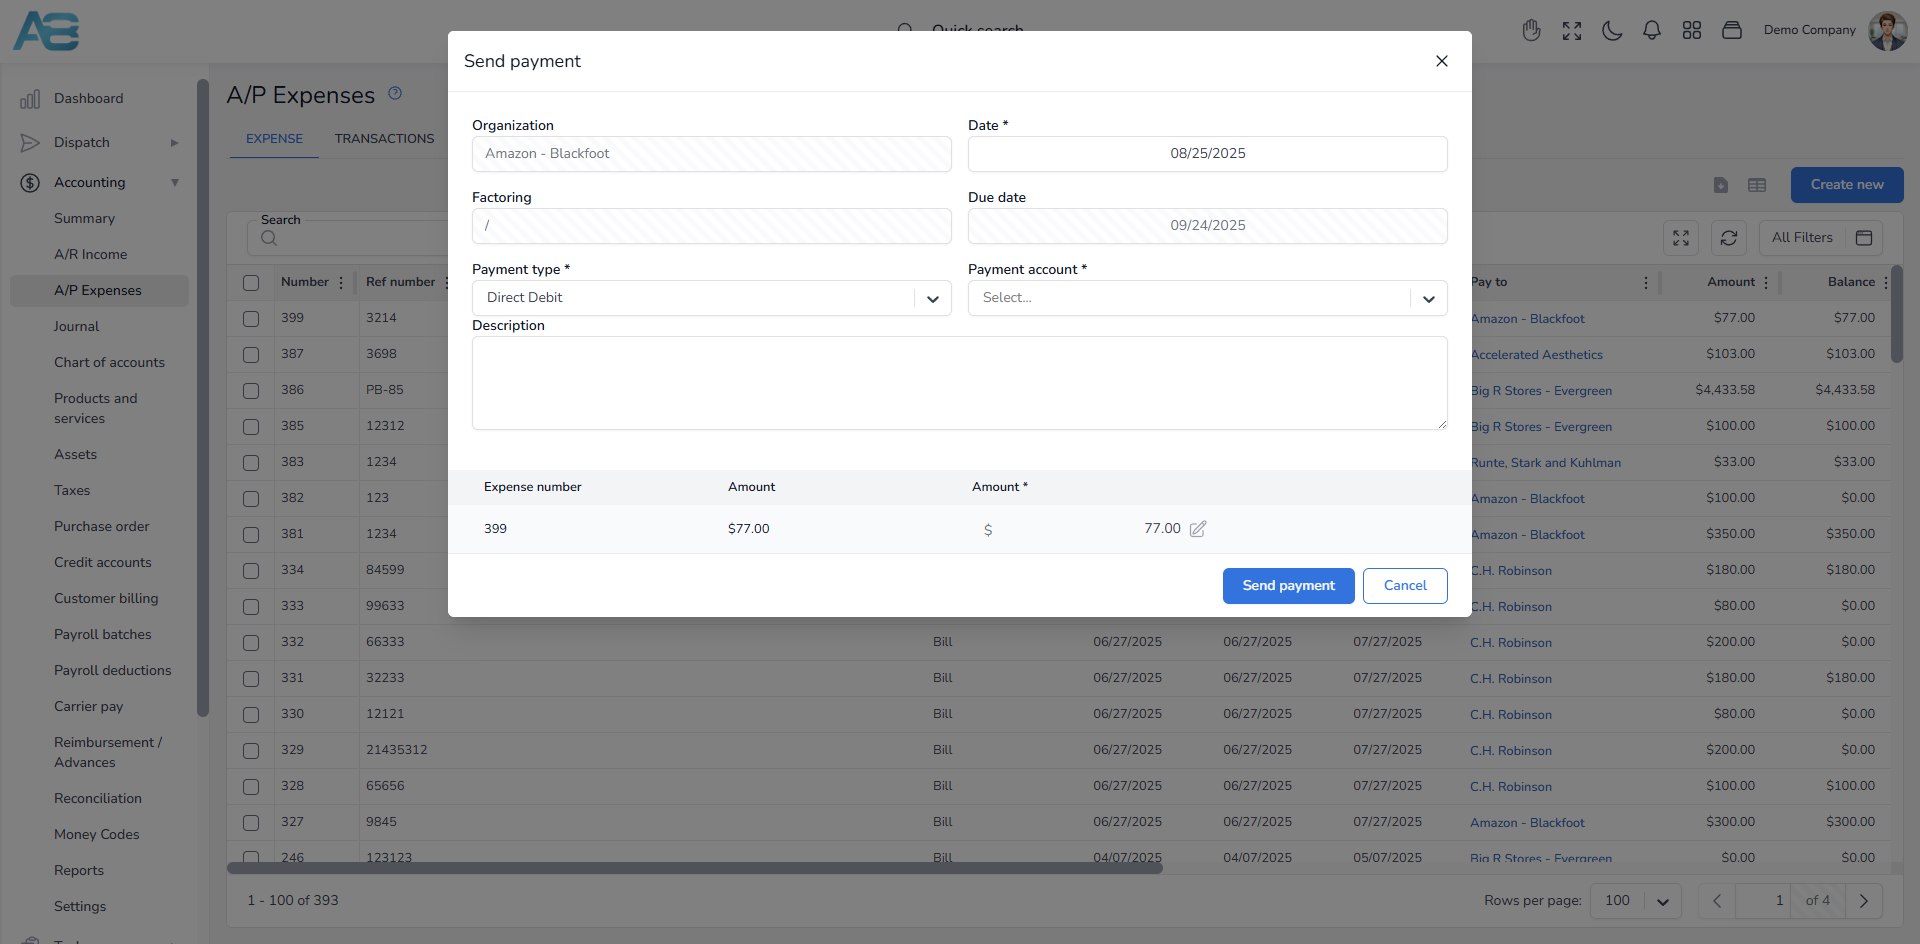
Your bill will now be visible in the A/P Expenses section, in the Settlement Summary for the selected driver or truck, and in the created payroll batch under the Expenses section.
Adding direct advance or reimbursement #
You can add a direct advance or a reimbursement to a driver’s/truck owner’s record by following these steps:
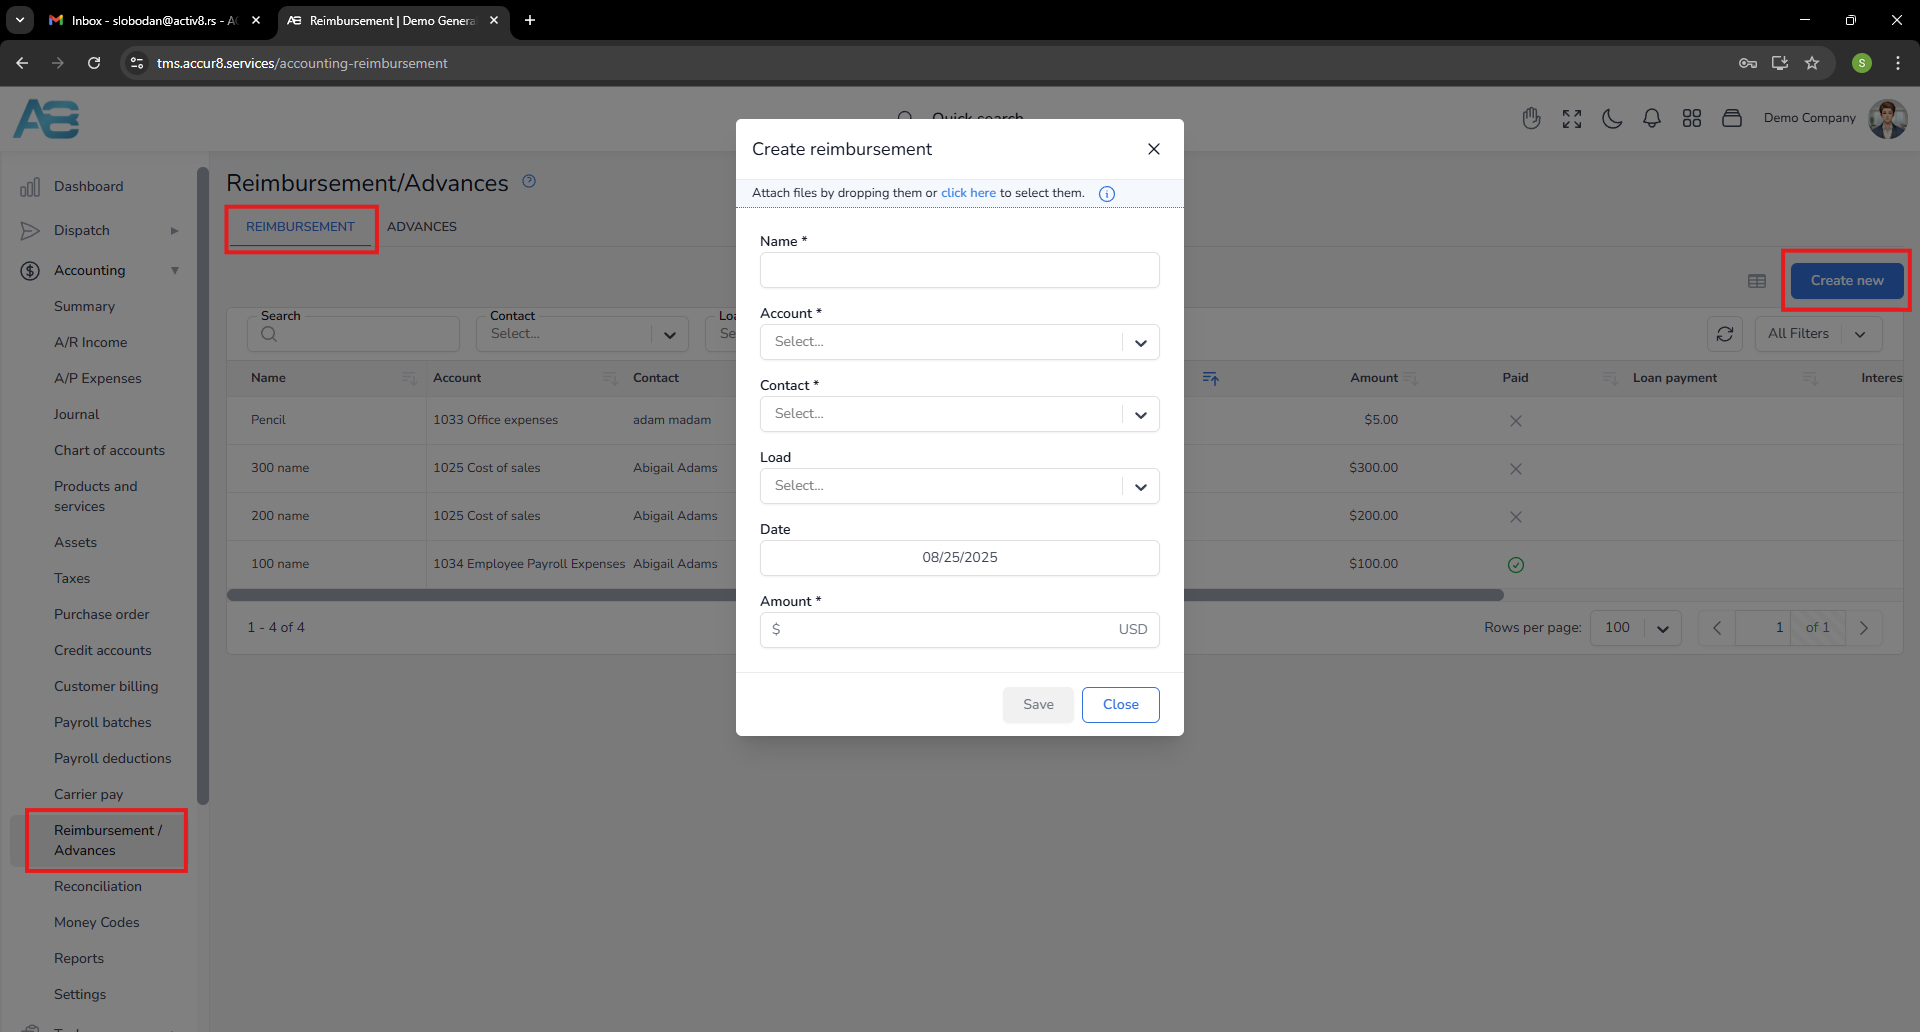
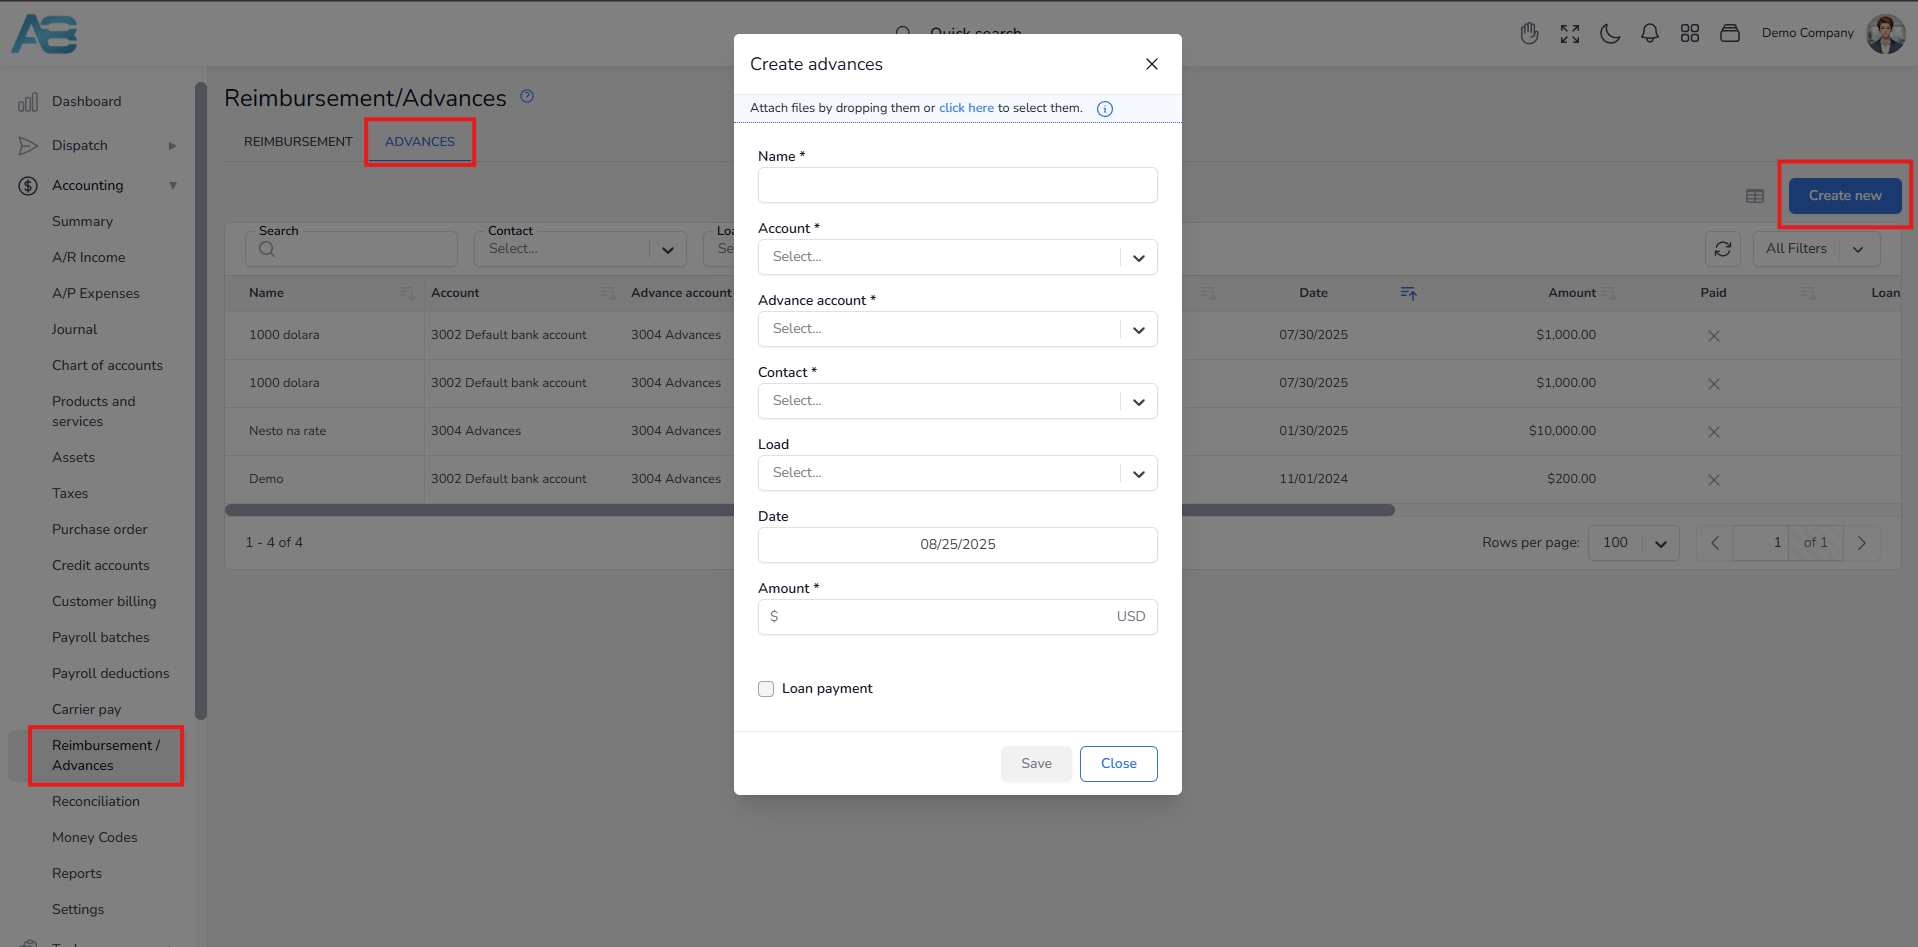
1. Navigate to the left sidebar, click on the Accounting section, and select Reimbursement/Advances. Choose the appropriate tab and then click the Create new button.
Note: An advance refers to the funds that a company lends to a driver to ensure smooth job performance. In contrast, a reimbursement occurs when the company repays the driver for expenses incurred.
2. After selecting the appropriate tab, a pop-up window will appear, and you will fill in all required fields marked with an asterisk and save your entry.
Alternatively, you can add these entries through the Pricing tab for the selected load, under the Advances/Reimbursements section.
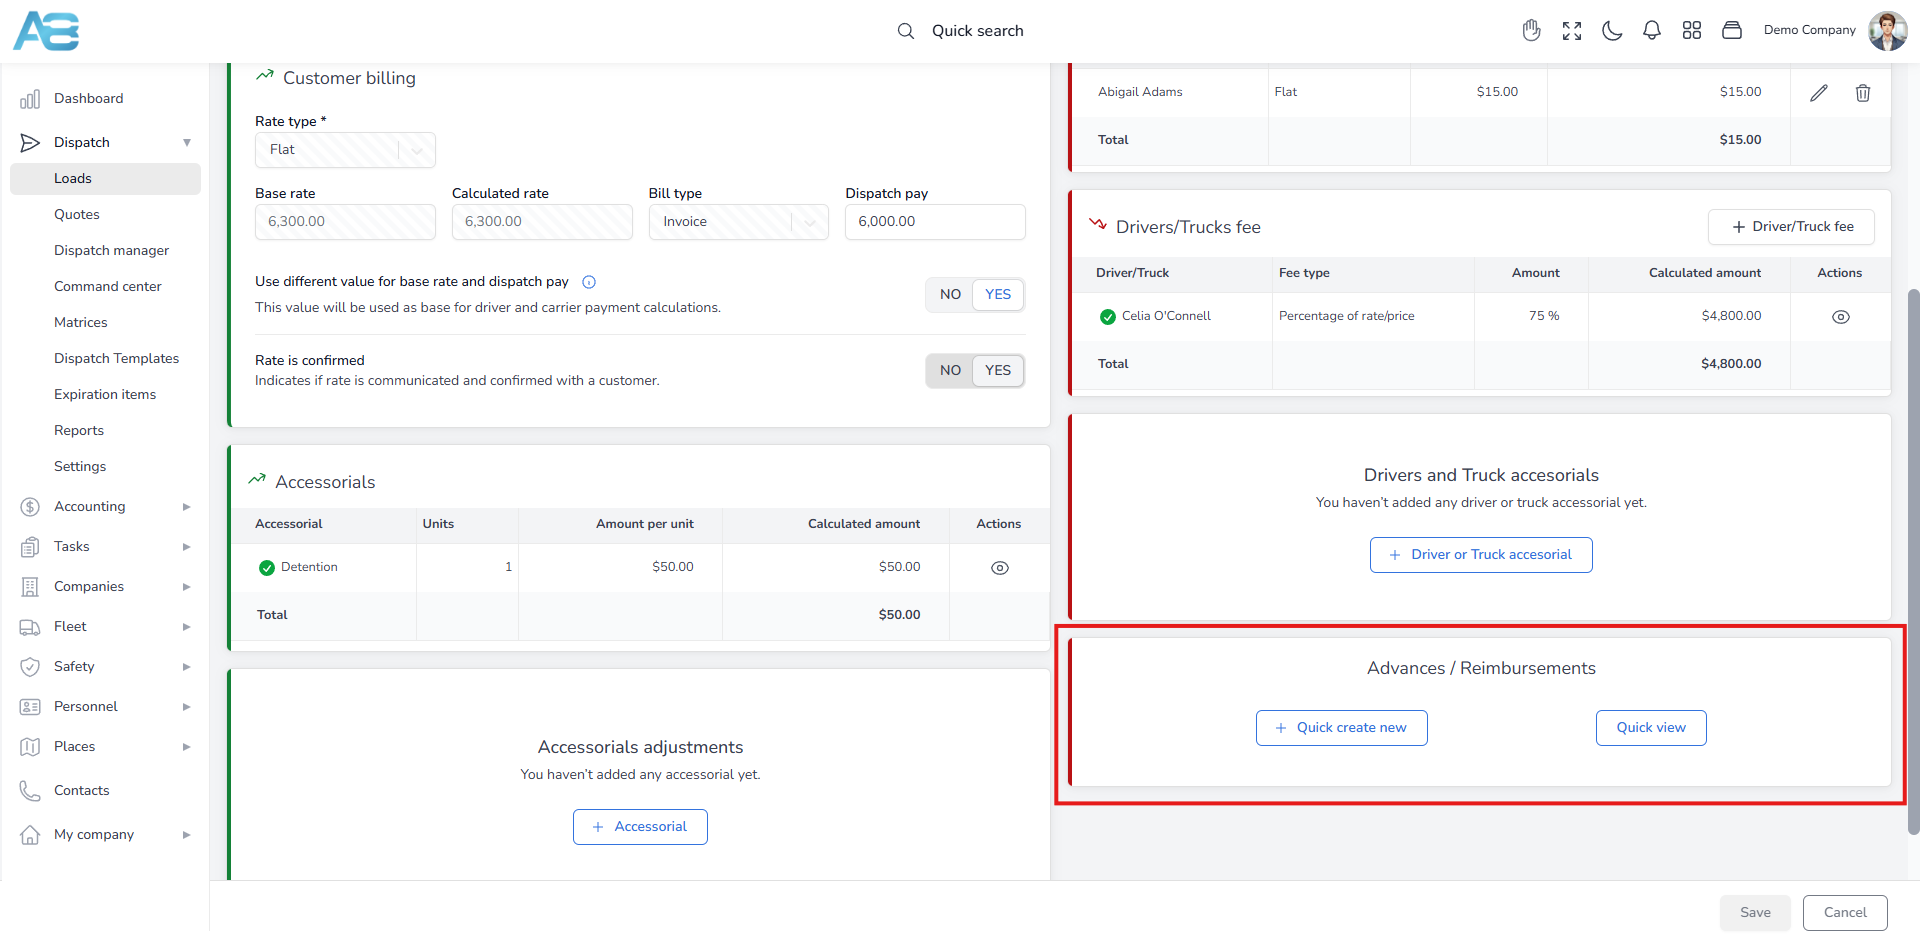
These entries will be displayed in the created payroll batch under the Reimbursement/Advances section.
Creating a payroll settlement #
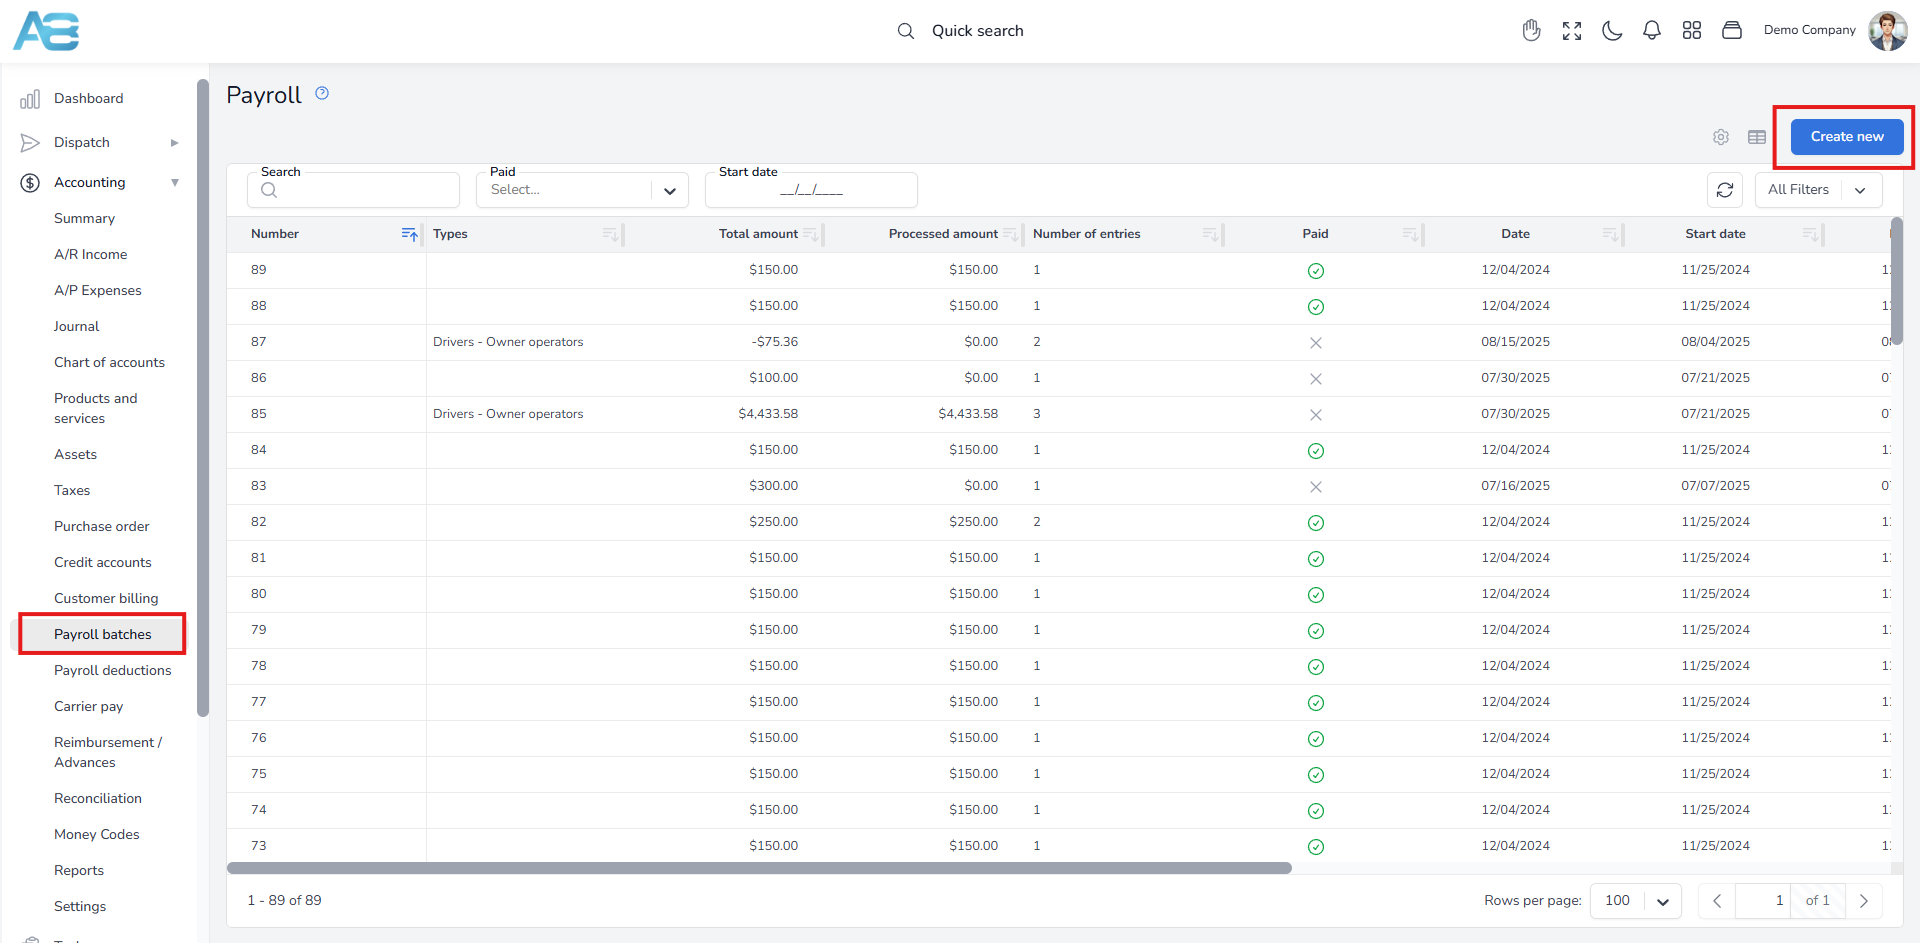
Once you have completed all previous steps, it’s time to create a payroll batch. To access this option, navigate to the left sidebar, click the Accounting section, then select Payroll batches. Next, click the Create New button in the top right corner.
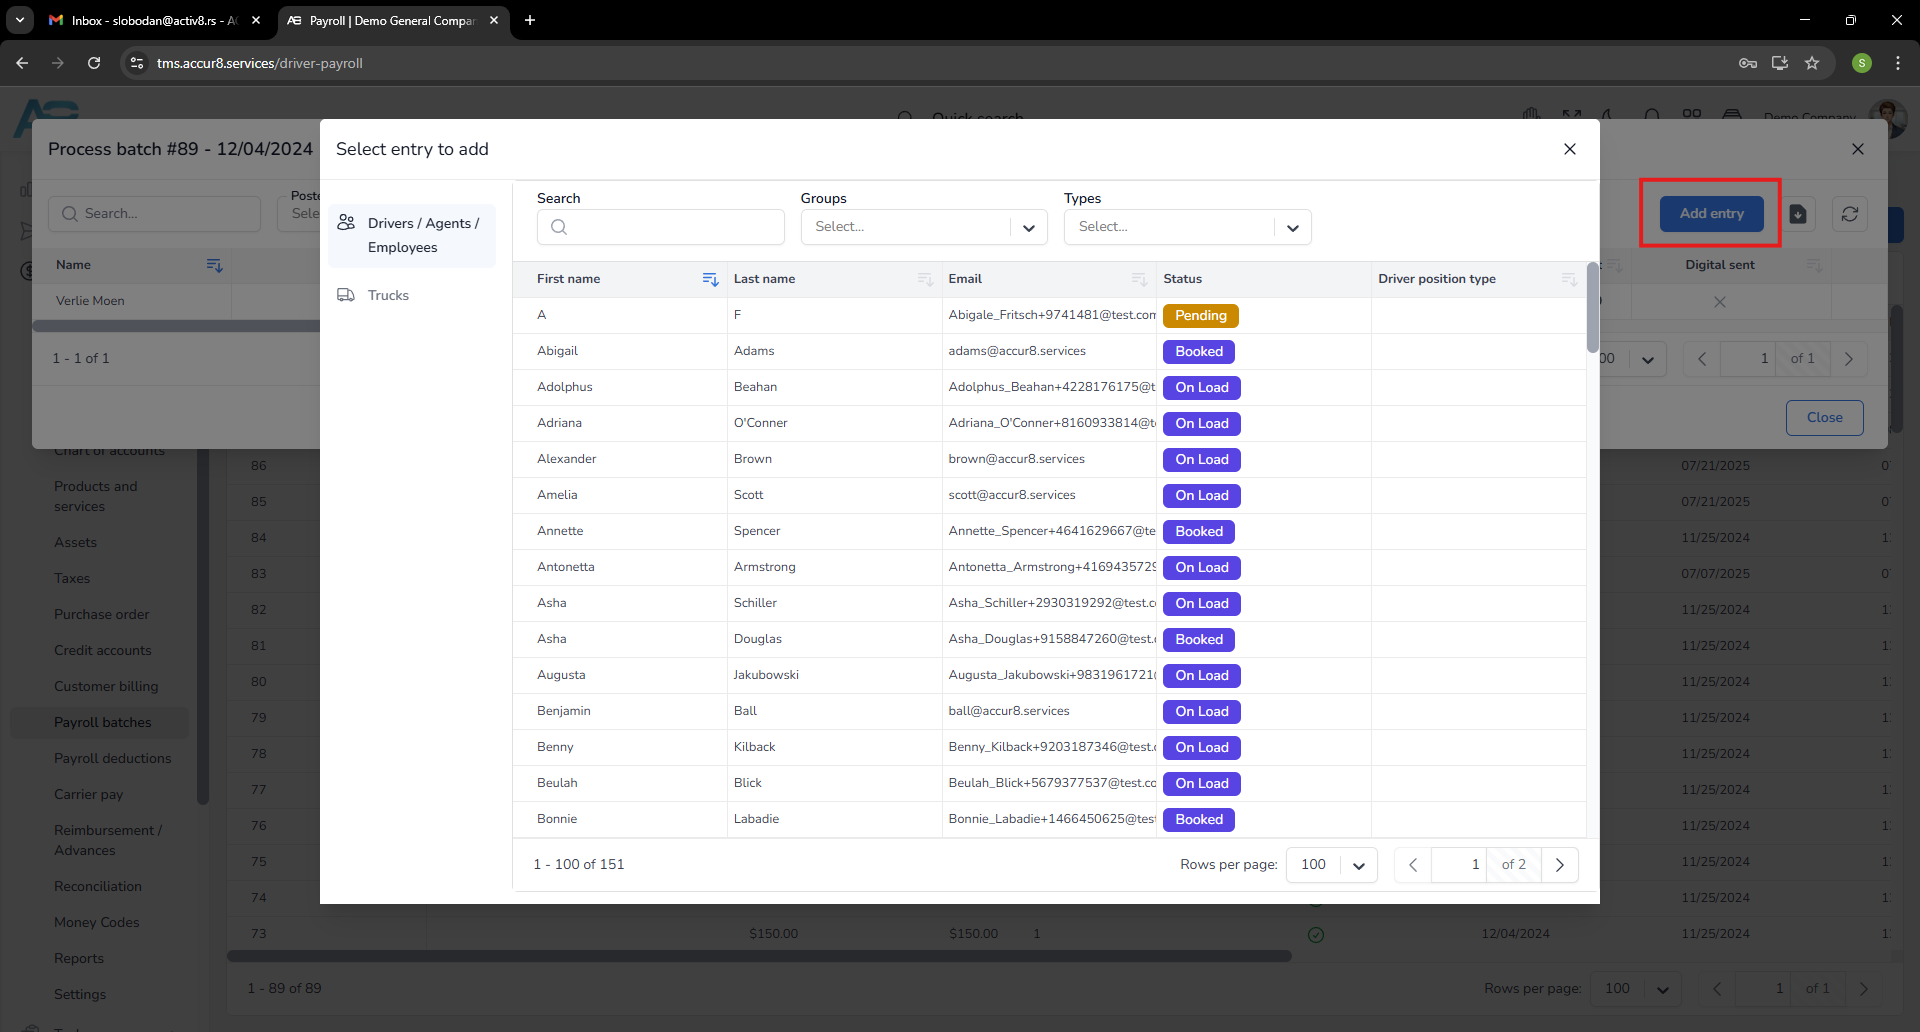
This will open a new page where you will find two options in the upper-left corner: Drivers/Agents/Employees and Trucks, depending on who you create this batch for. After selecting the appropriate option, a list of all drivers or trucks will be displayed. Choose a driver or truck from the list, and then enter the start and end dates. Additionally, you must specify the batch date and the check/posting date. The line haul items will be displayed according to the selected date range; however, advances, escrows, and expenses will be shown regardless of the dates.
*Important: The batch date is when the settlement will be issued, and the check/posting date refers to the date under which journal entries will be recorded; this date is usually the last day of a settlement period.
After entering all the necessary information, click the Save button, and the new batch entry will appear in the Payroll list.
If needed, you can select multiple entries for an existing batch. To do this, choose the batch from the list, click the Add Entry button, and then select the entries you want to add. They will be automatically included afterward.
In the Payroll list, click the created batch and then hover over it. You will see the Assign button if you need to define yourself as being in charge of this batch, and the Process button if you wish to proceed with the payment settlement.
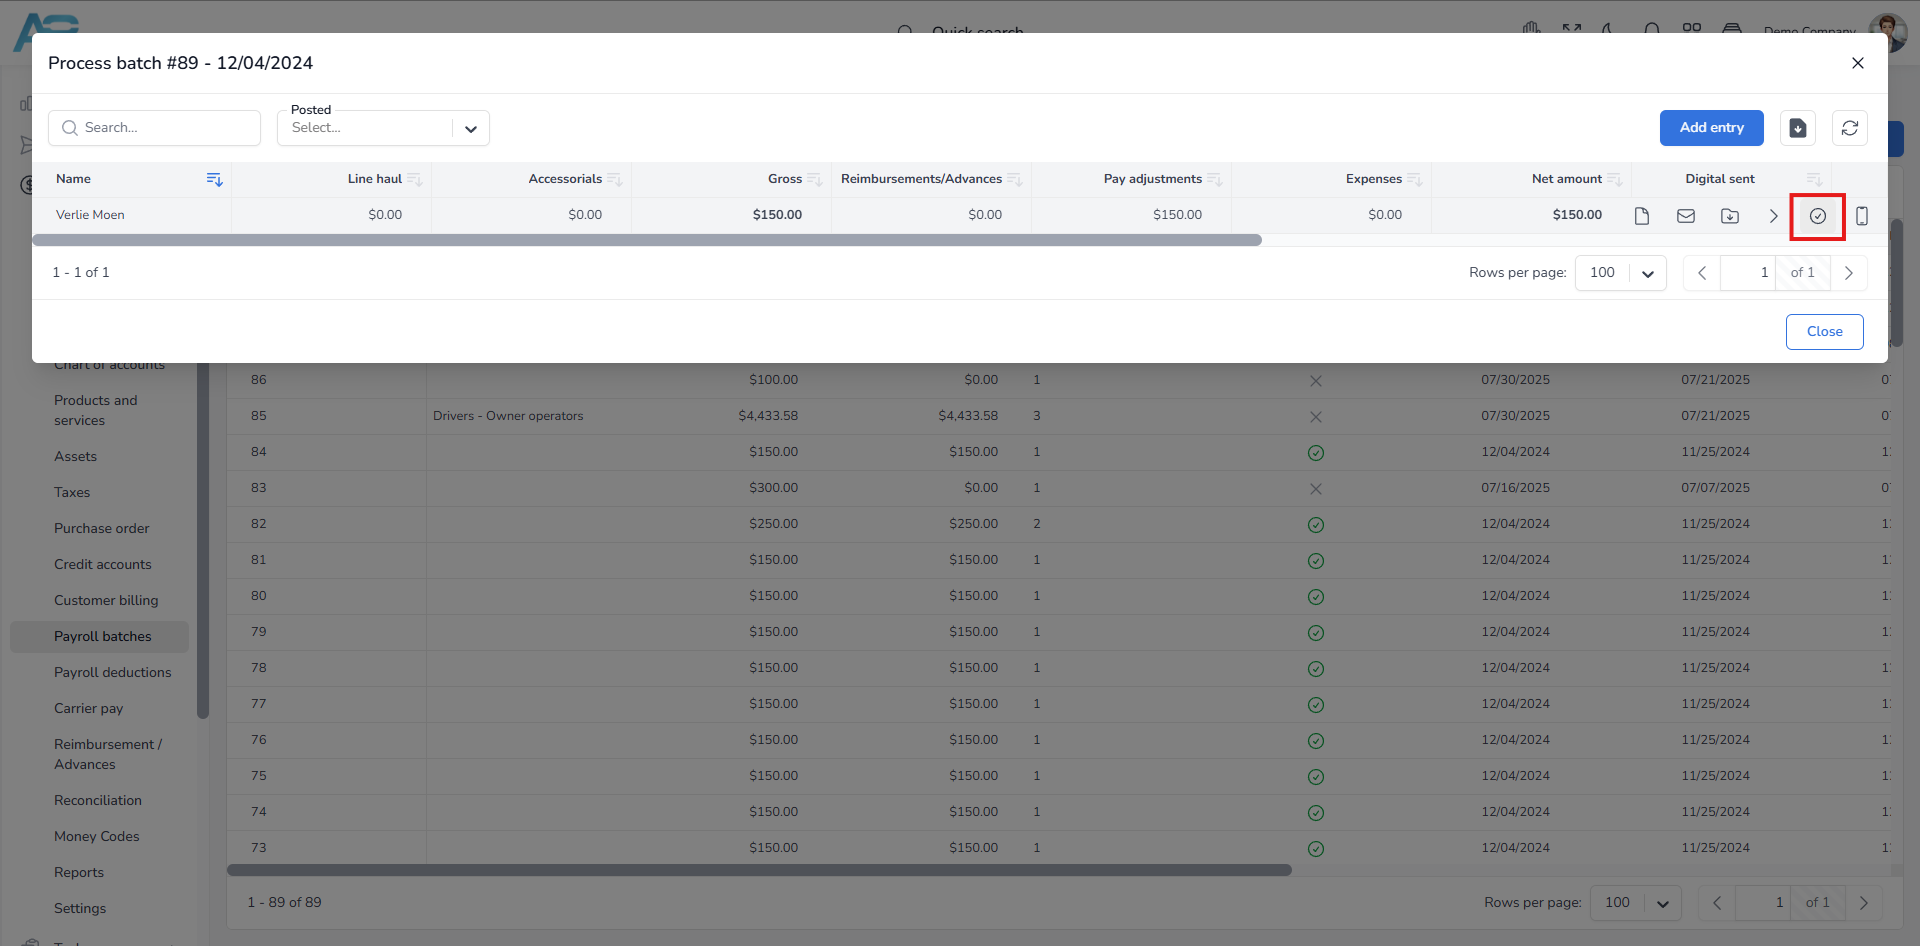
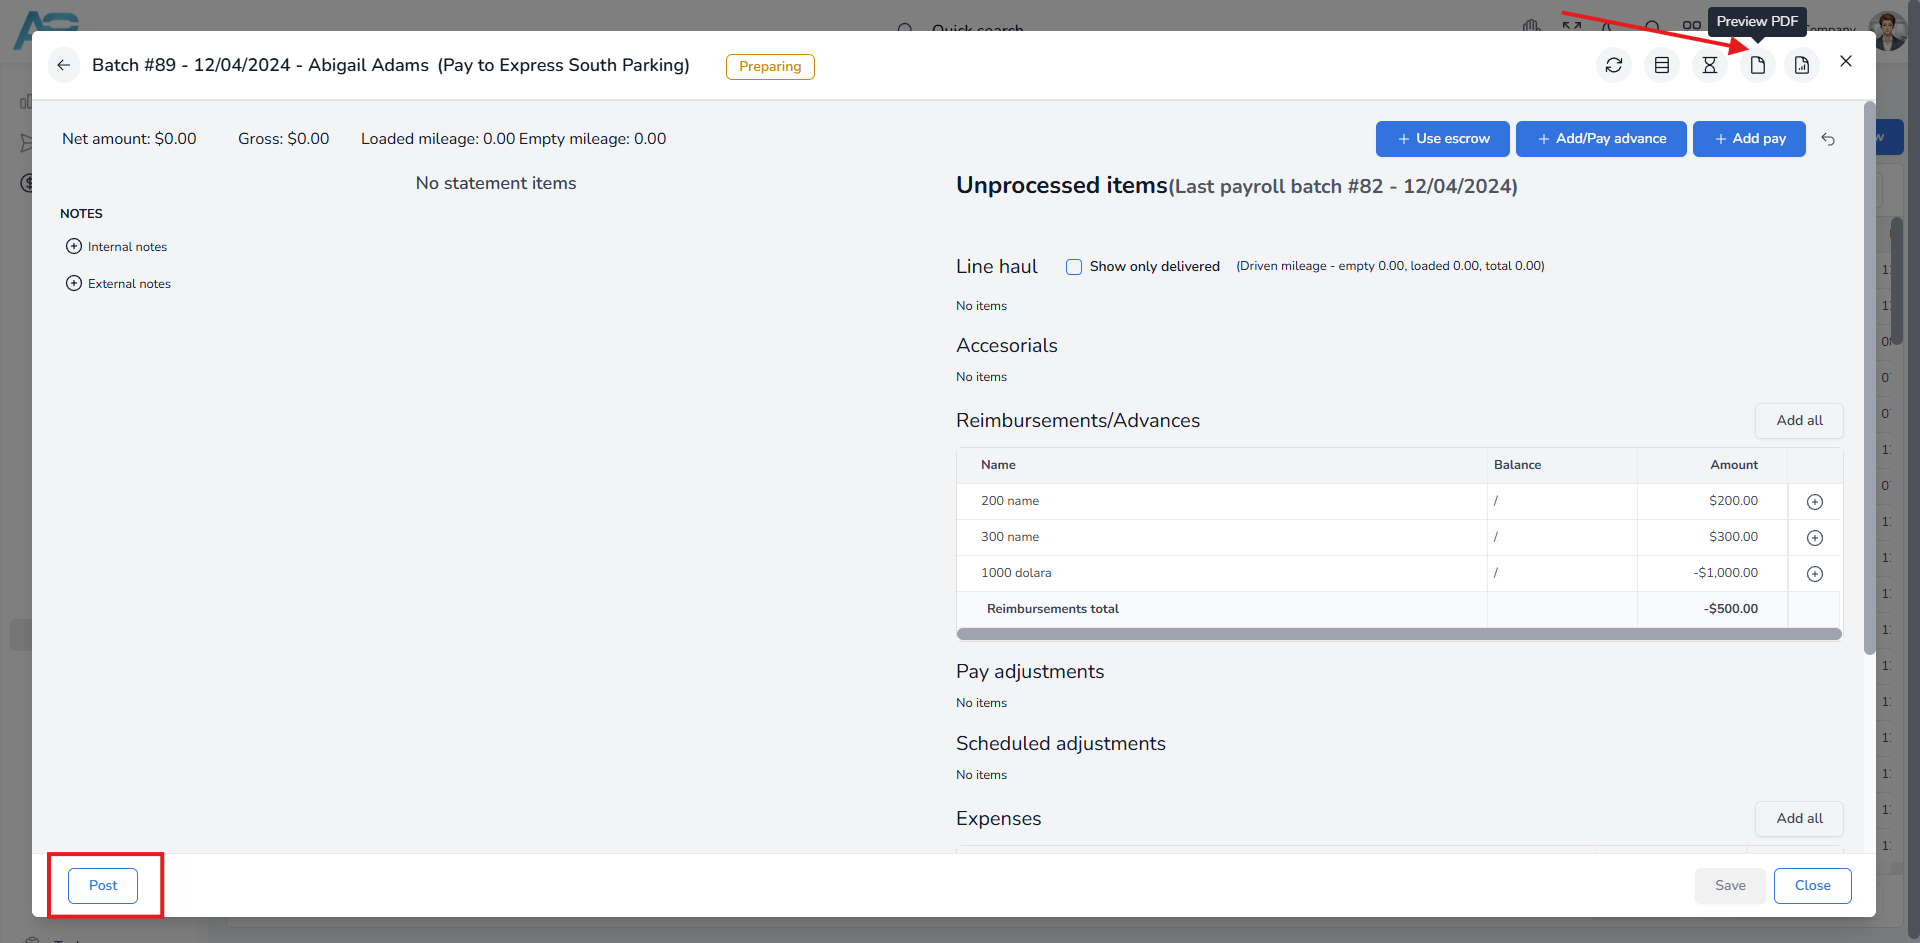
Once you open the payroll batch, all unprocessed items will be displayed on the right, grouped under the following titles: Line haul, Accessorials, Reimbursements/Advances, Pay adjustments, and Expenses. By clicking the plus button next to each record, you can add it to the Statement on the left. You can also use the Add all option to add all records at once. At the upper-left corner, you will see the calculated totals for the Net amount, Gross amount, Loaded mileage, and Empty mileage.

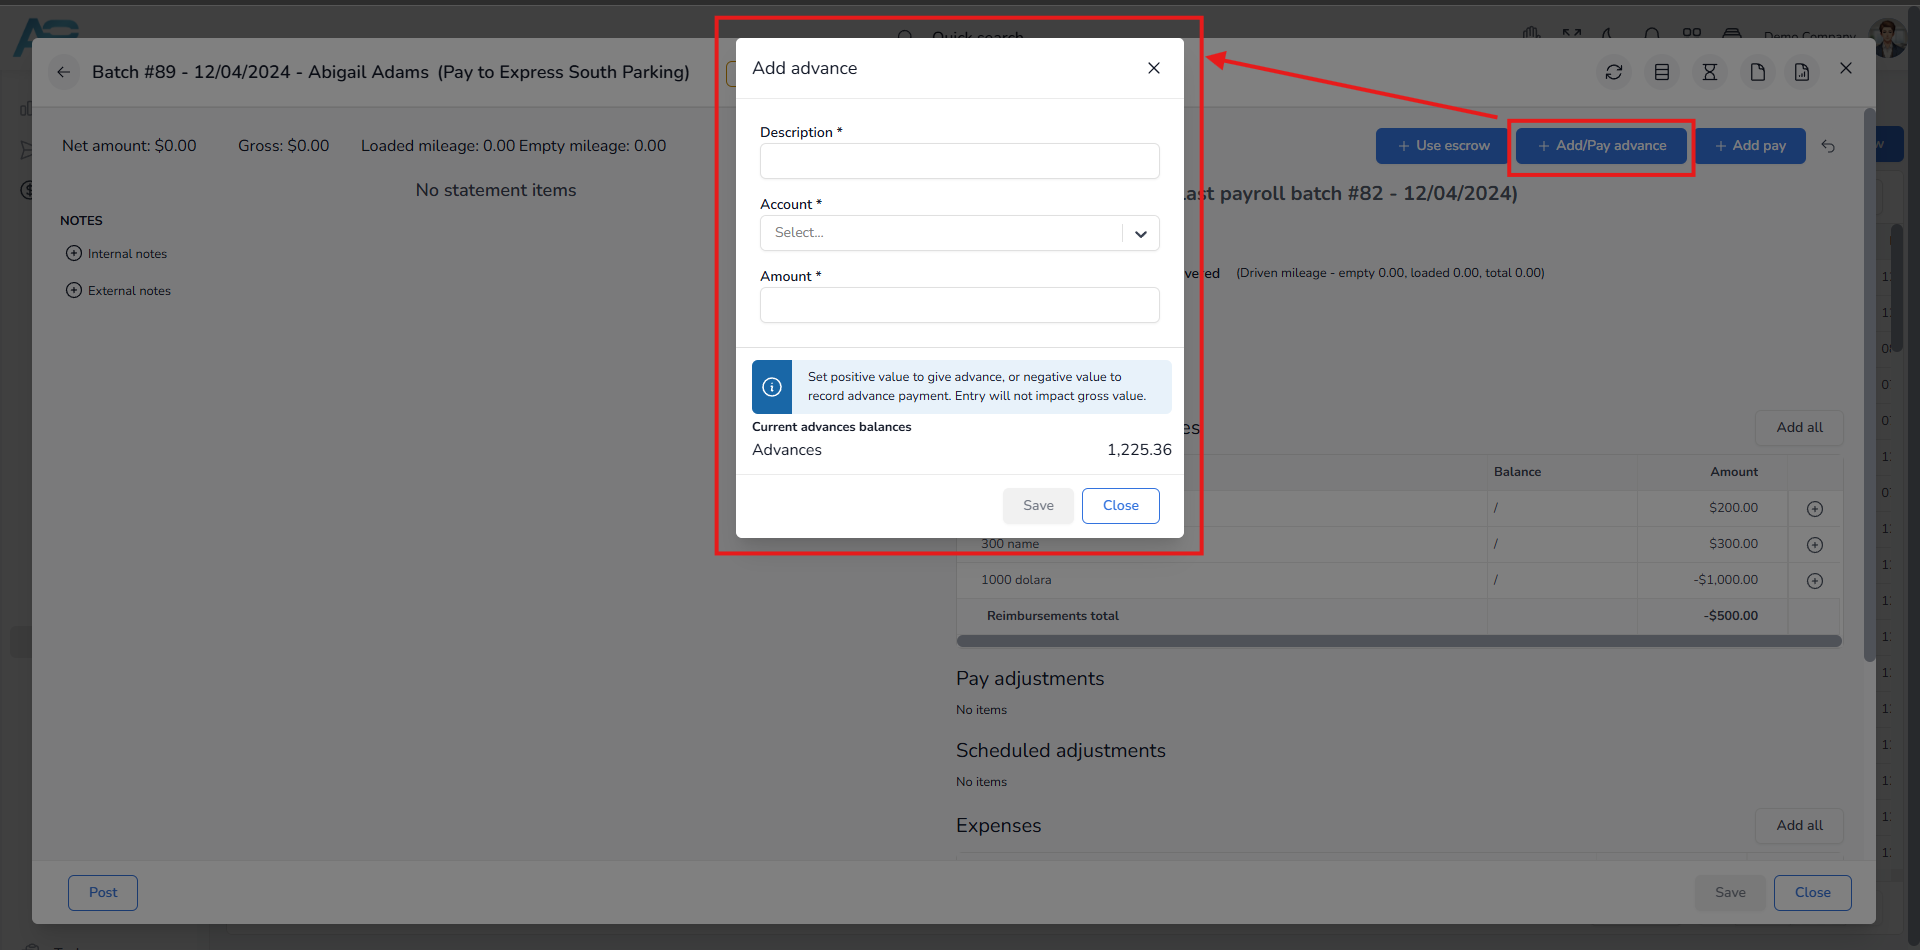
Suppose the payroll statement shows an overdrawn situation, meaning the expenses exceed the income. In that case, you can use the Add Advance option to provide a loan to the driver or truck owner, allowing the debt to be transferred to the next paycheck. To do that, click the Add Advance button at the upper right corner, enter a description, select the account, and specify the amount you need to loan to the driver. After saving the entry, you will see that the net amount is now zero. You can also use this option to add a negative value to record advance payments, which will not affect the gross value.
Once you have entered and reviewed all the records, your payroll statement will still be in the preparing status. To recheck everything, click the Preview PDF button in the upper-right corner. Additionally, you have the option to send the statement to the driver or truck owner for review. Once the statement has been approved, click the Post button in the bottom-left corner. The payroll statement will be visible in the A/P Expenses, Journal, and Payroll batch list.
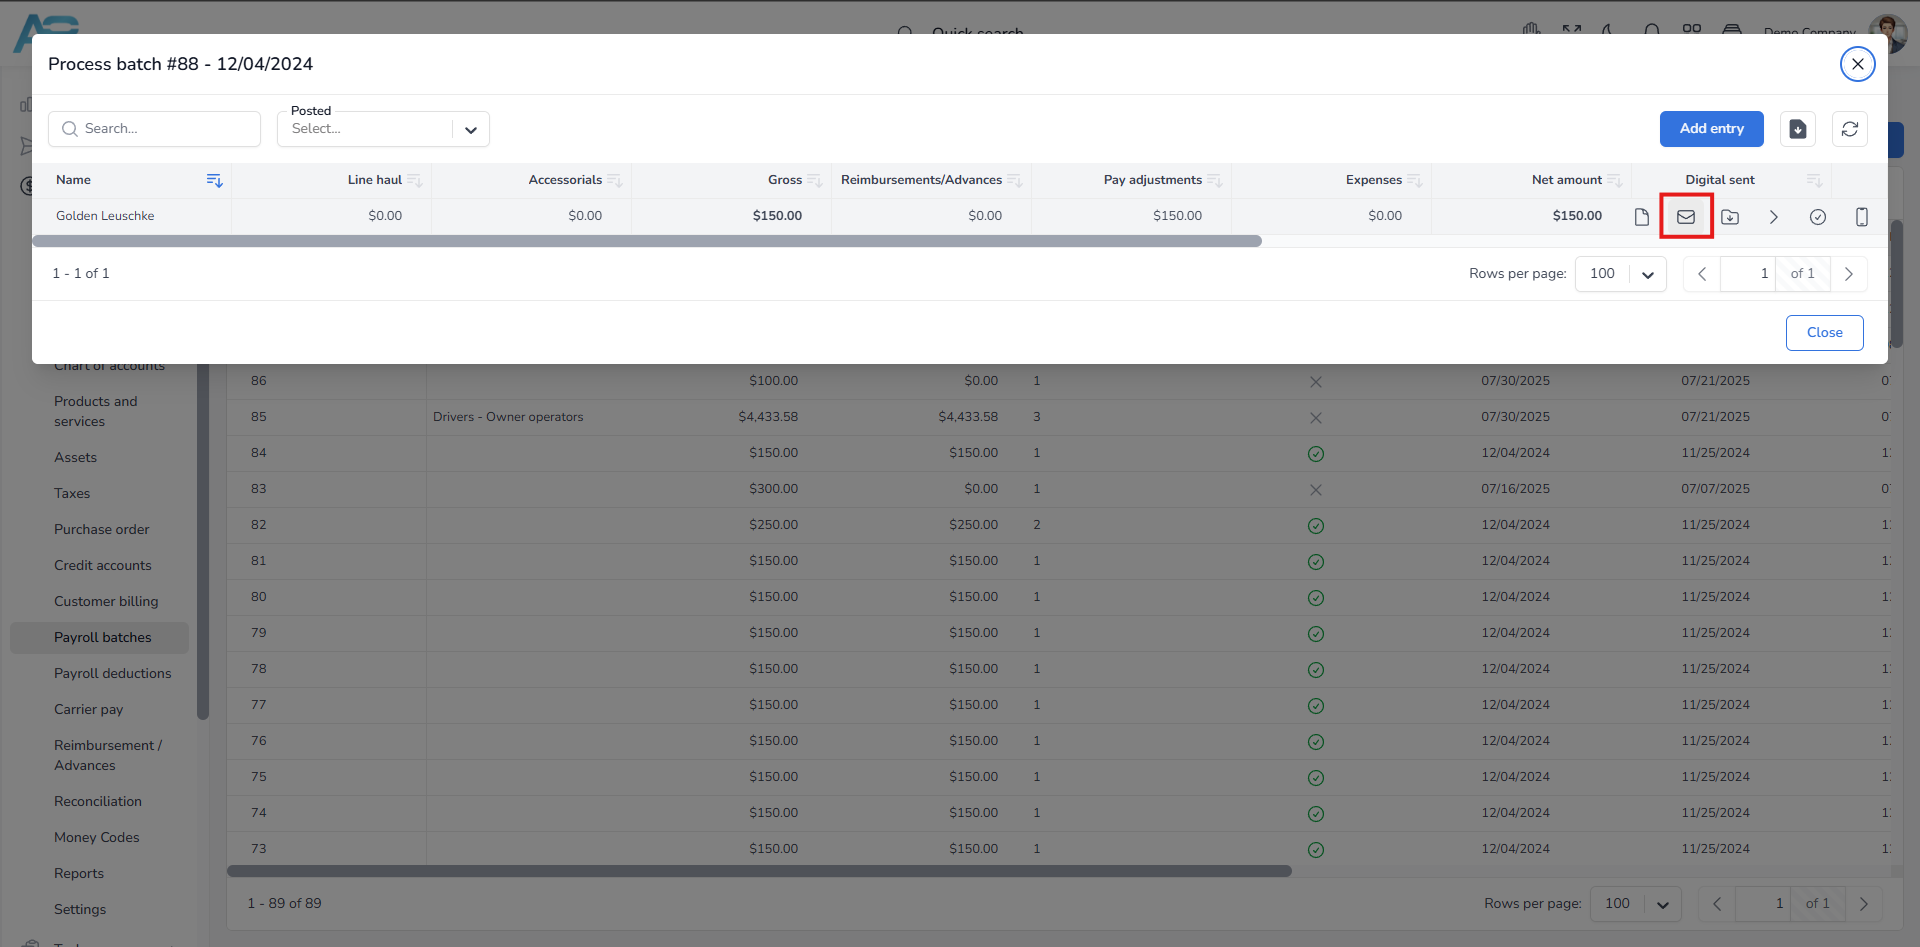
To send your statement, locate the batch you created in the Payroll batches list and hover over it. You will see the Send document via email button. Click this button, enter the recipient’s email address in the pop-up window, and click Send.
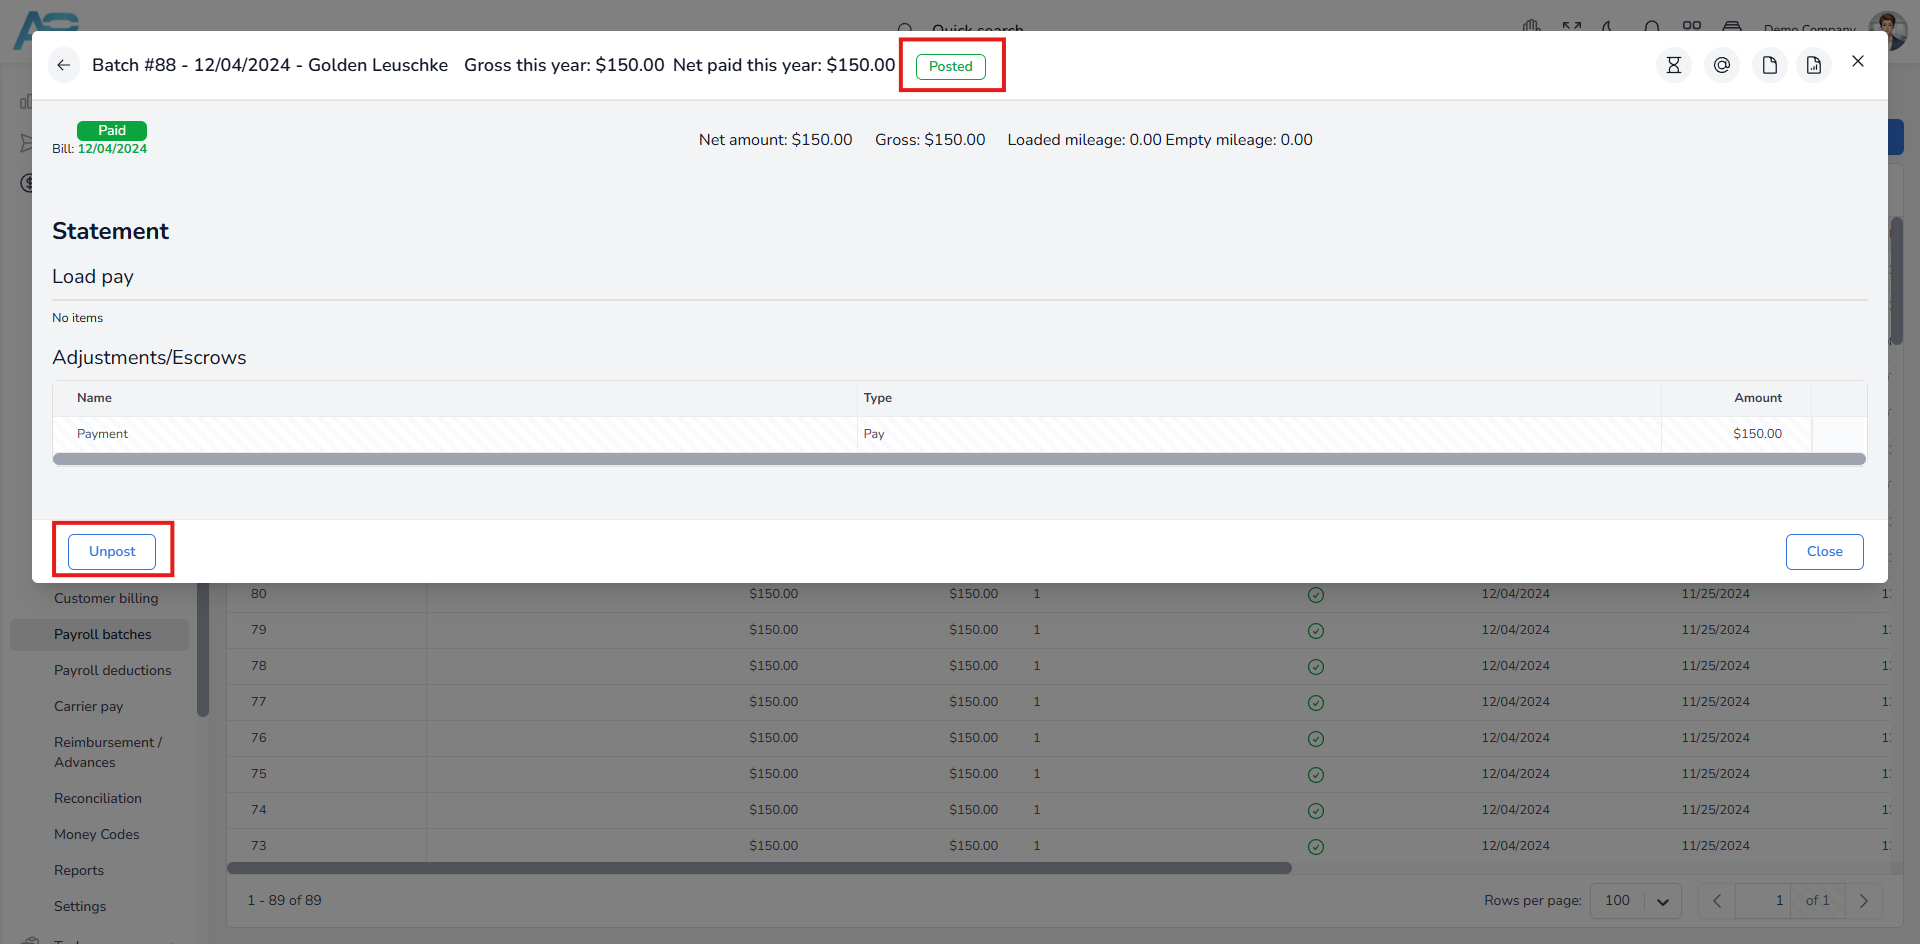
Important: You can modify the records as long as the payroll statement has not been posted yet. Once the settlement is posted and the corresponding bill is created, these transactions will be recorded in the Journal and will also be marked with a green check mark in the Payroll list, indicating that they can no longer be changed. However, the system allows you to modify a settlement, but you must first unpost it.
Please note that if the bill linked to a settlement has already been paid, you must delete the payment before you can unpost the settlement.
Additionally, if you attempt to unpost it, the system will prevent you and display a message in the lower left corner: Bill already processed for the entry, please delete the bill payment first.
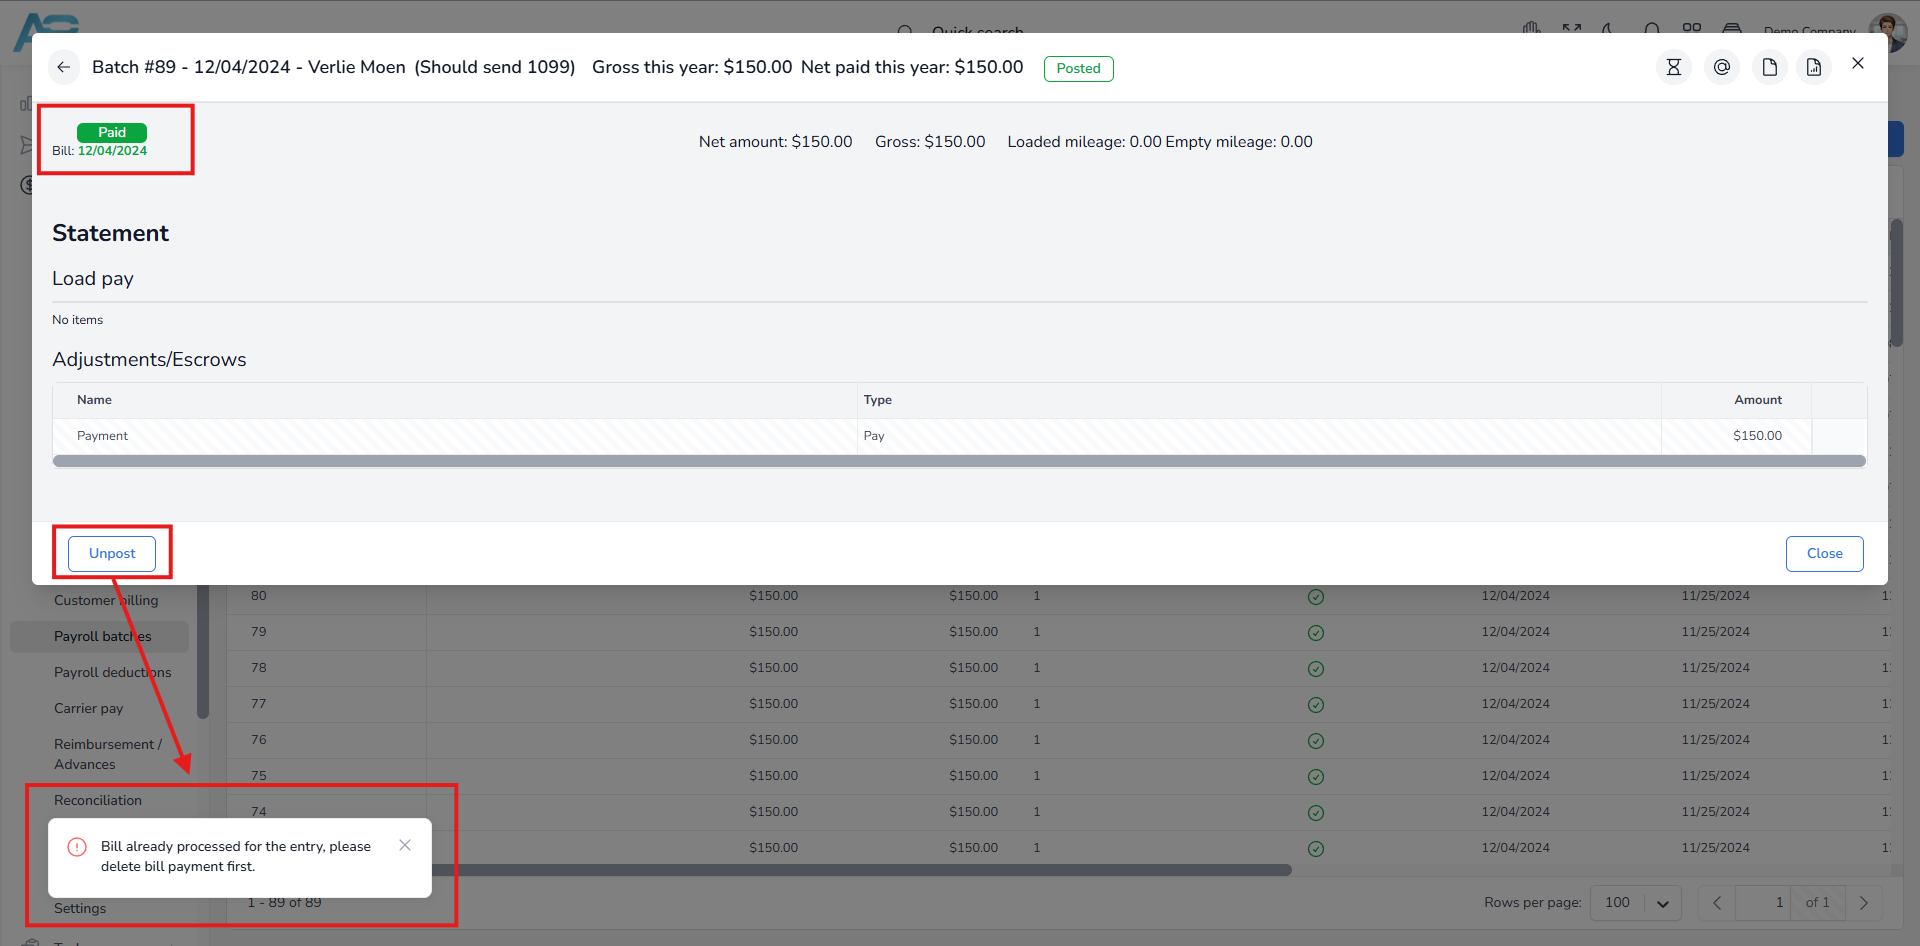
To resolve this, delete the bill first. This will unlock the entry, which will then be removed from both A/P Expenses and the Journal. All settlement entries from the bill will return to the left side, allowing you to add new ones and repost them.
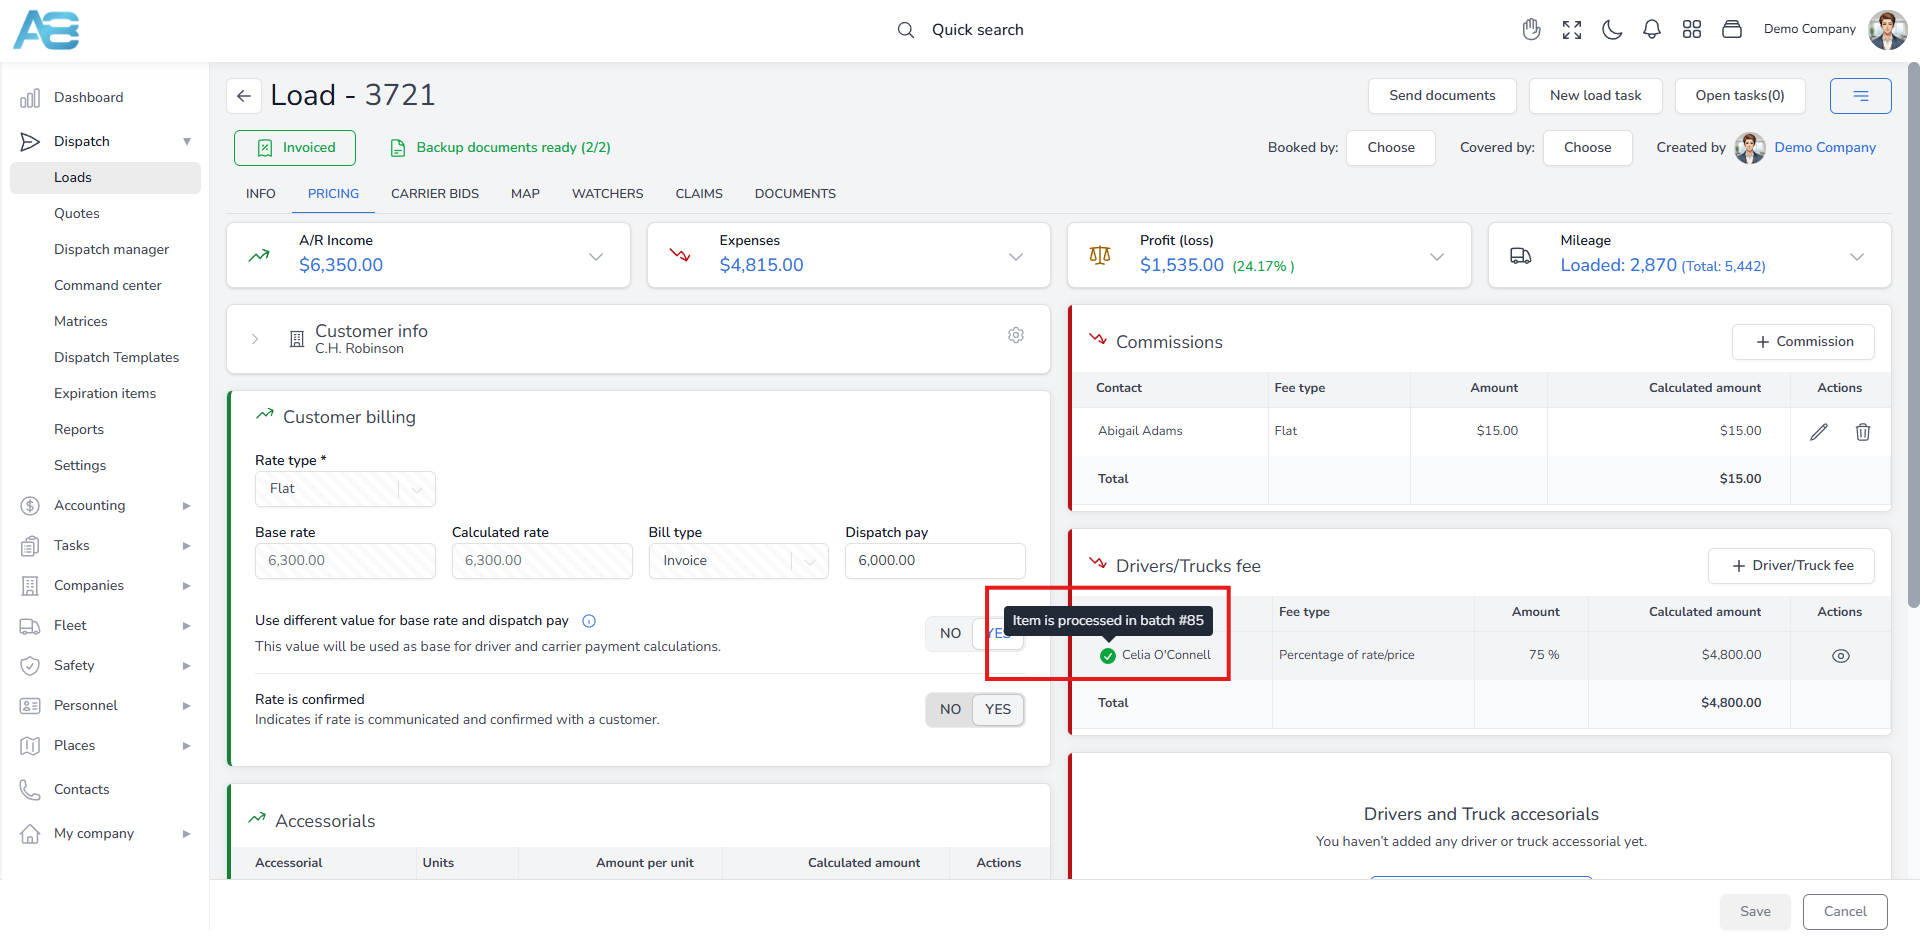
Note: Entries that have been posted will be marked with a green checkmark, which can be seen in the selected load pricing tab under the Drivers/Trucks Fee section. Additionally, if you hover over a green checkmark, it will display the batch number in which the entry was processed.
Tip: To quickly locate a bill, type the prefix PB followed by its batch number in the Search field on the A/P Expenses page. The bill will also be marked as part of payroll.