
Invoicing and factoring #
The ACCUR8 TMS system streamlines financial processes such as invoicing and factoring by automating these processes. In this way, the system reduces errors, saves time, and improves accuracy. With real-time invoicing, your company can ensure prompt payments and build customer trust. Additionally, the seamless integration with factoring partners enables direct invoice submission and total visibility into collections, eliminating the need for third-party tracking tools.
Creating an invoice #
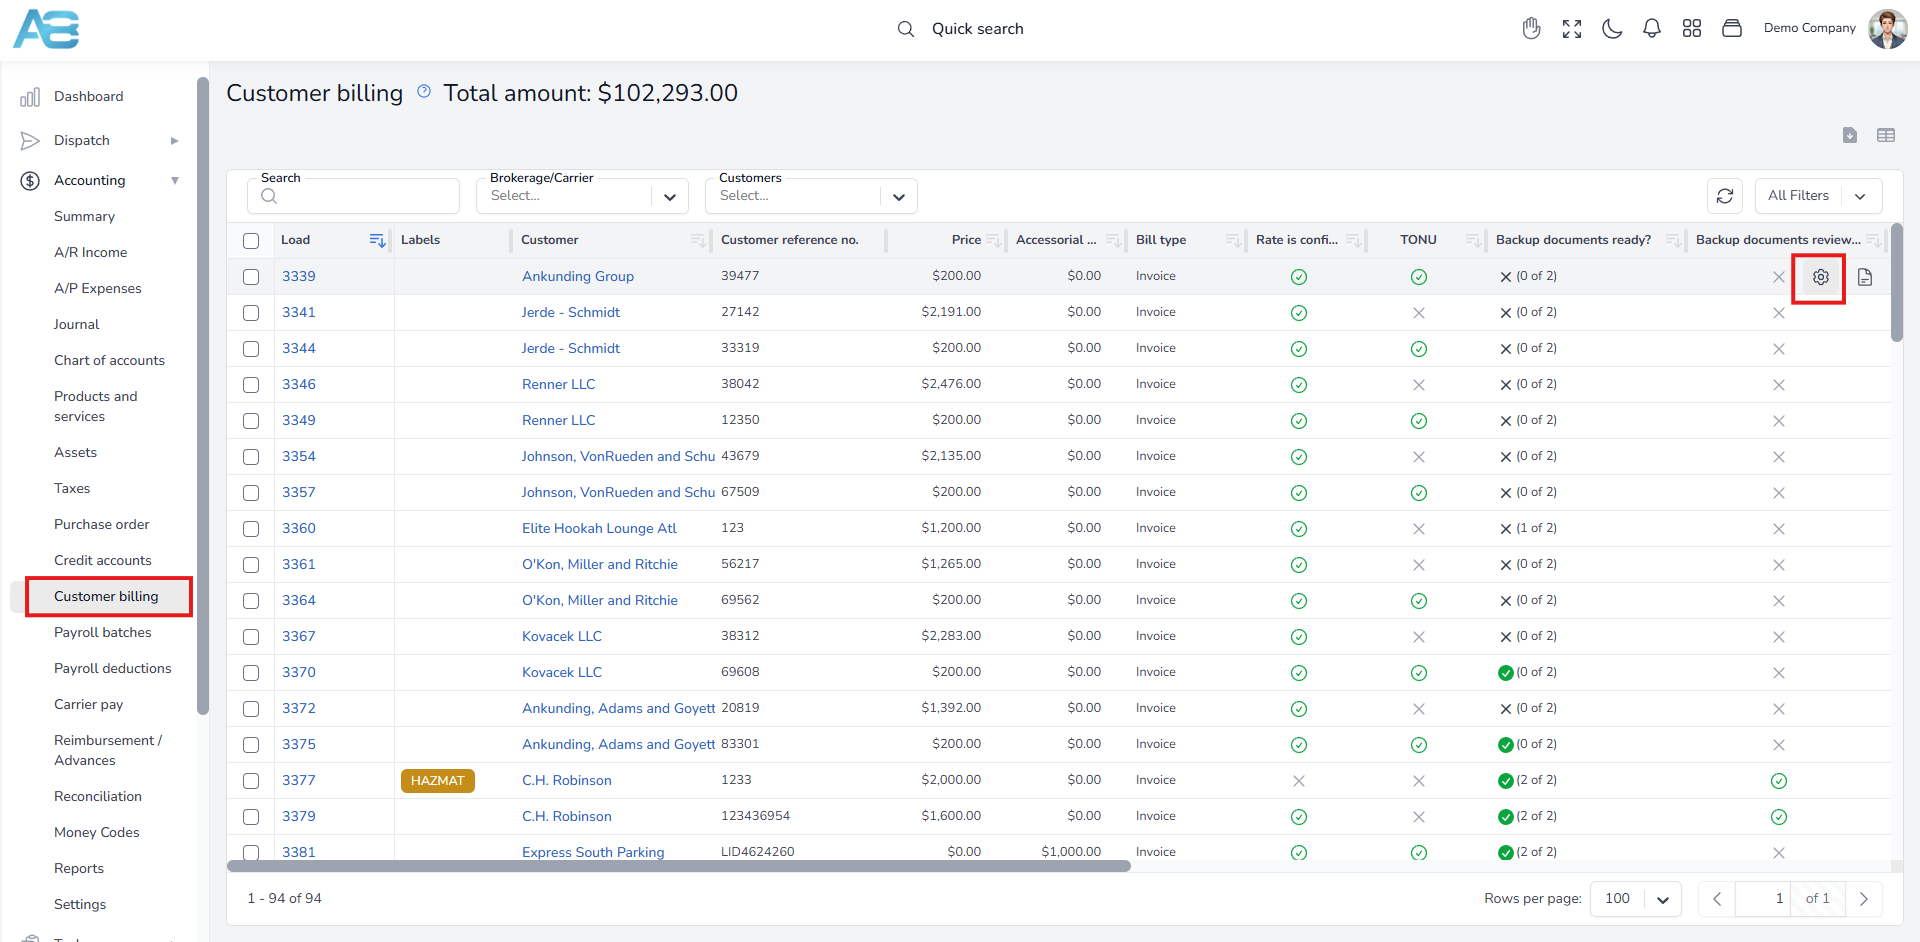
After you create and deliver a load with the previously specified amount, it will appear on the Customer billing list. From this page, you can process the load, generate the invoice, and send it to the customer. Once you complete these steps, the invoice will be listed on the A/R Income page under the Invoices tab, marked as CREATED (if you send it to your factoring company) or SENT (if you send it to the customer). For more detailed instructions on how to process an invoice, please refer to our guide on the following link: https://accur8.help/docs/customer-load-billing-manual-accounting
Marking an invoice for factoring #
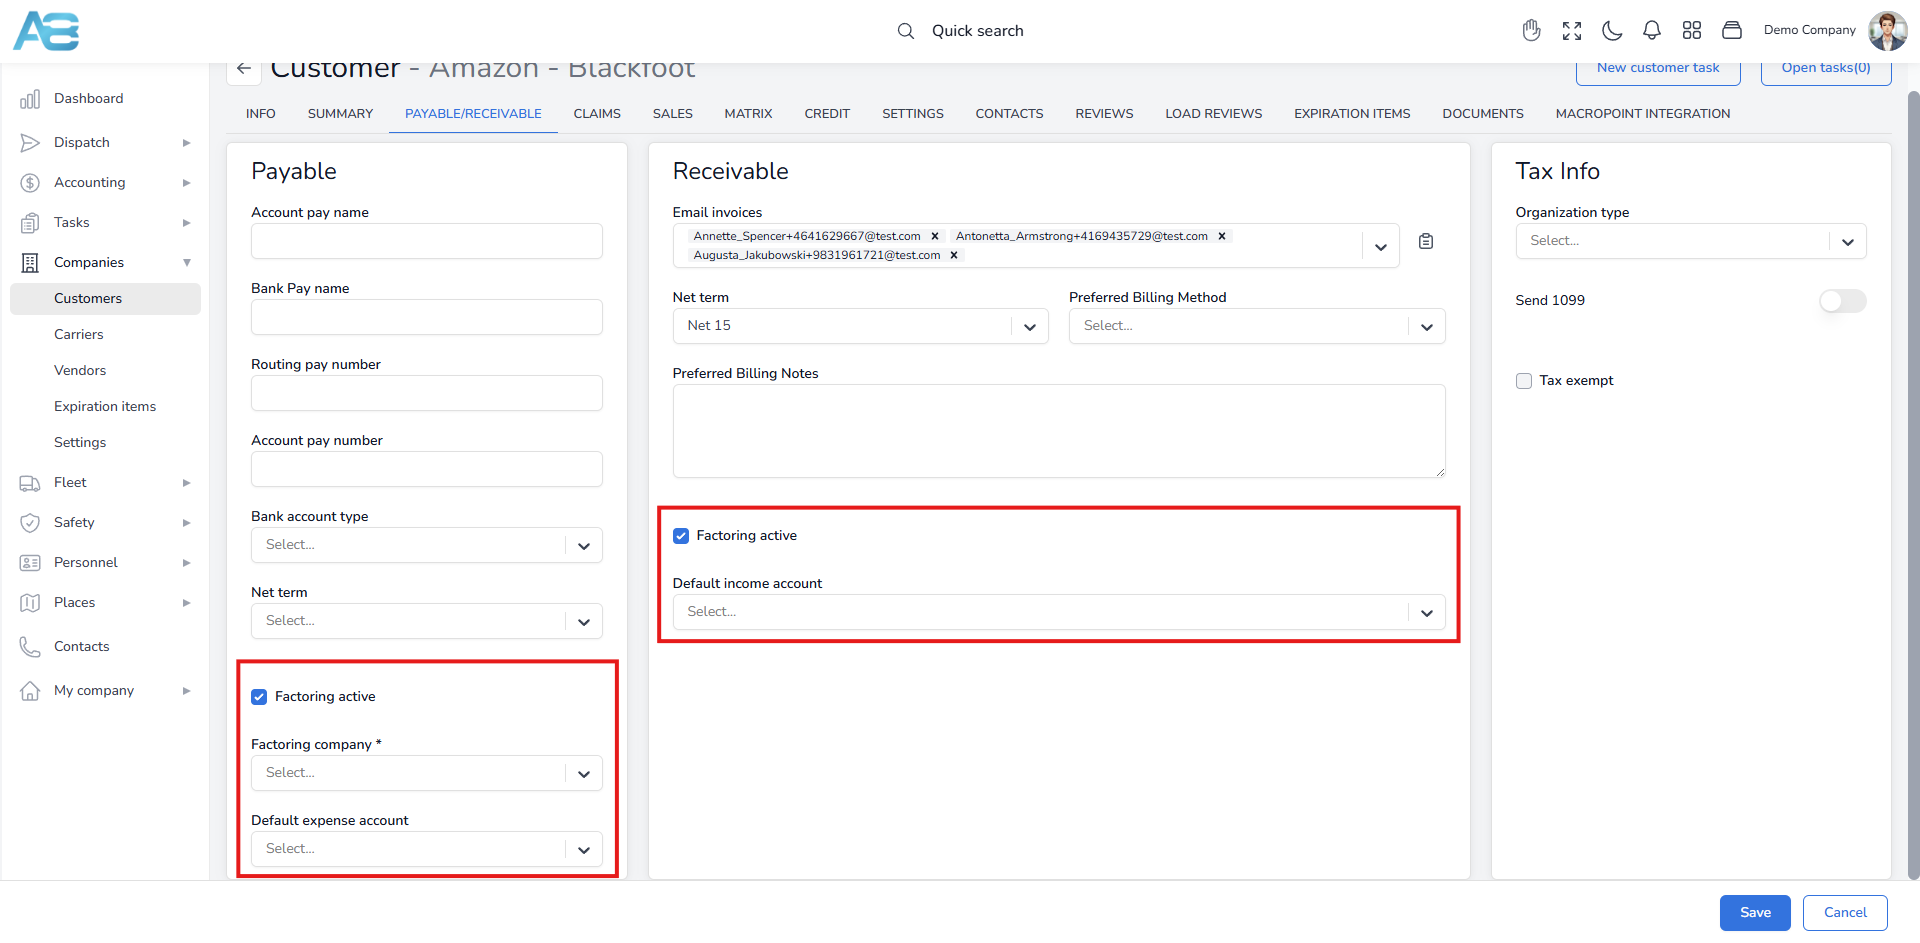
To mark an invoice for factoring, you must set a default value by checking the Factoring active checkbox on the Customer’s Payable/Receivable tab.
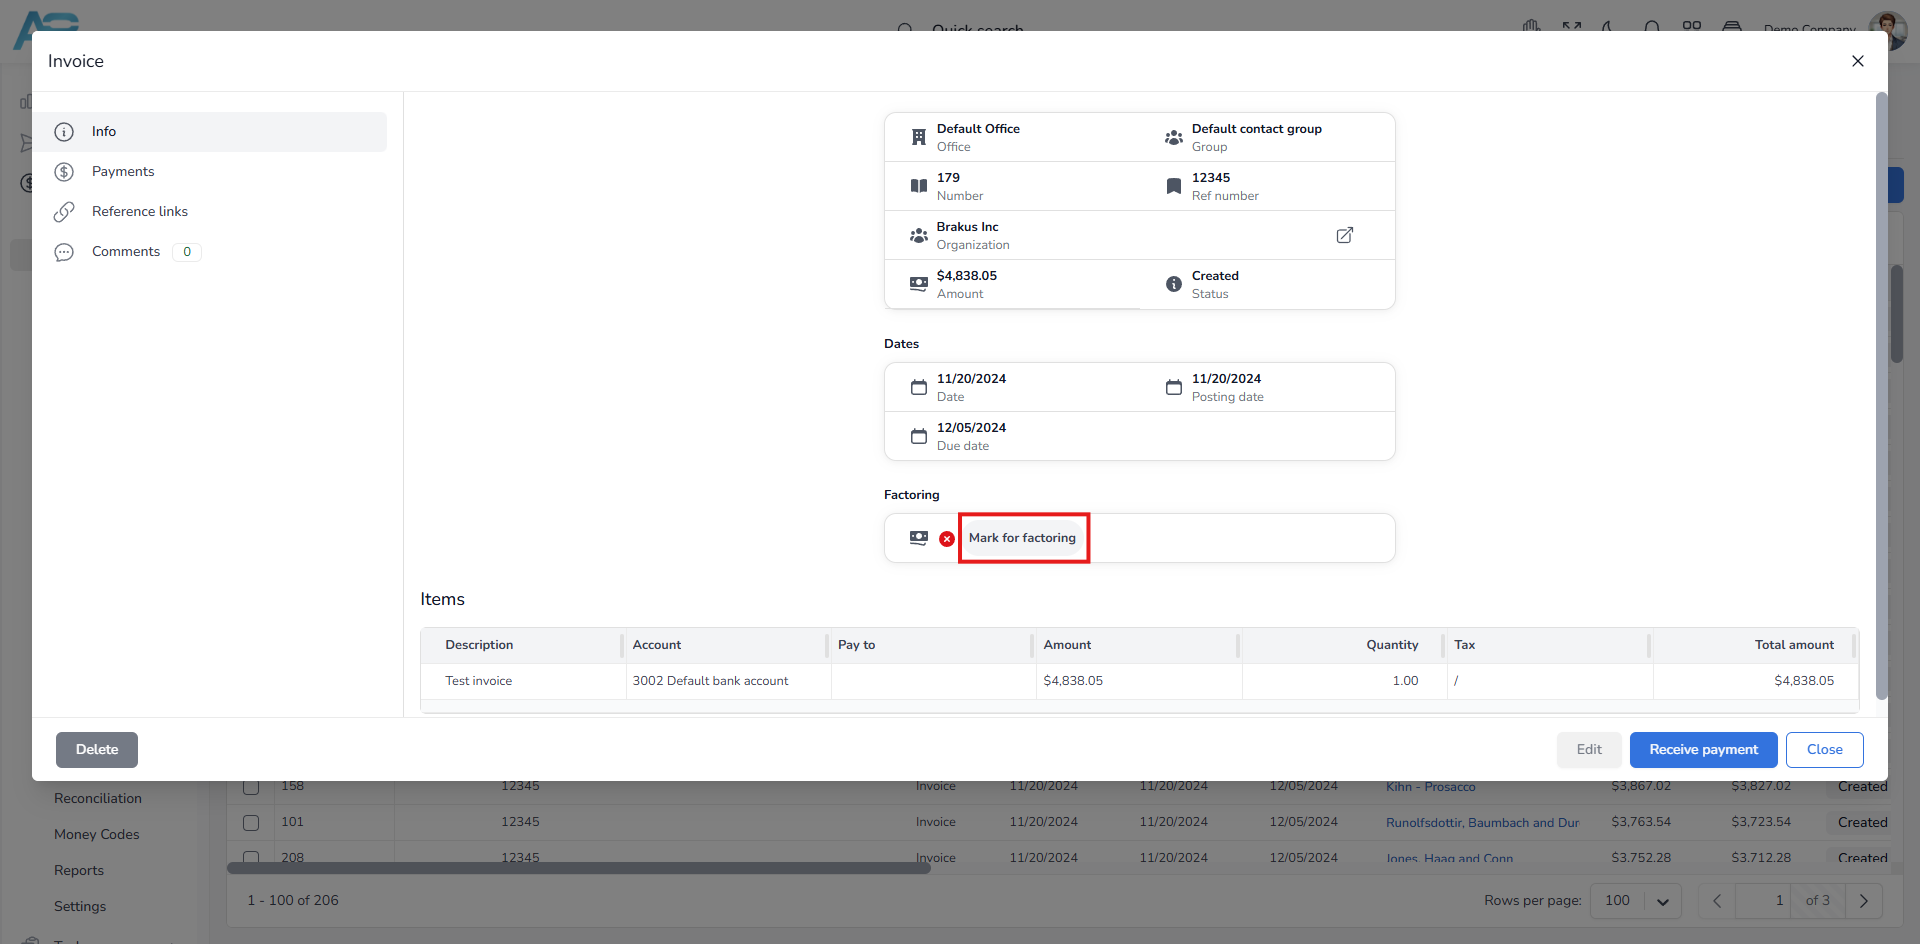
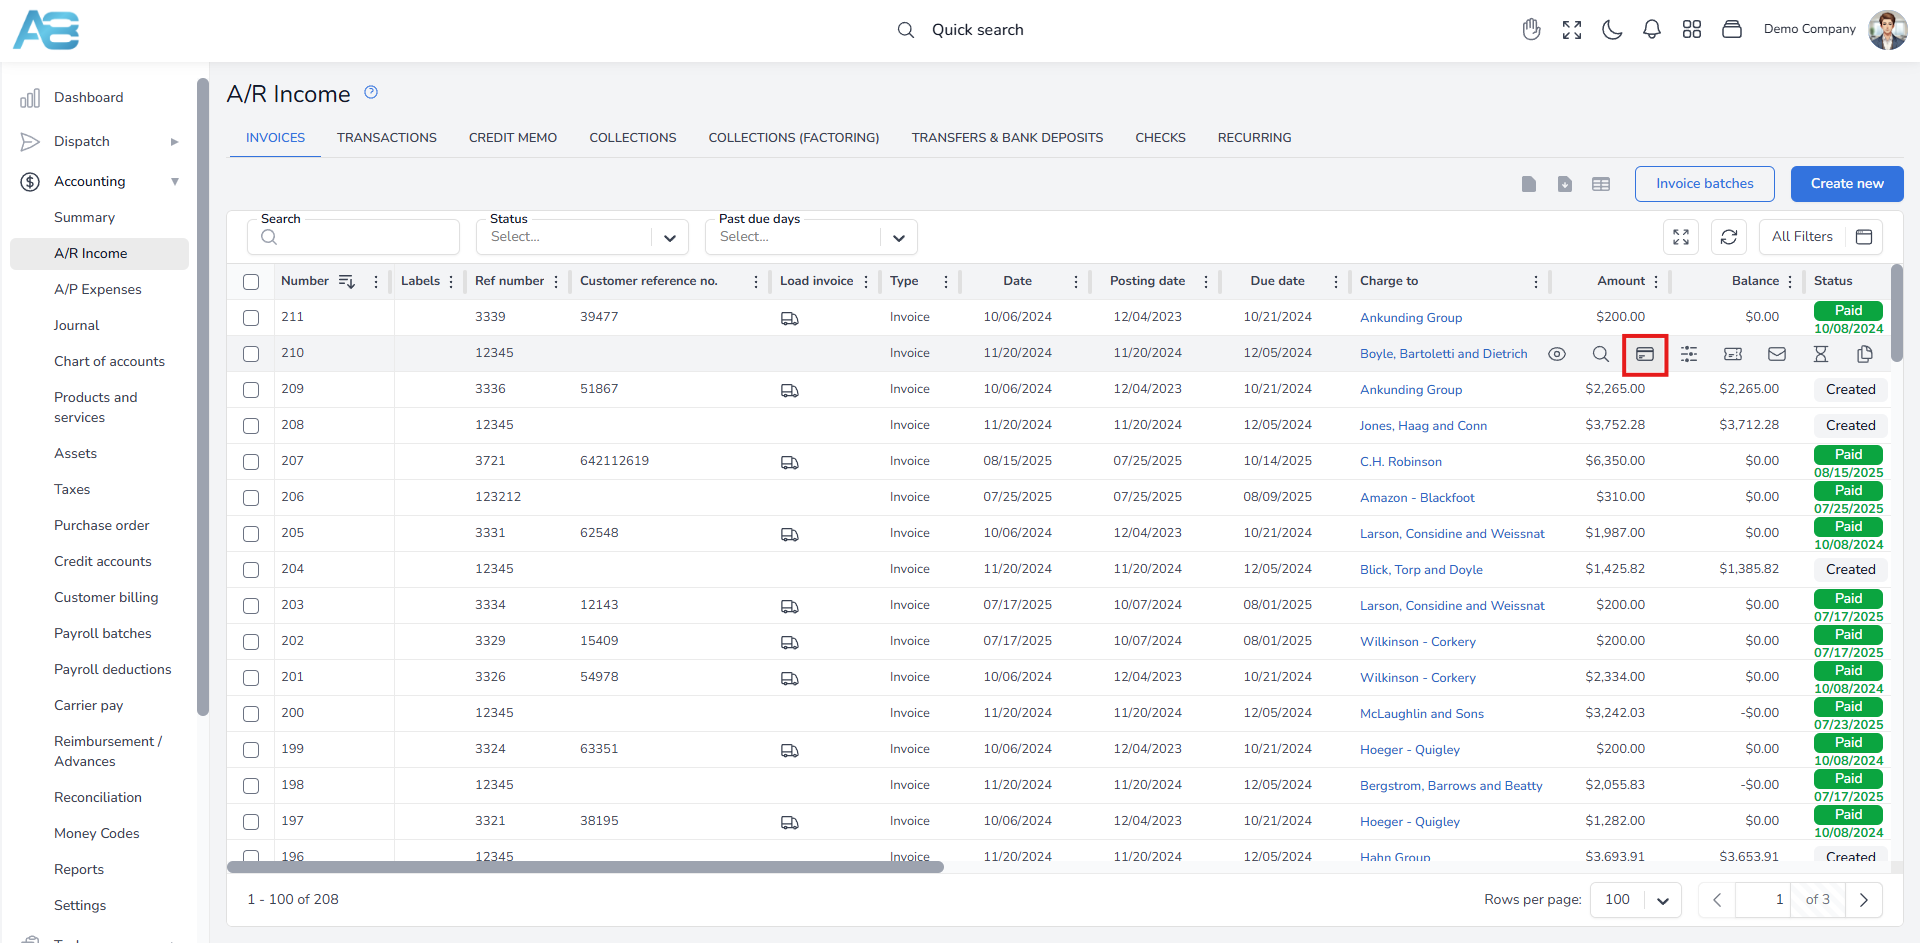
You can also mark an invoice for factoring by clicking the Show details icon in the A/R Income section and selecting the Mark for Factoring button under the Factoring option.
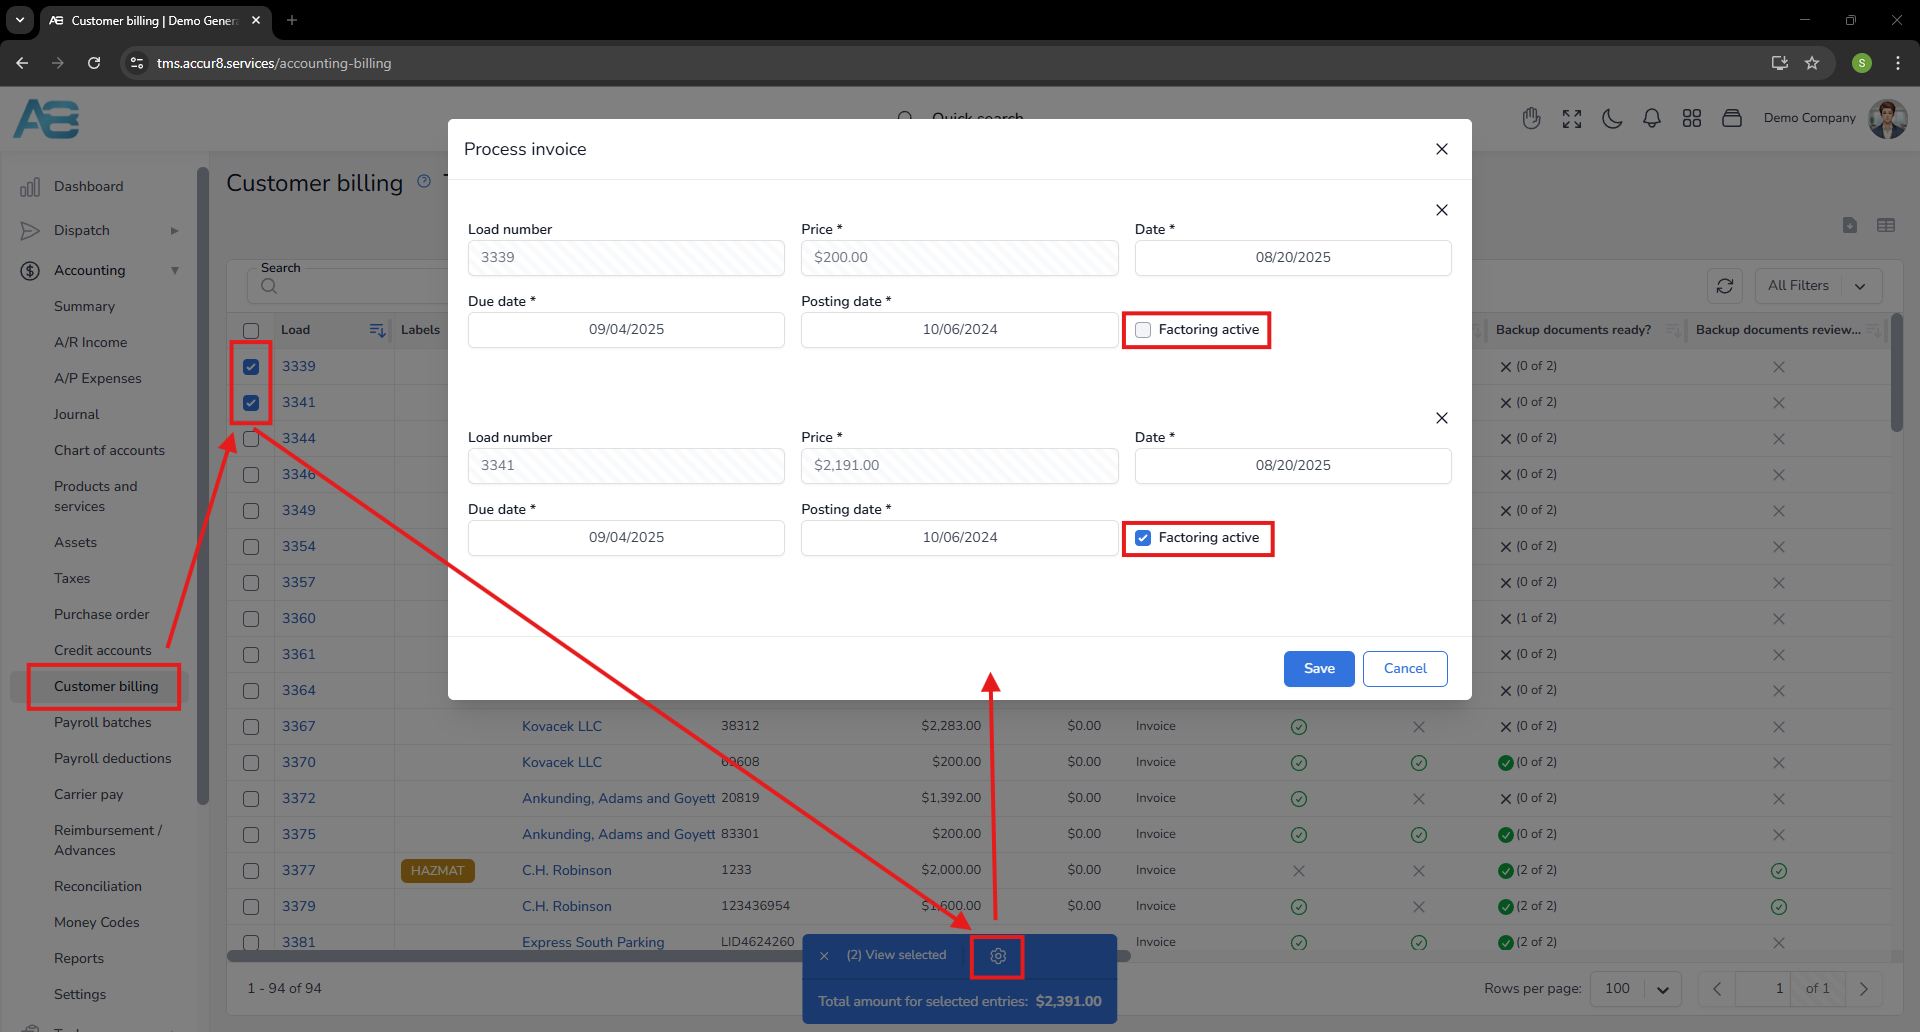
Additionally, you can complete this step through the Customer Billing page by clicking the Process button. This will open a window where you can check the Factoring Active checkbox.

If you need to mark several invoices, select them from the list and click the Process multiple billings button at the bottom of the page. A window will open, allowing you to check the Factoring Active checkbox next to each selected invoice.
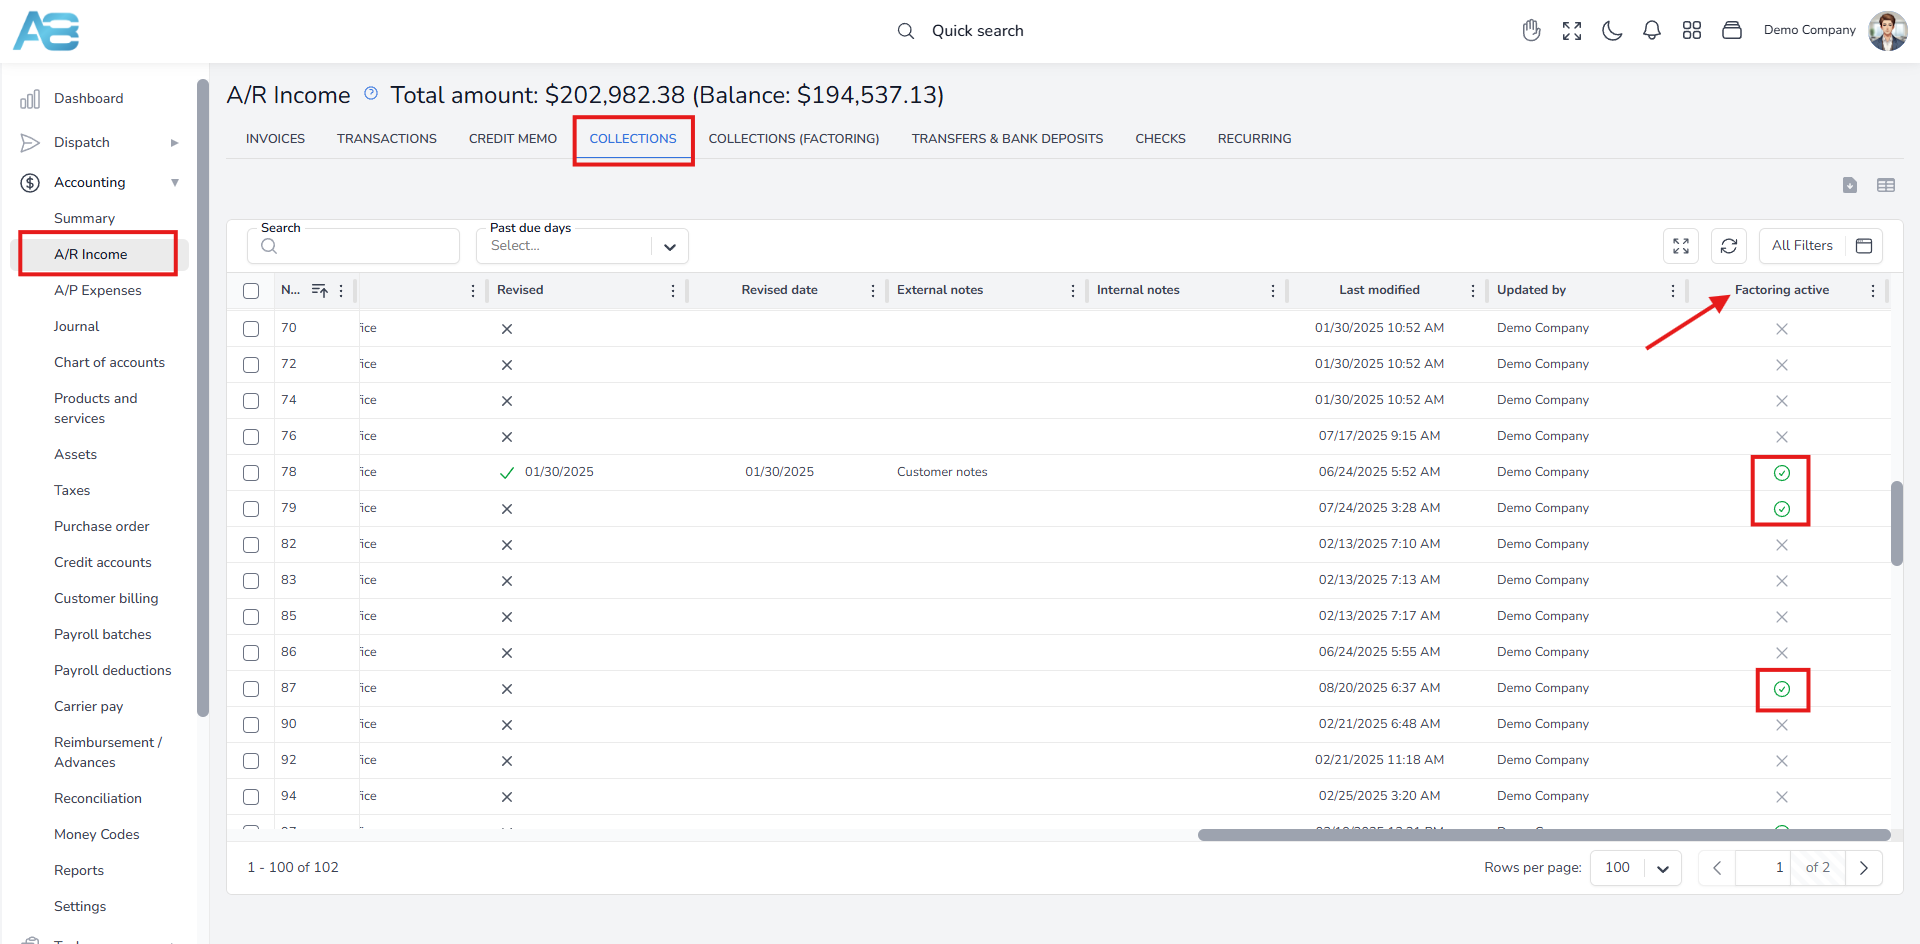
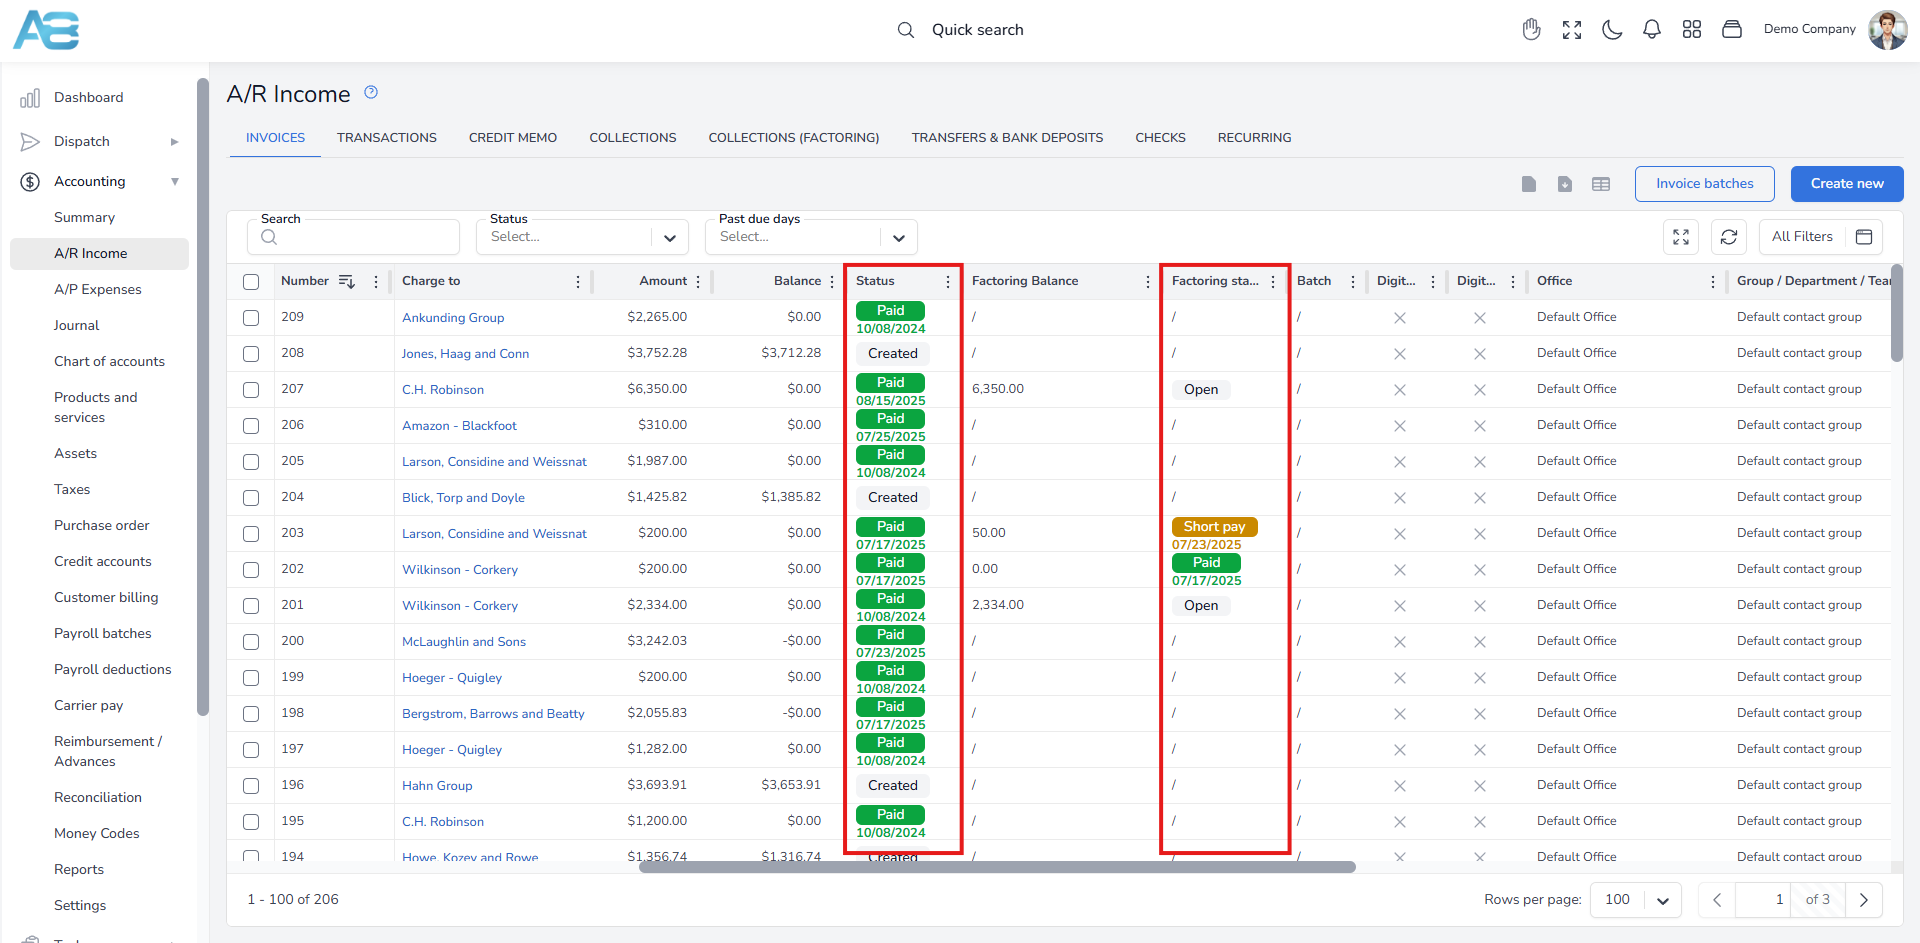
Note: By marking an invoice for factoring, new columns for monitoring factoring payments and balances will appear on the A/R Income main page. These columns will display the Factoring Balance and Factoring Status.
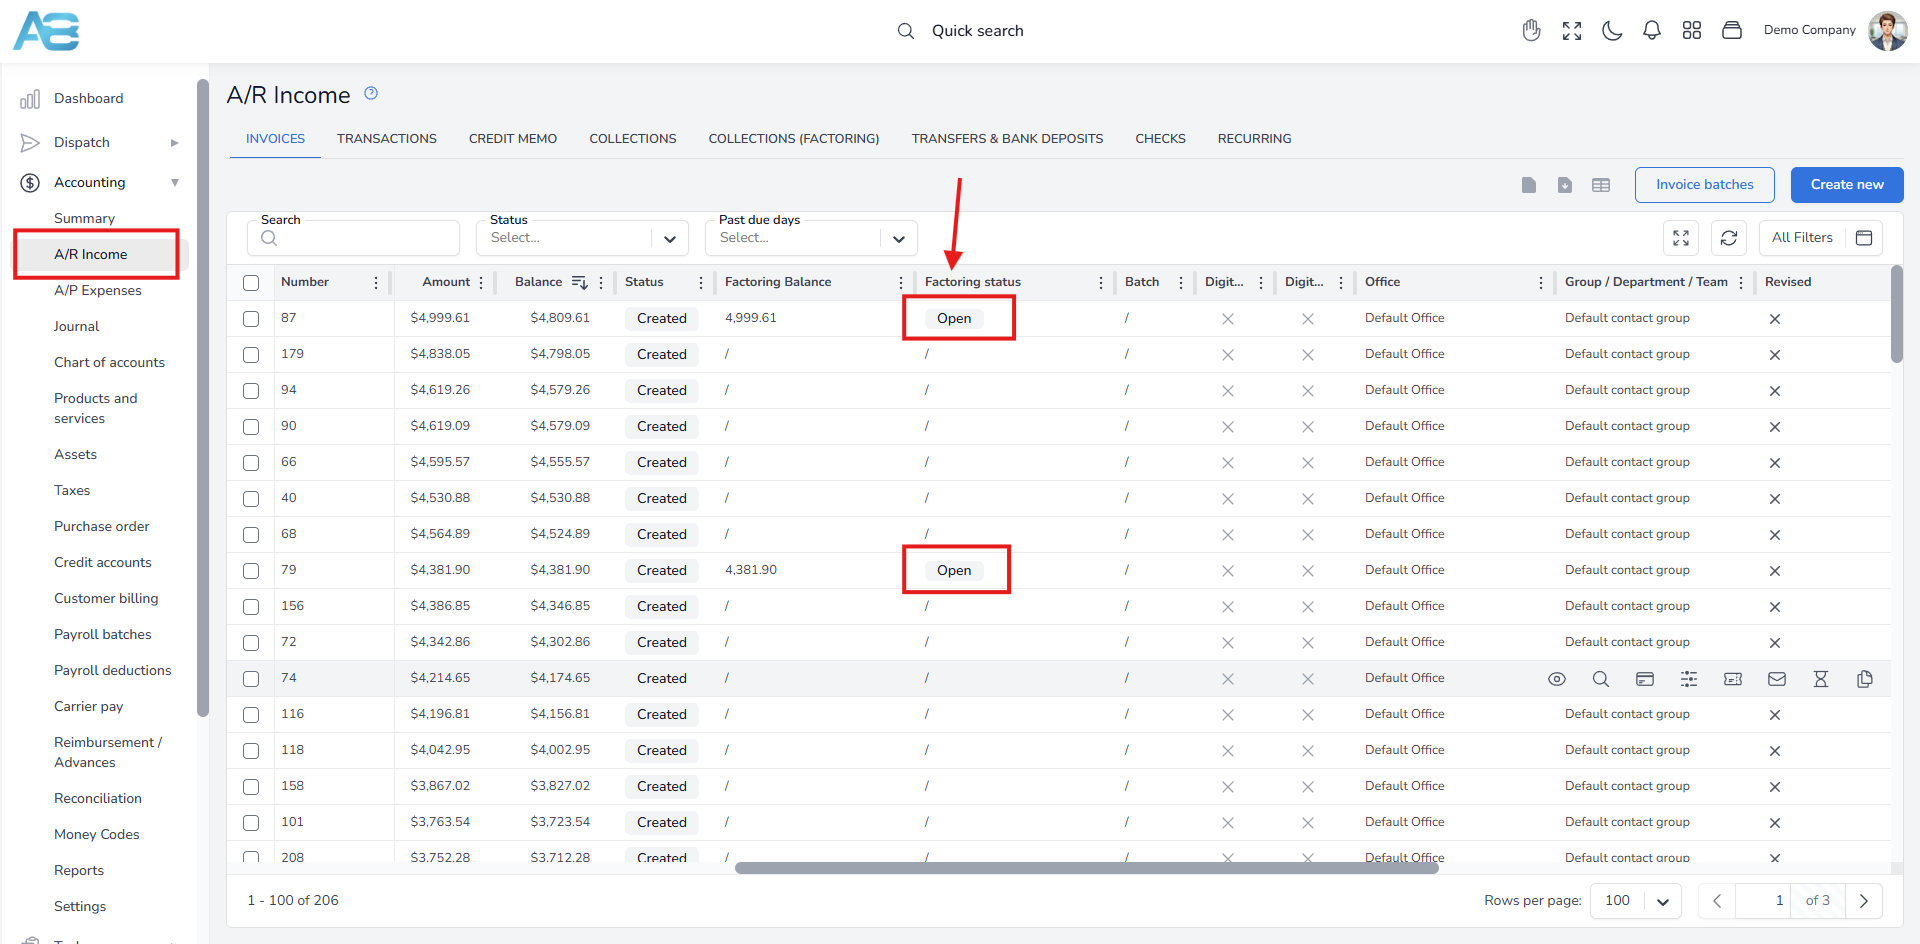
Additionally, if the factoring balance remains unpaid, the invoice will also be listed under the Collections (Factoring) tab.
Sending invoices to a customer via email #
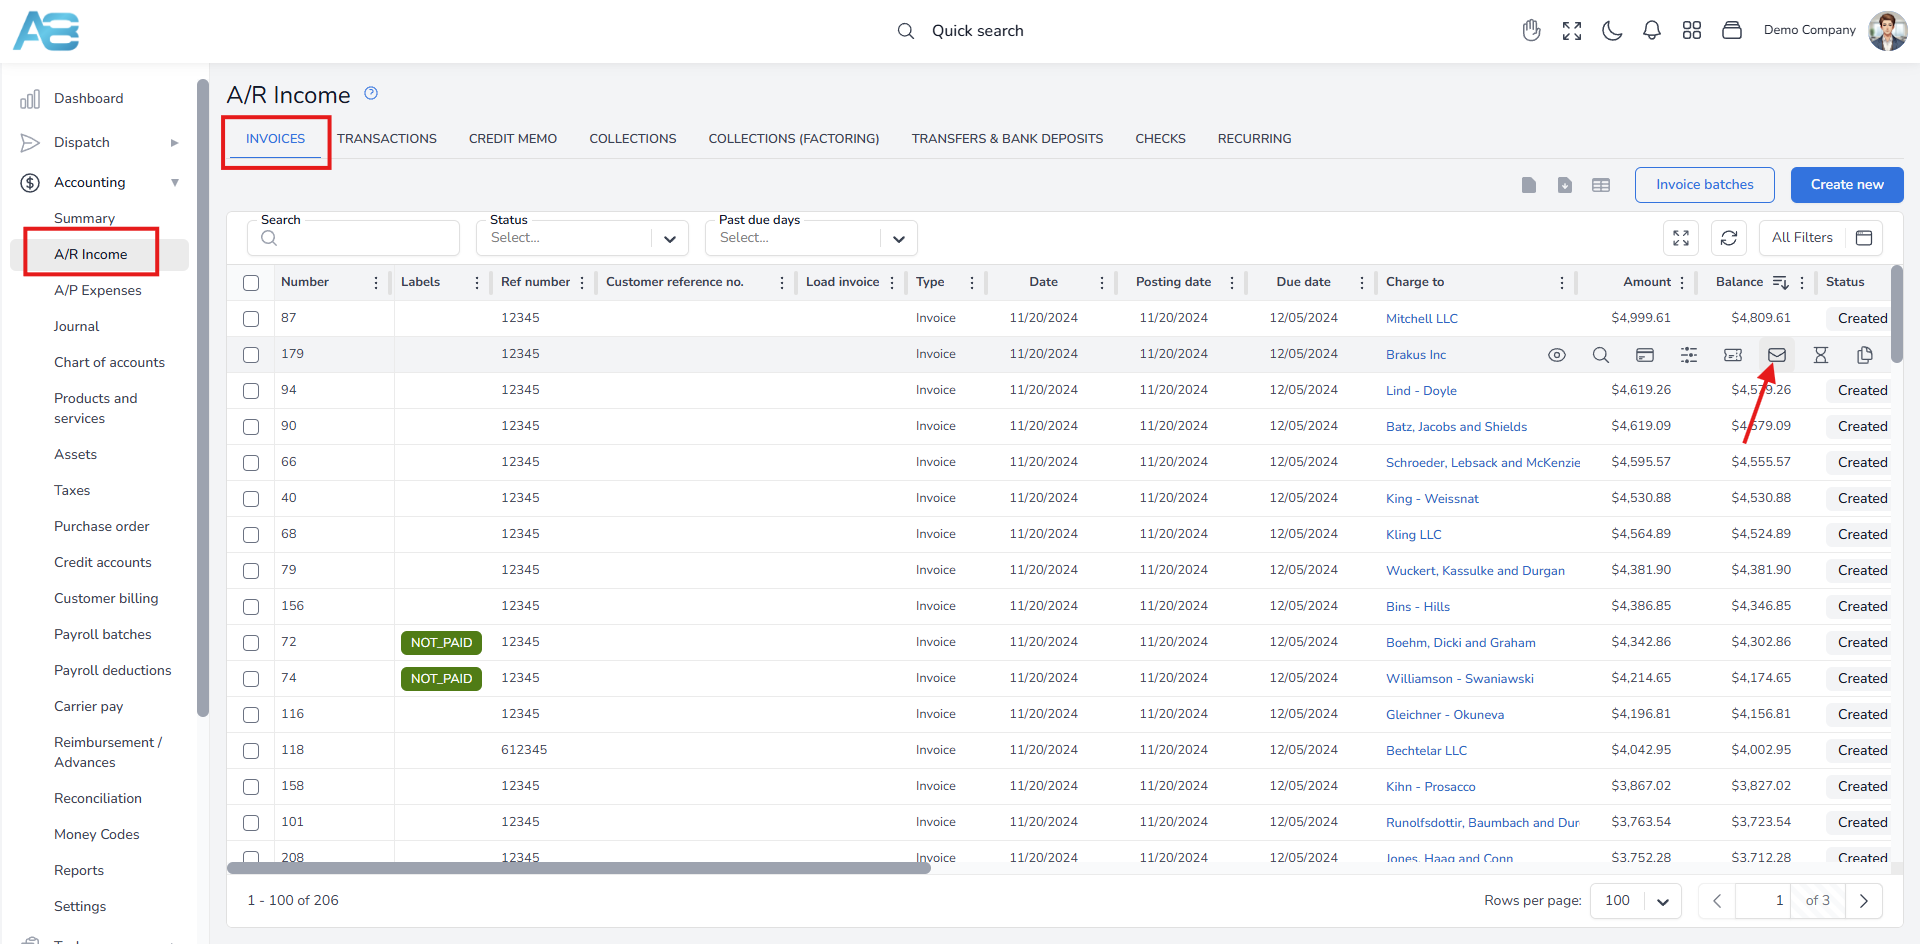
From the A/R Income page, you can send invoices to a single customer by hovering over the invoice and clicking the Send document via email option. After you receive confirmation from a customer that your invoices have been accepted, you can proceed with processing payments.
Downloading invoices as a batch for a factoring company #
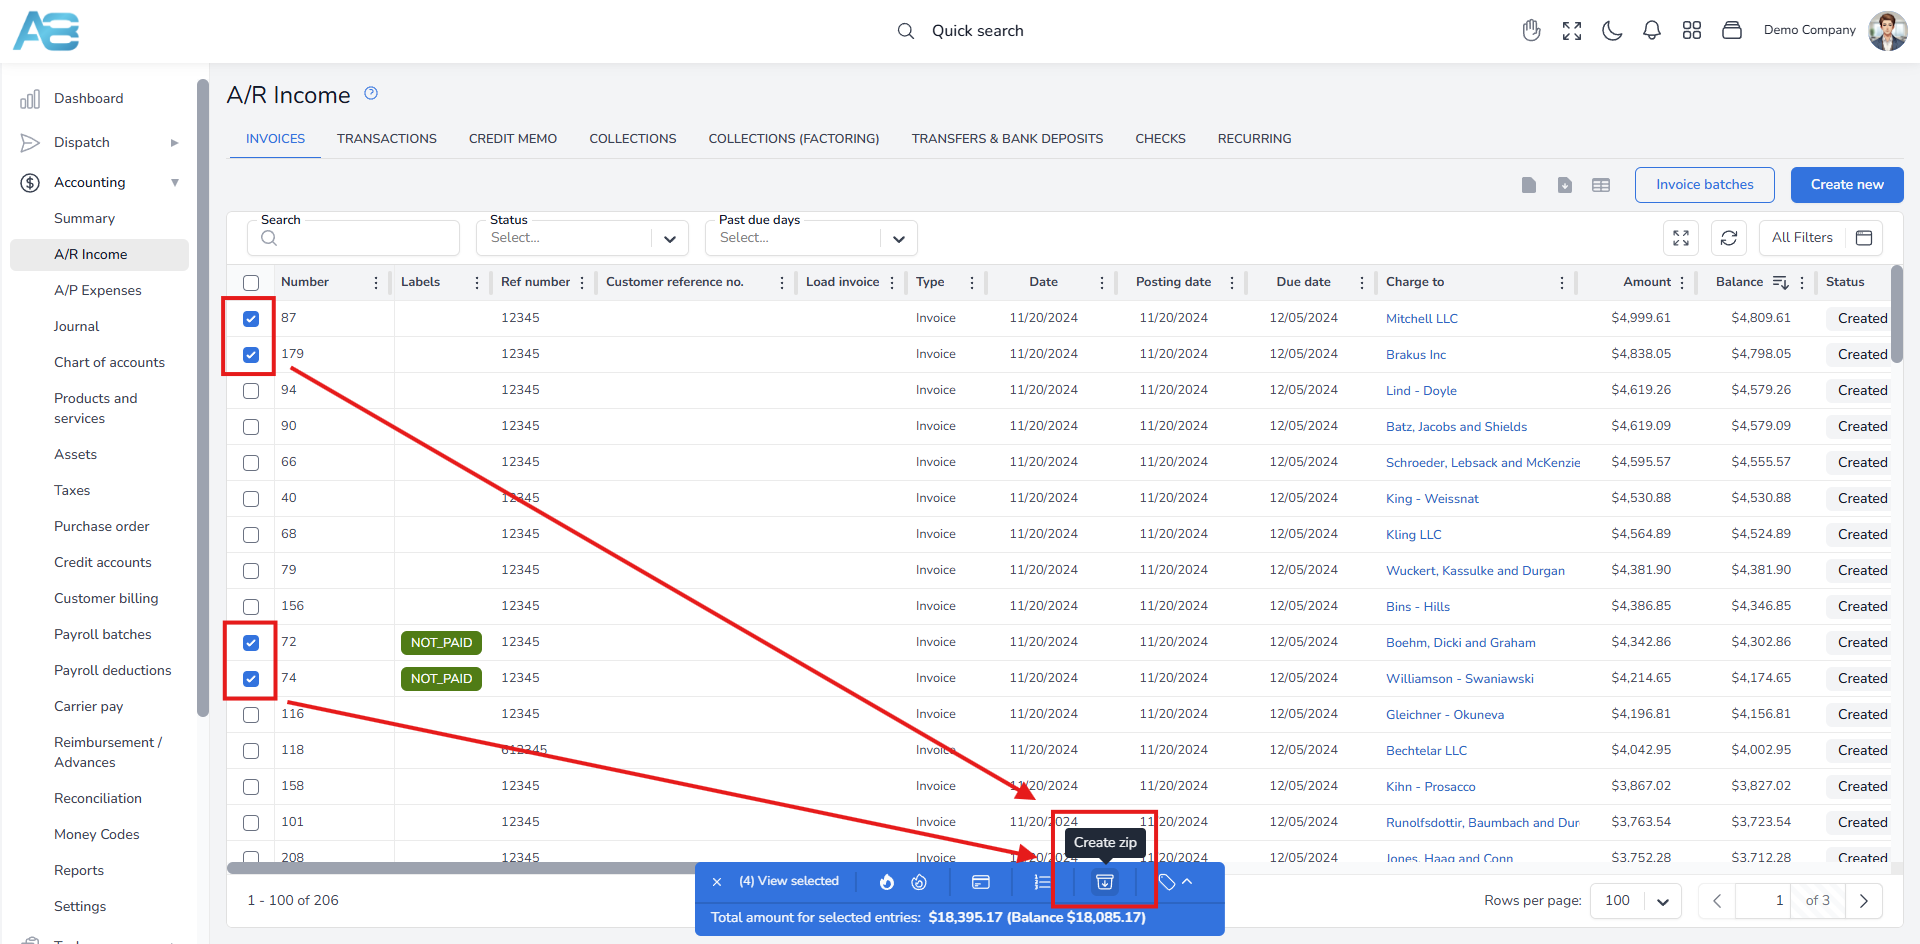
To create a zip batch for sending to a factoring company, select the desired invoices, and a window will appear at the bottom of the page. Click the Create zip button and wait for the system to package the documents.
Once the zipping process is complete, you will see a notification at the top center of the page stating Job Completed. Click the Open in a New Window button, and the system will redirect you to the Download Center, where your zipped files are stored.
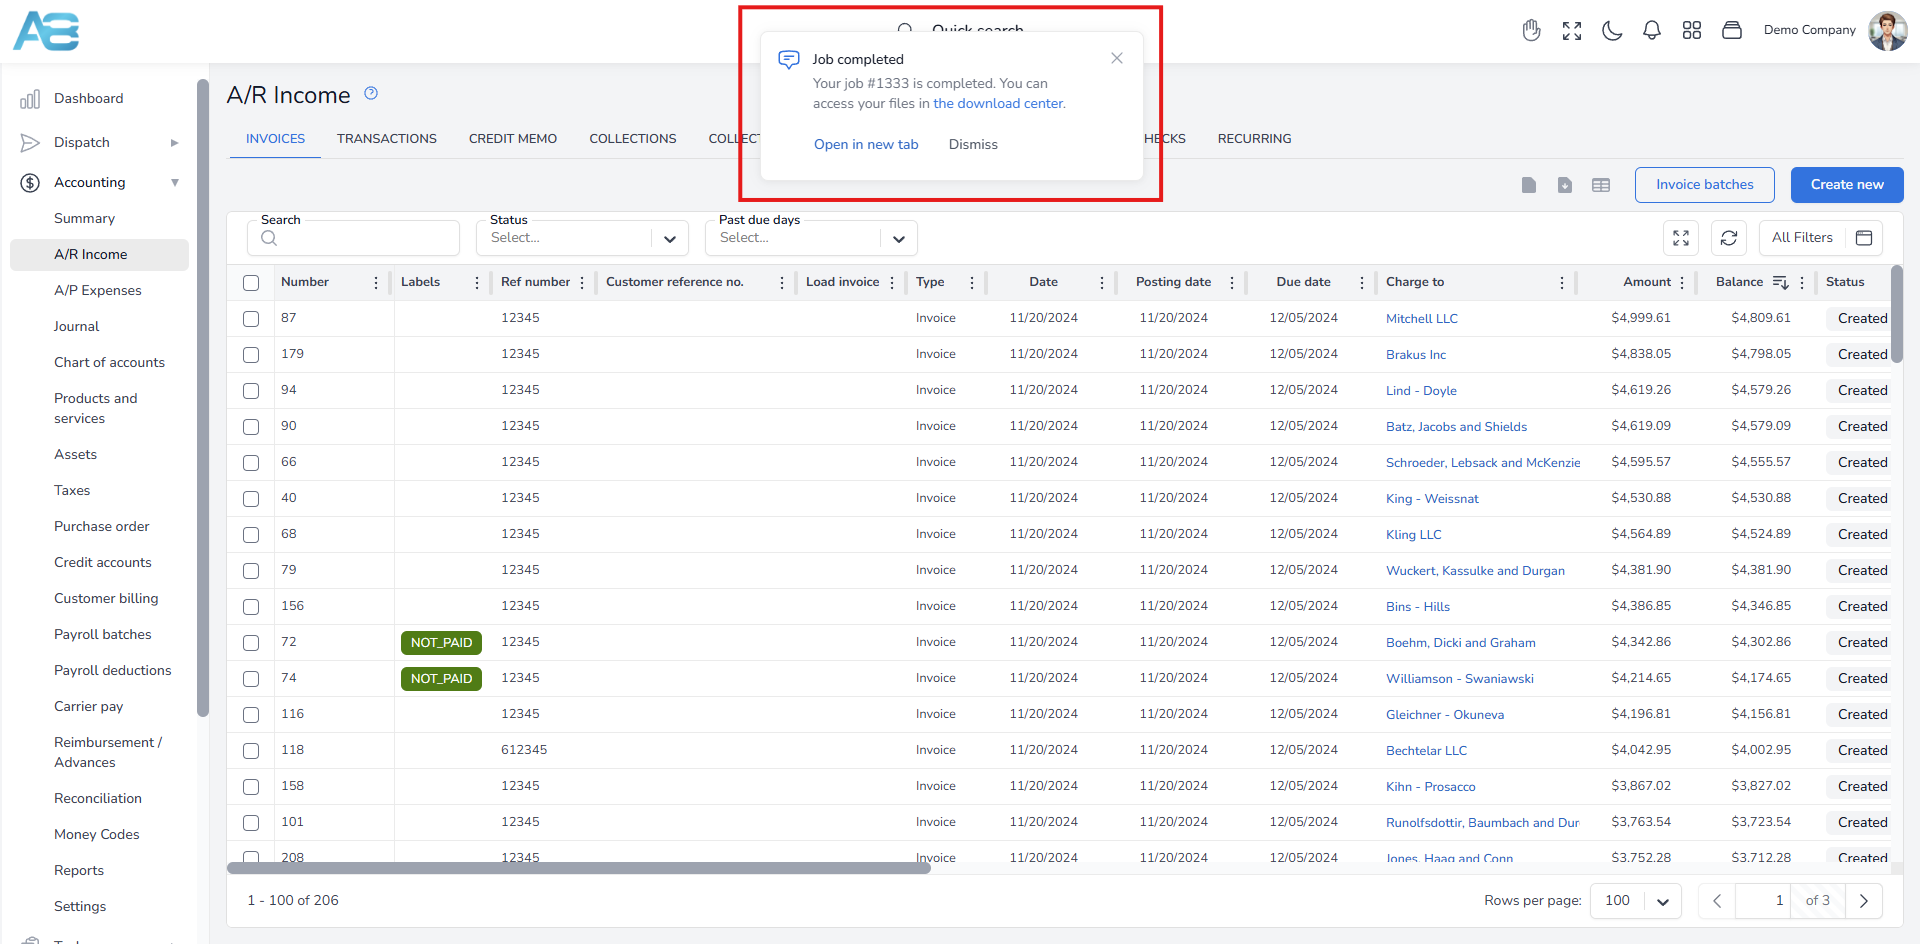
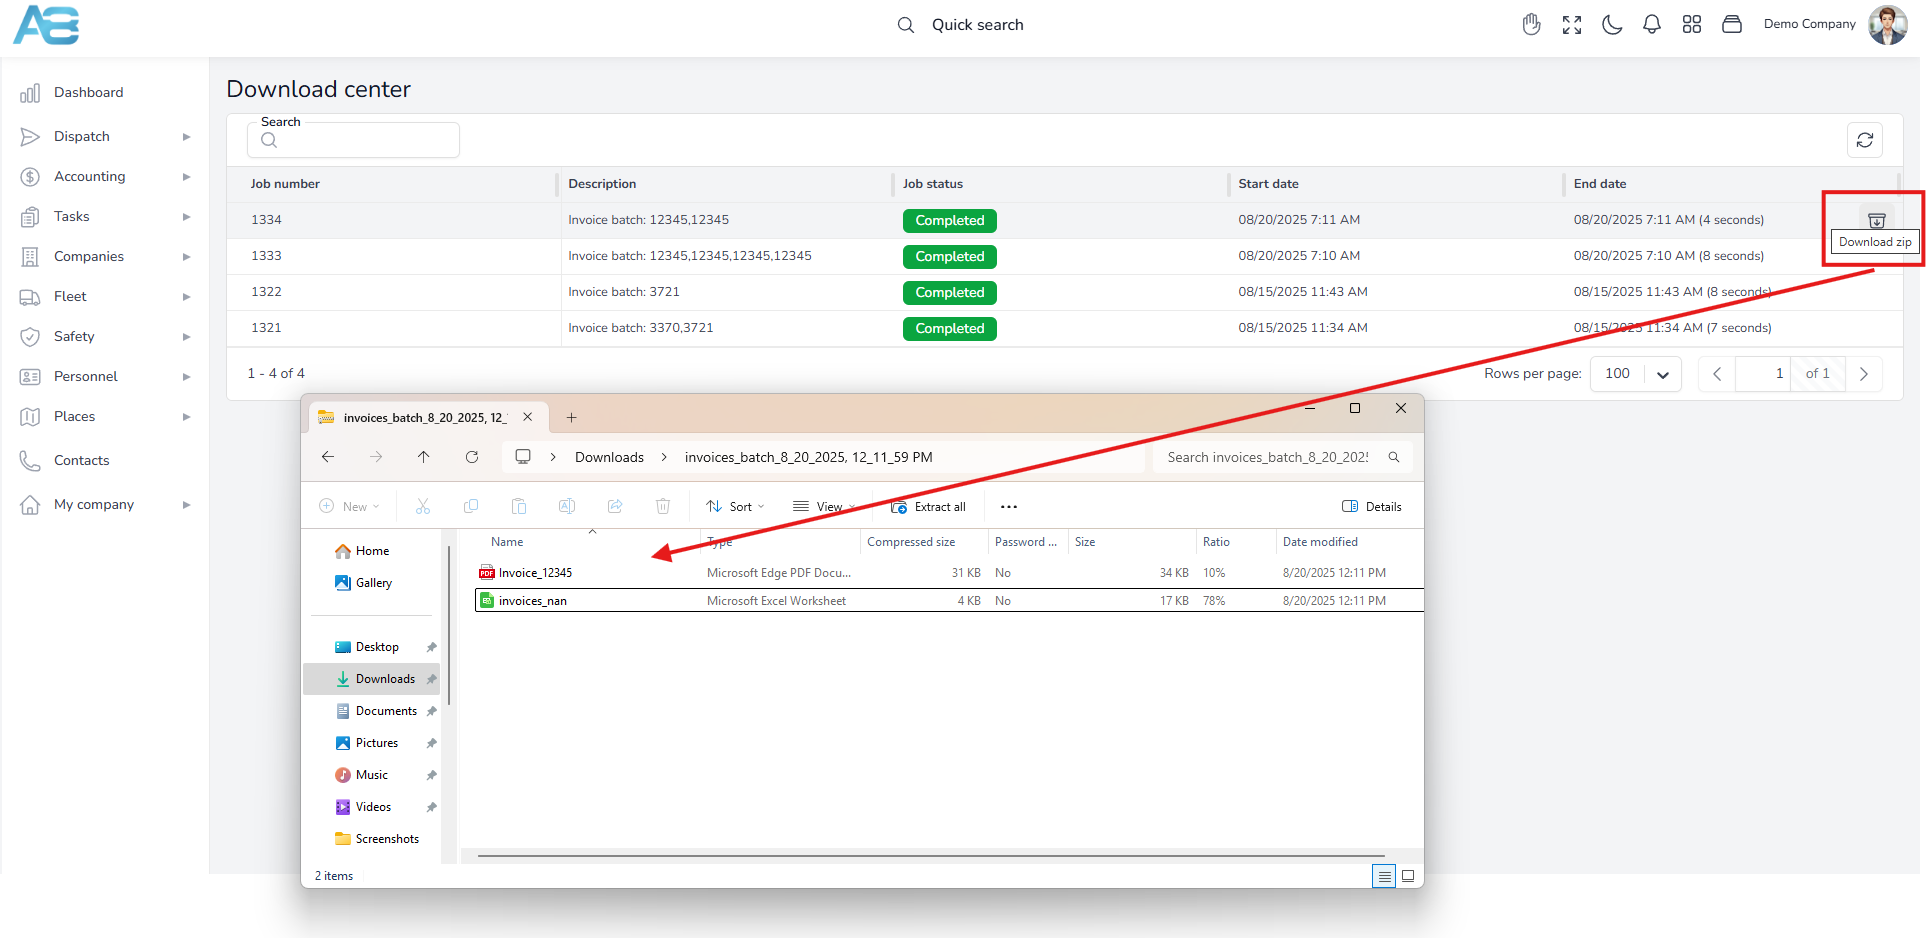
The zip file will contain all selected invoices along with an Excel file. You can download the zip file from the Download Center and send it to your factoring company for processing. After you receive confirmation from a factoring company that your invoices have been accepted, you can proceed with processing payments.
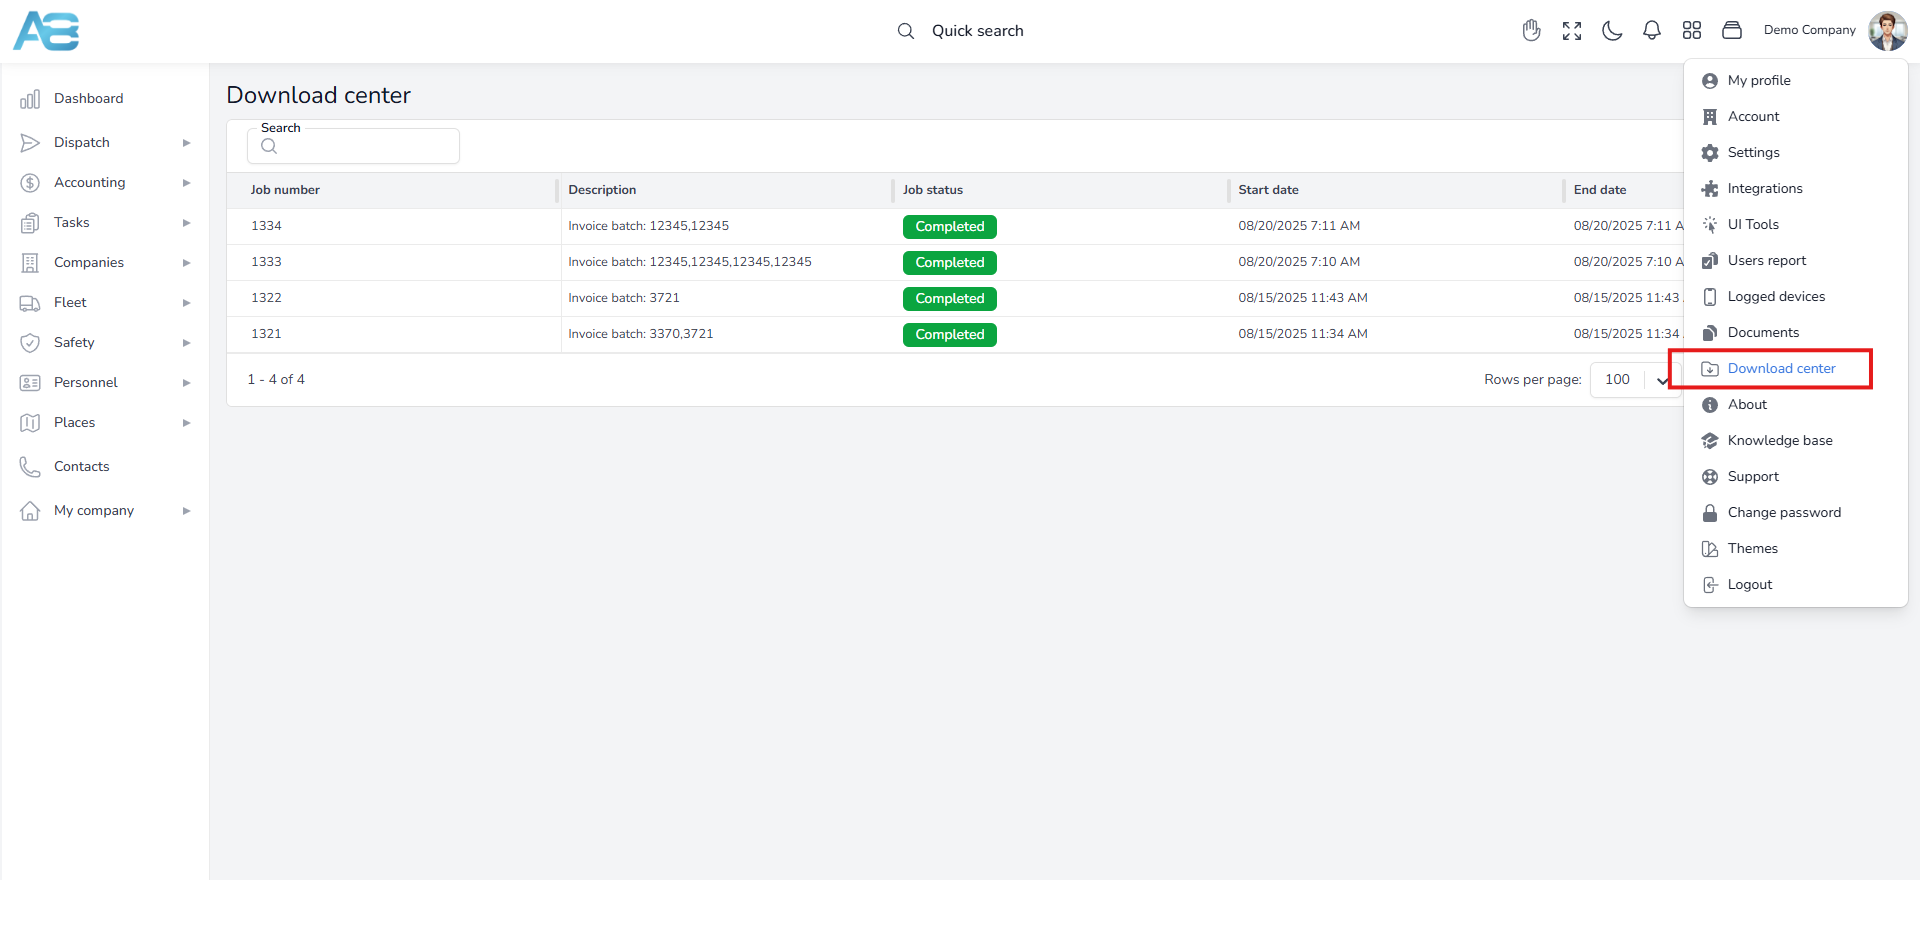
Note: You can access the download center by clicking the Profile button in the top right corner. A drop-down menu will appear, displaying the Download Center, among other options.
Marking regular invoices as paid by the customer #
Once a customer has confirmed that your invoice schedule has been accepted, you can mark the invoices as paid. To do this, go to the A/R Income page and select the accepted invoice. You can choose to pay a single invoice or select multiple invoices, which will be processed as a single bank transaction. To select only one invoice, hover over it and click the Receive Payment button.
When you select several invoices, a window will appear at the bottom of the page.
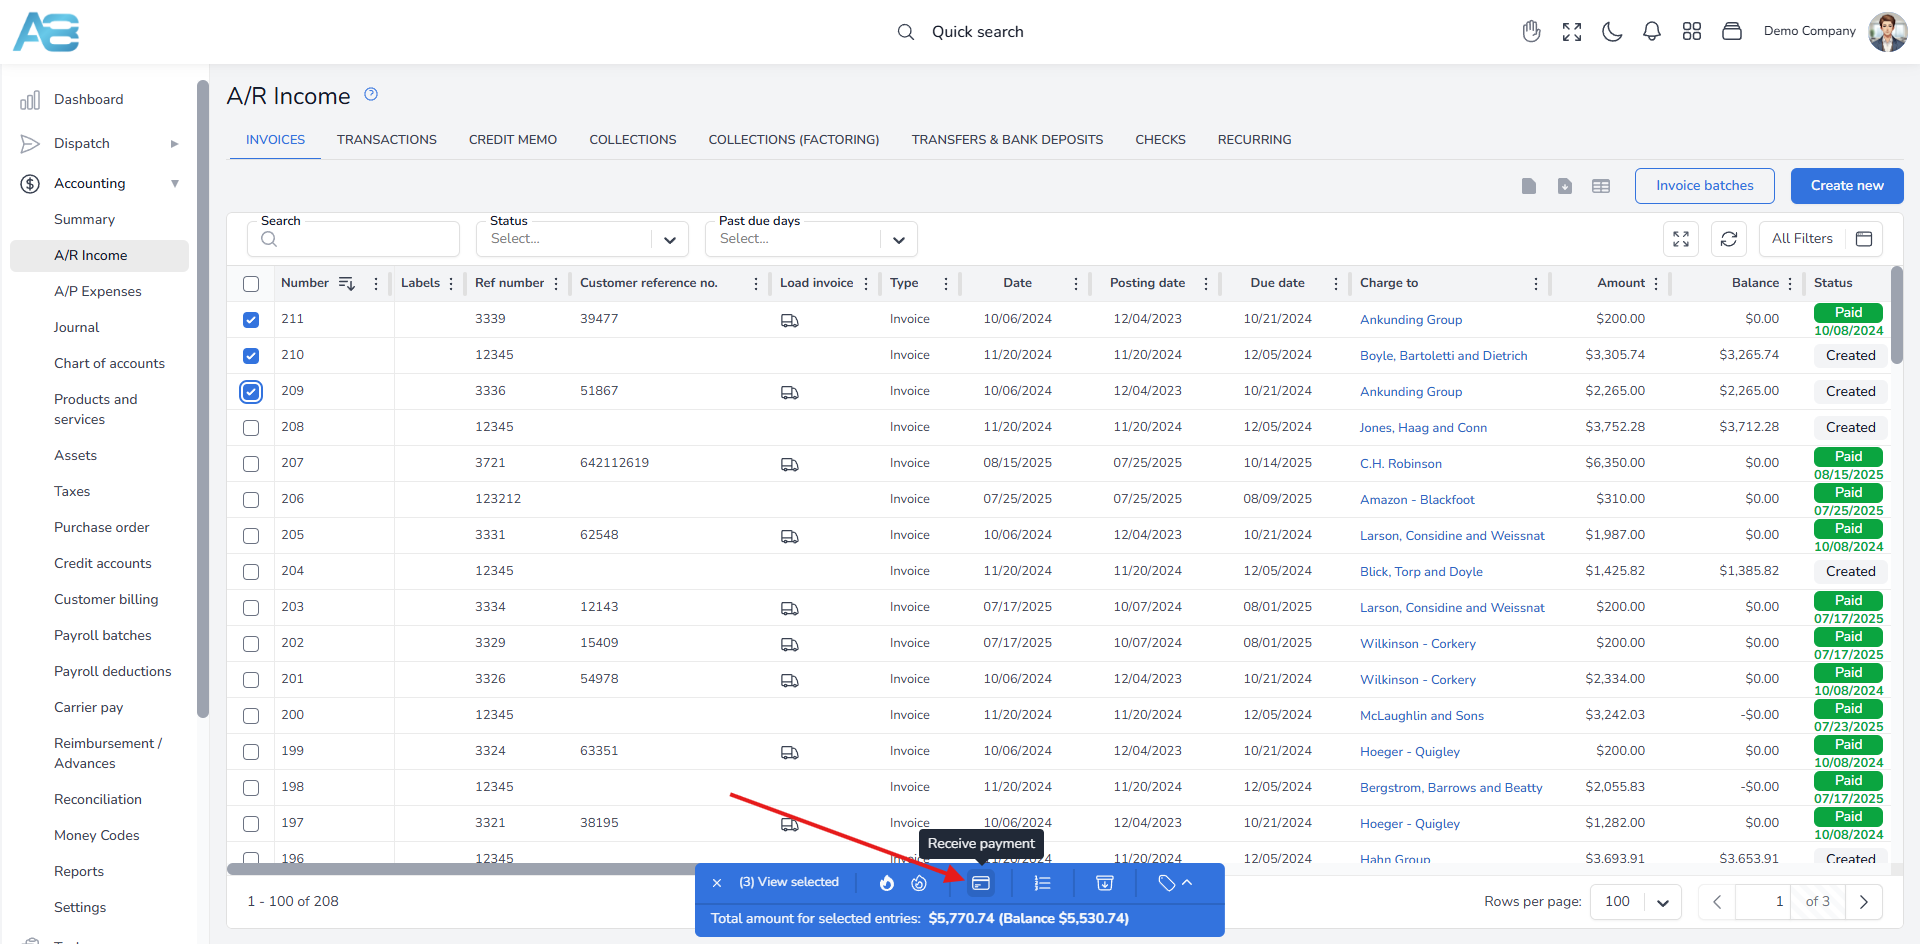
Click the Receive Payment button, and a pop-up window will open. First, select the Payment Type, and then choose the bank account in the Deposit To field where the payment will be deposited. Once you have completed these steps, click the Save button.
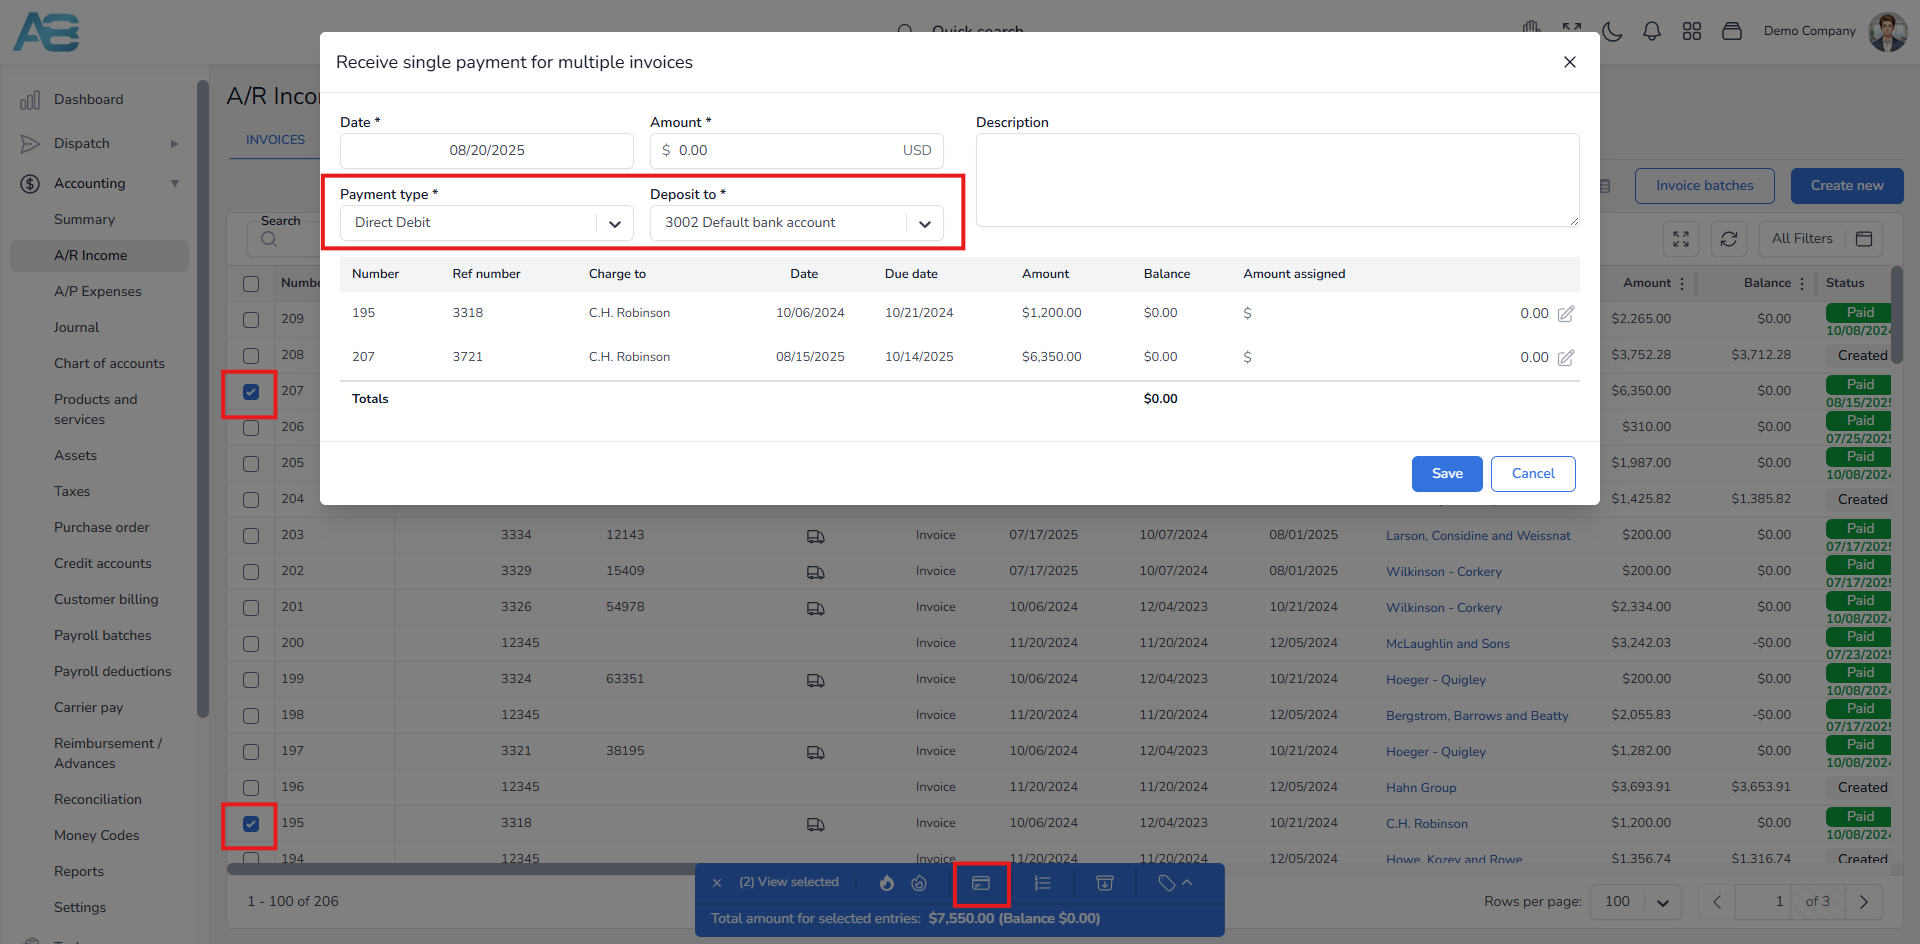
When this action is completed, the account balance should be zero, and the invoices will have a status of PAID along with the payment date.
Note: If you create multiple payments for different vendors/customers, the system will notify you with the following message: You are creating a multiple payment for different vendors/customers, please make sure this is correct. The system will write the payment as a single bank transaction.
Marking invoices as paid by the factoring company #
Once your factoring company confirms that your invoices have been accepted, you can proceed with marking invoices as paid. To do this, go to the A/R Income page and select the accepted invoices. A window will appear at the bottom of the page. Click the Receive Payment button, and a pop-up window will appear.
In the pop-up window, follow these steps:
- In the Payment Type field, select the Factoring option
- In the Deposit To field, choose the bank account where the payment will be deposited
- In the Processing Fee field, enter the amount charged by the factoring company for their service
- In the Processing Expense Account field, select the account used to track all fees paid to the factoring company
- After completing these steps, click the Save button.
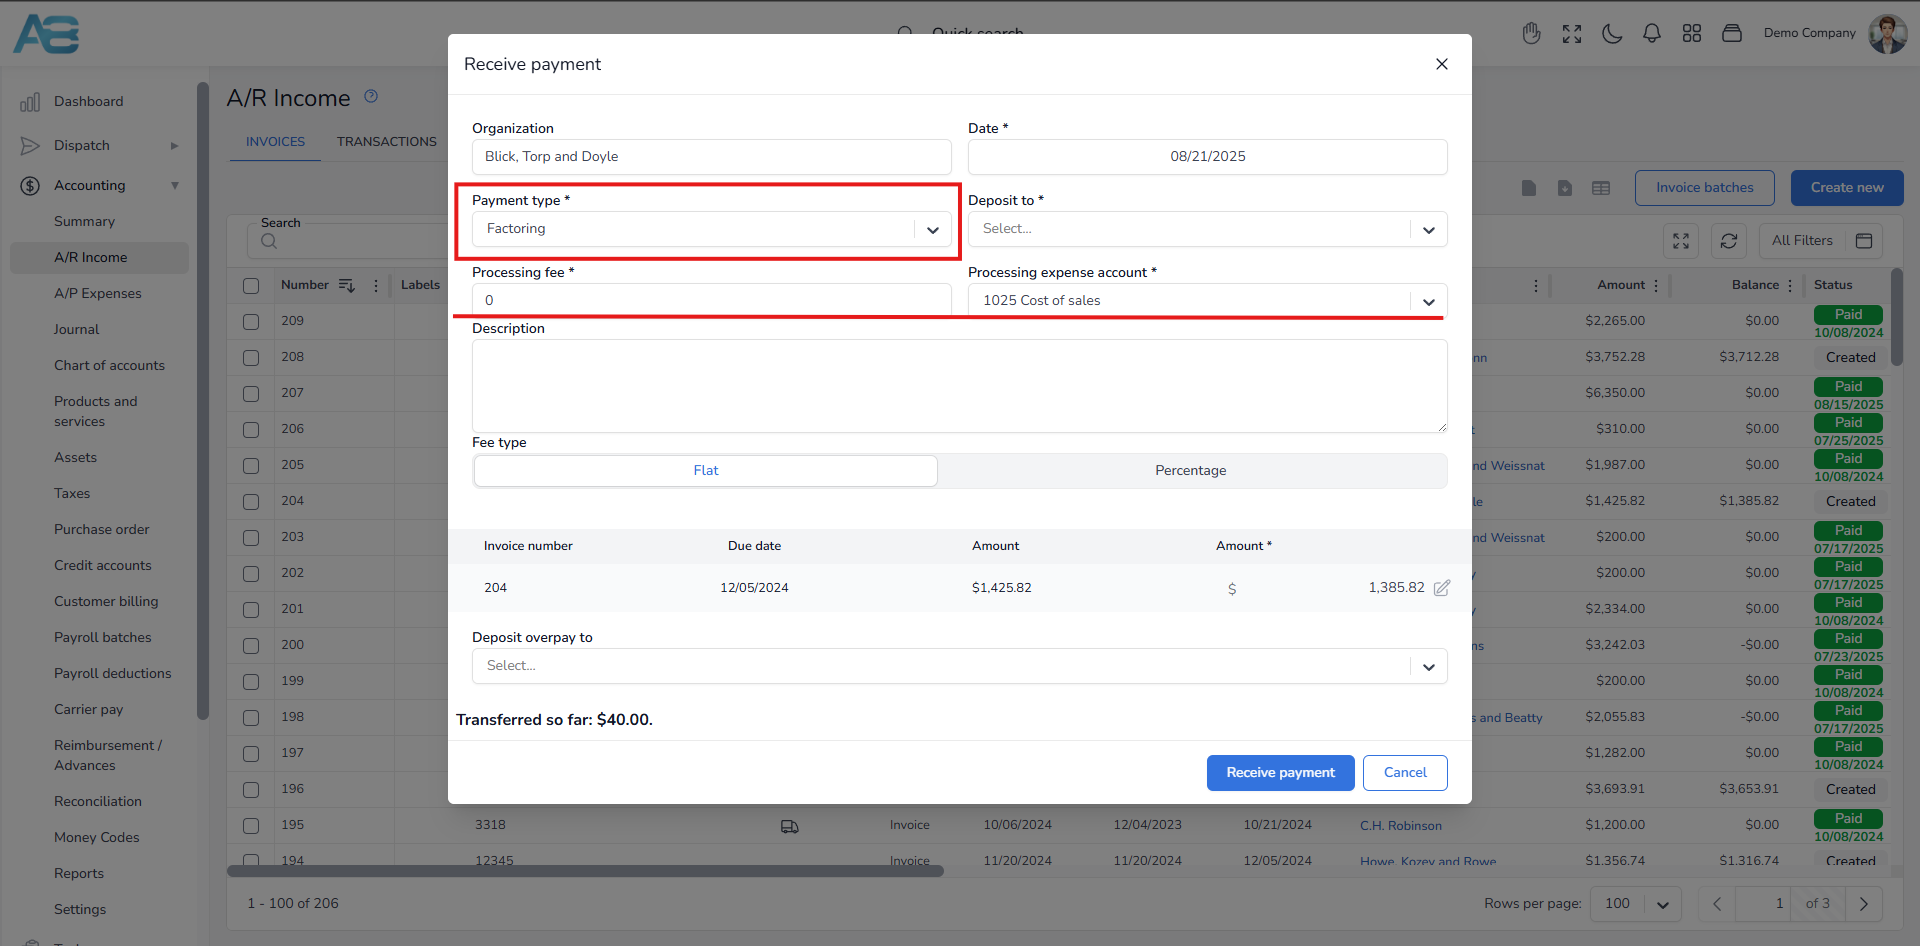
Note: The Amount field will be auto-populated. However, if the factoring company agrees to pay only part of the invoice, you can enter the approved amount in the Receive payment window by clicking the pencil icon and saving it.
When this action is completed, the account balance should be zero, and the invoices will have a status of PAID along with the payment date. This process enables you to receive a single payment for multiple invoices, as the system records the payment as a single bank transaction.
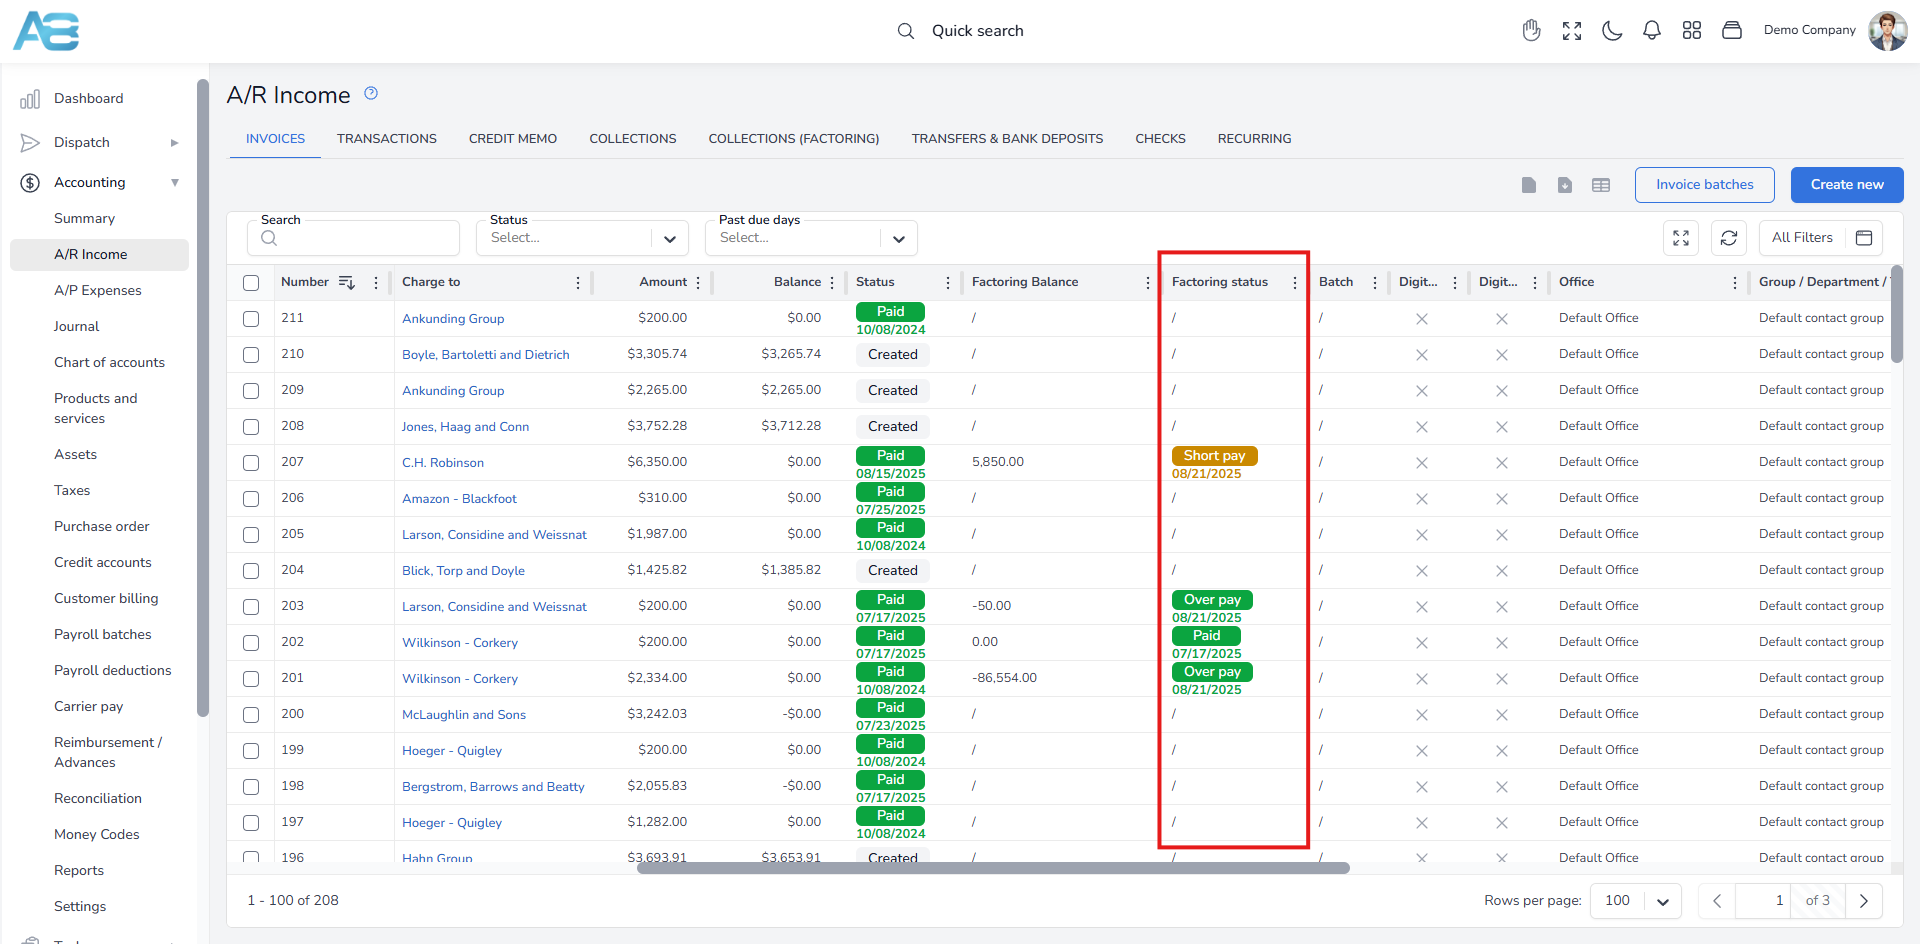
On the A/R Income page, you can track both the invoice and factoring status. In the Status column, you will see PAID, and in the Factoring status, OPEN. This indicates that the factoring company has accepted your invoice, but you are uncertain if the customer has paid it yet.
Setting Factoring Balance #
The ACCUR8 Factoring Balance feature allows you to track the status of payments to a factoring company. When you receive funds from a factoring company after it has purchased your invoices, it does not guarantee that the end customer has paid their debt to the factoring company. This feature enables you to verify whether customers have fulfilled their obligations.
To check the payment status, navigate to the Collections Factoring tab. Hover over the invoice in the list and click the balance icon labeled Set Factoring Balance.
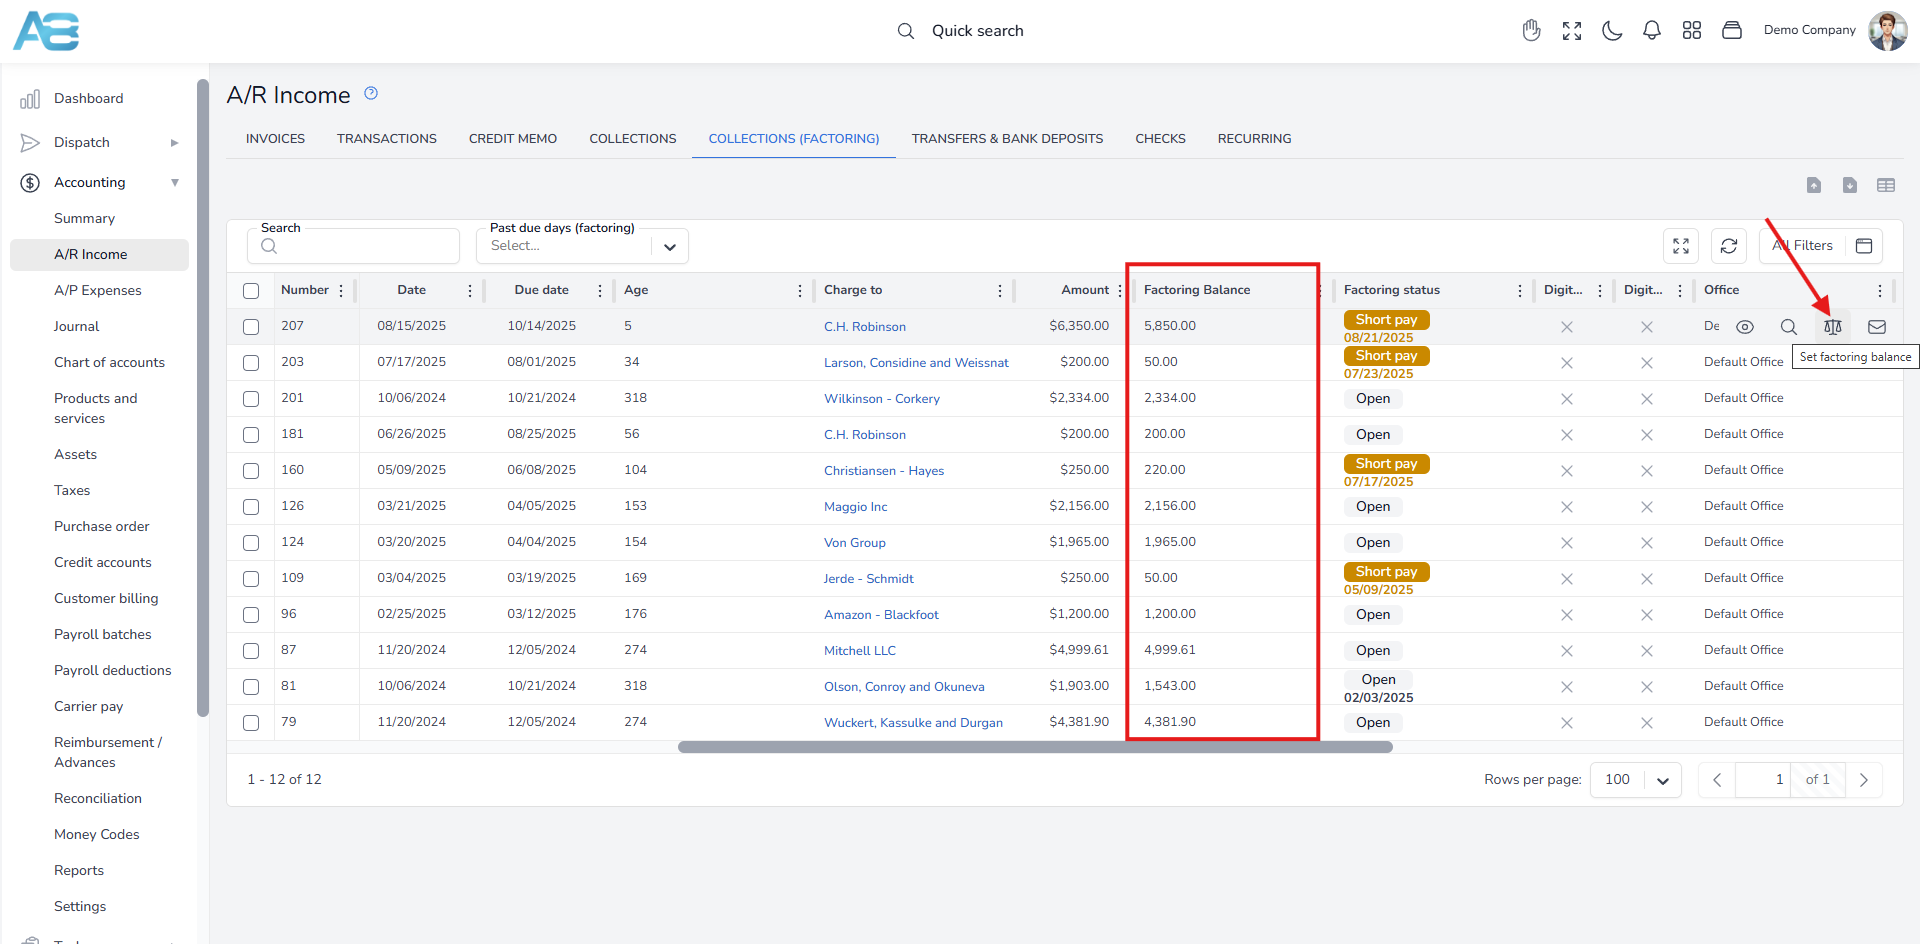
A pop-up window will appear, allowing you to enter the paid amount and the payment date. After you save this information, the Factoring balance column should display zero, and the Factoring Status will update to PAID, along with the payment date.
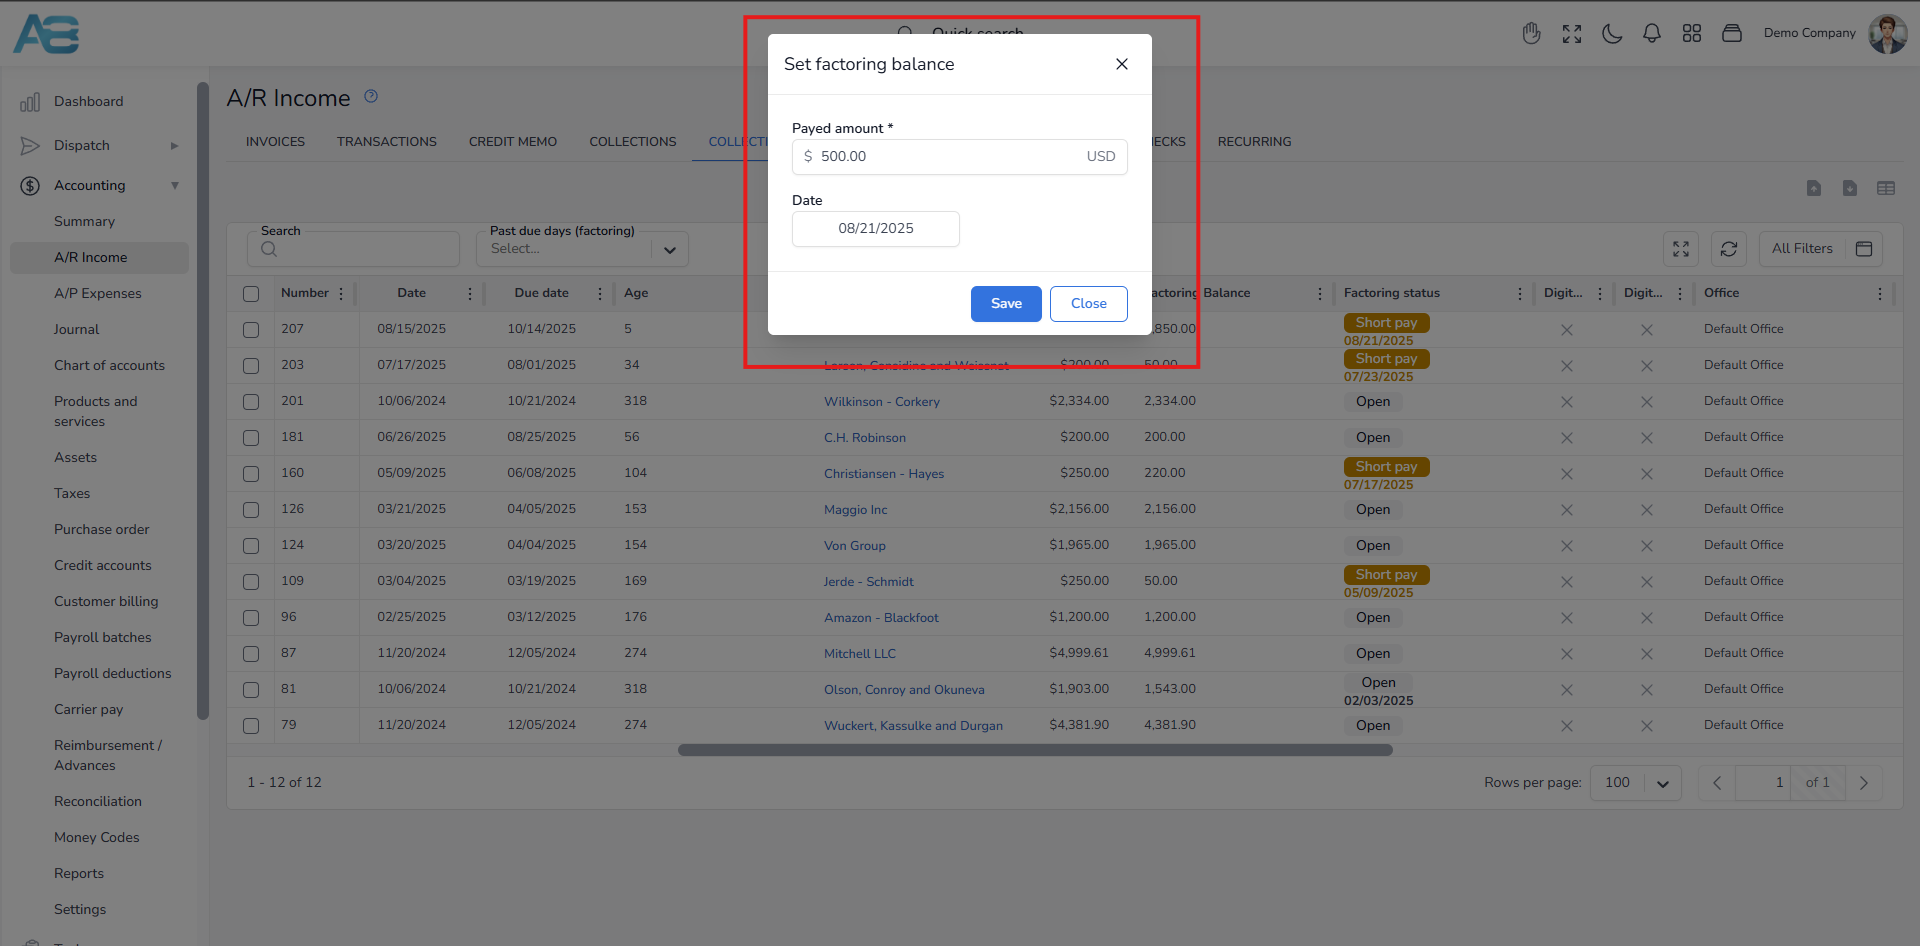
If you enter an amount that is less than what is owed, the Factoring Status column in the Invoice tab will display a yellow note indicating Short Pay. Contrarily, a green note will be displayed indicating Overpay if you enter an amount greater than what is owed.
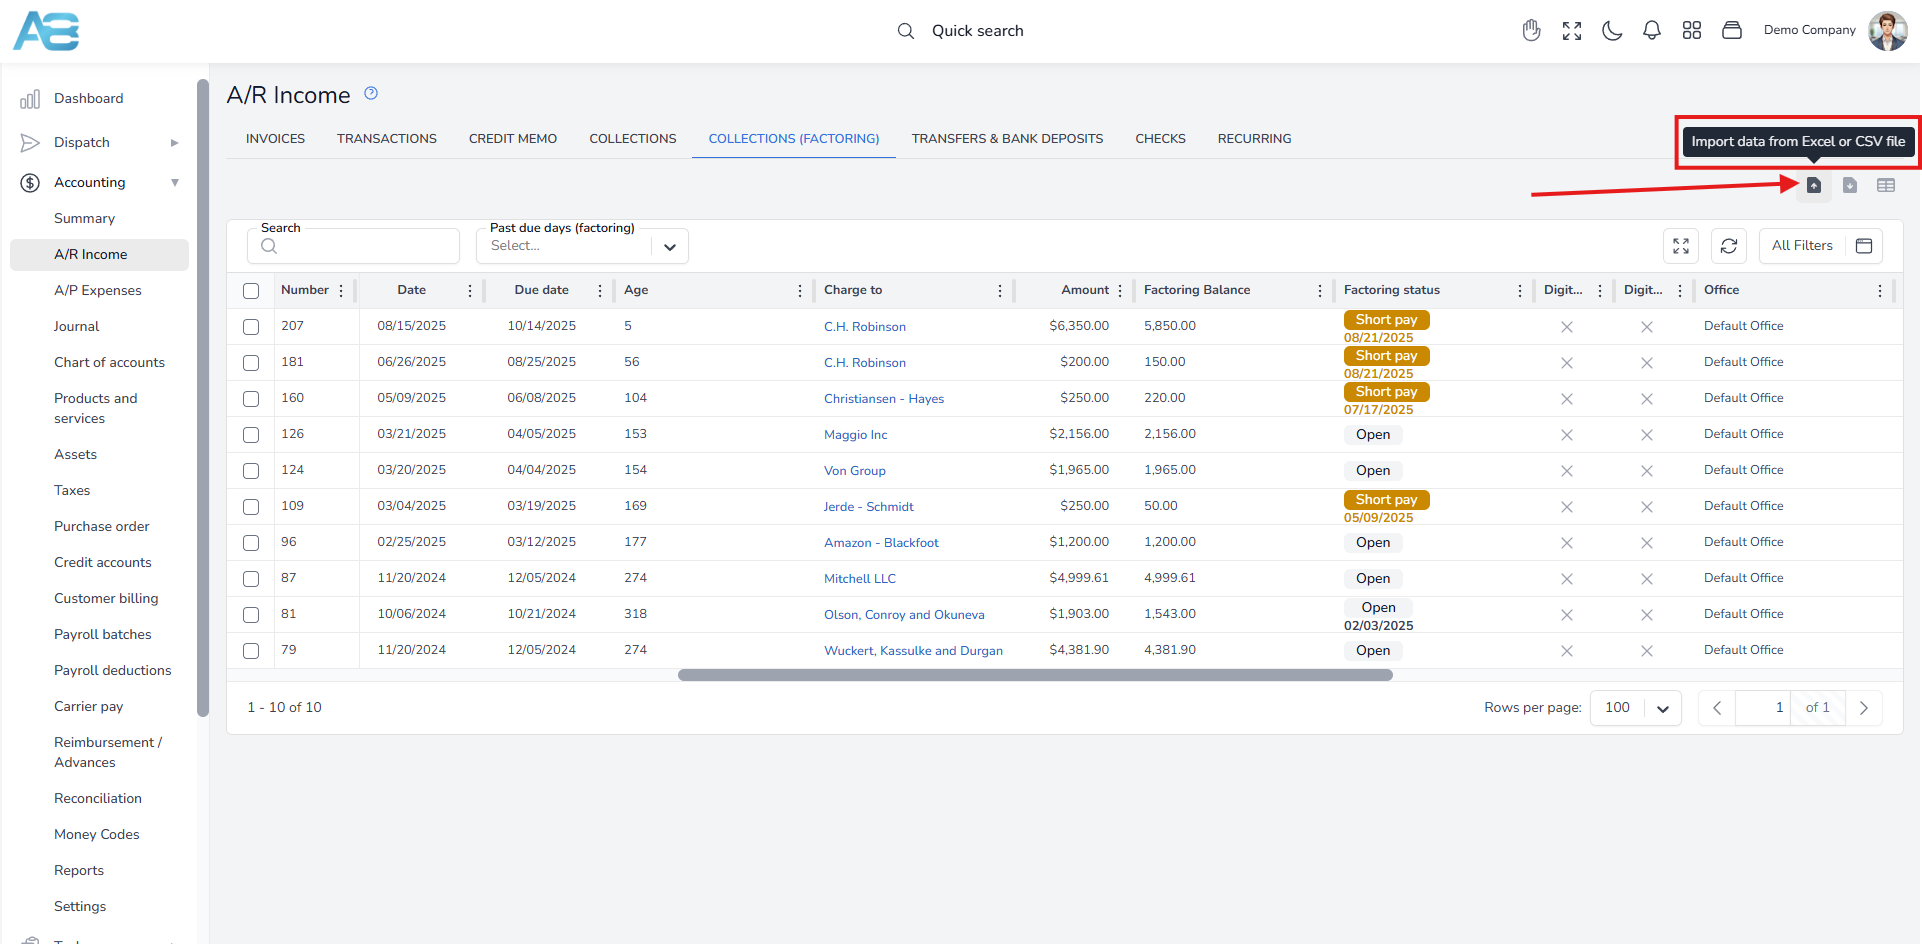
If you have several invoices, you can easily import them into the system by clicking the Import data from the Excel or CSV file button at the top-right corner of the screen. Ensure that you import a report from the factoring company that includes the load numbers, invoice numbers, and balance details.
Adding an accessorial after the load is invoiced #
If you need to add an accessorial after a load has been invoiced, follow these steps:
1. Navigate to the Pricing tab of the selected load.
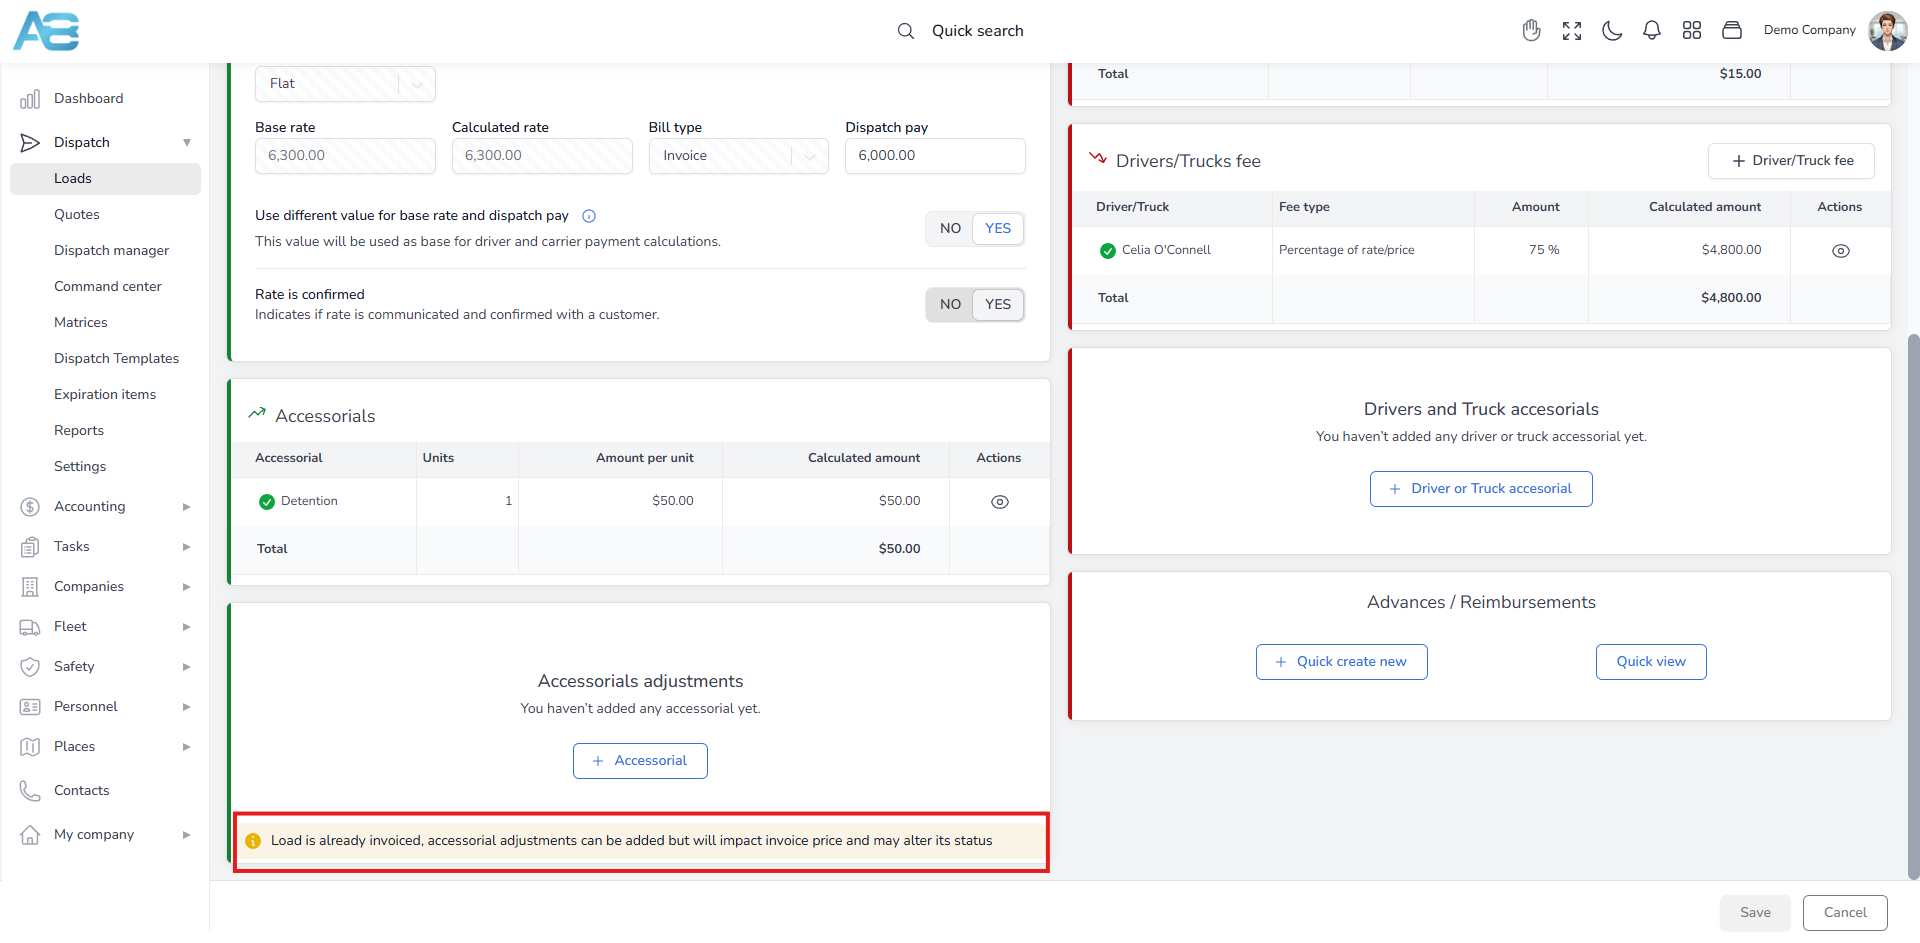
2. Scroll down to the Accessorials Adjustments section. You will see a notification stating: Load is already invoiced; accessorial adjustments can be added, but they will impact the invoice price and may alter its status.
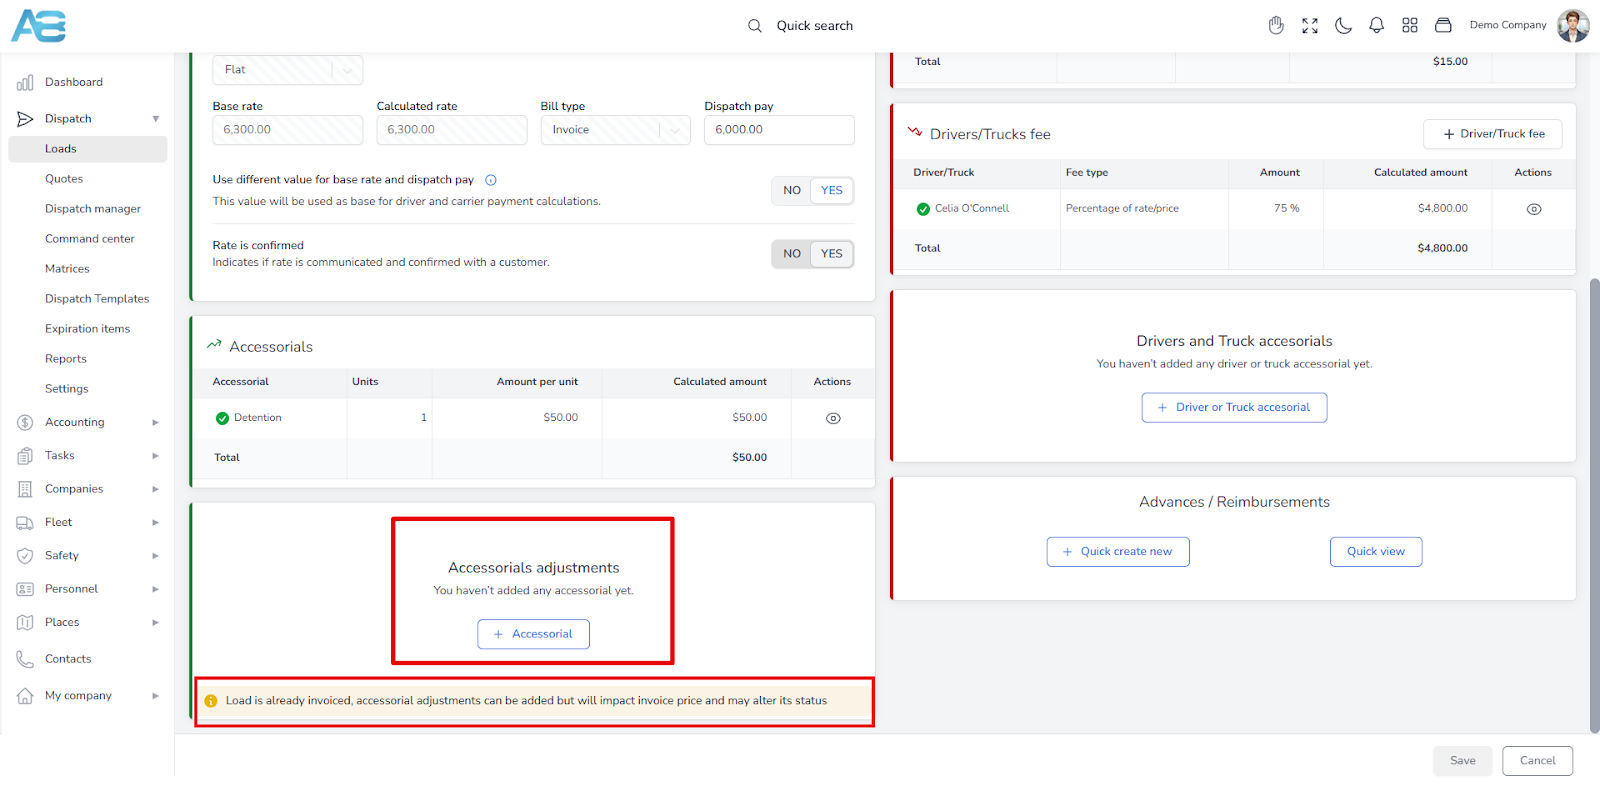
3. Click the Accessorial button. A new window will appear.
4. From the drop-down menu, select the desired Accessorial type, then enter the number of Units and the Amount per unit.
5. Choose either the Charge or Deduction option, depending on how it will affect the customer’s charge.
6. Once you have filled in all the information, click the Save button, and then click the Save button again at the bottom right corner to confirm your changes.
After saving, a notification will appear at the top of the screen, indicating that an accessorial has been added to the selected load, and the invoice status is now set to Created/Revised.
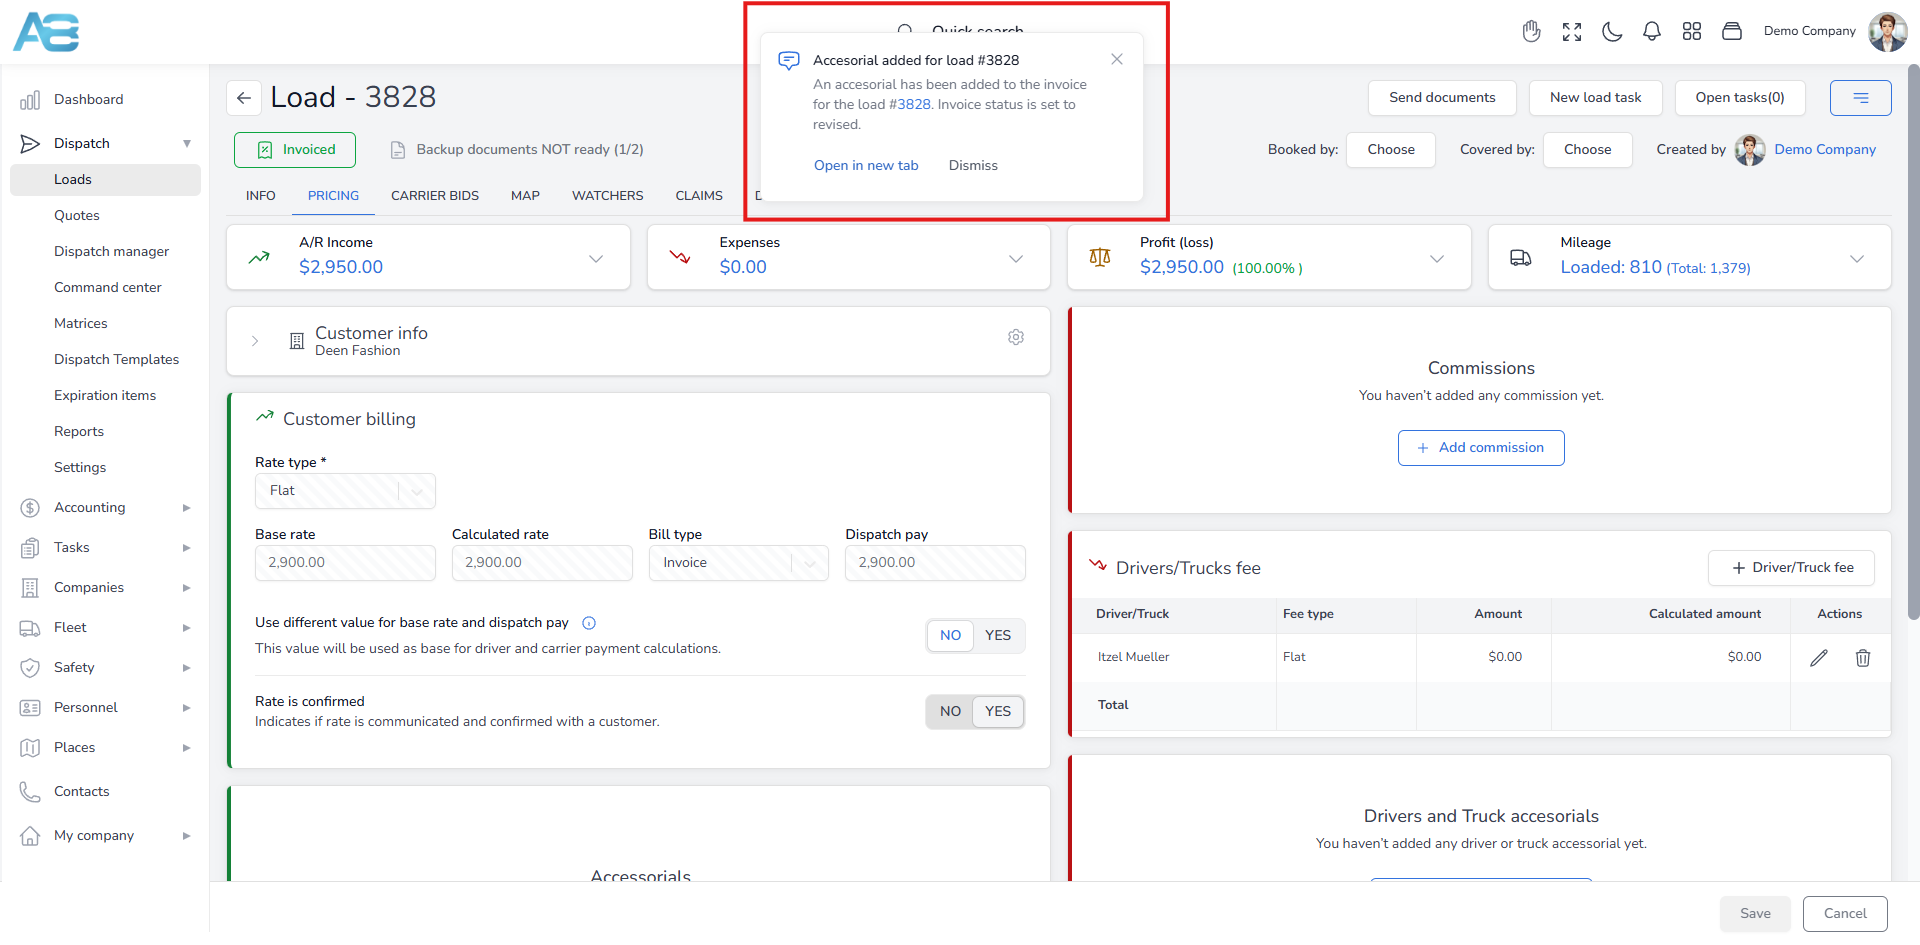
The system will also notify the person who created the invoice and all users on the mailing list specified in the Dispatch settings, under the Default email(s) for editing or adding accessorials after the load is invoiced option.
To verify this change, navigate to the A/R Income page and click on the invoice in the list. On the Info tab, under the Items section, you will see that the accessorial has been added to the invoice, and you can proceed with the receiving payments option.
Correcting a paid invoice #
If you realize you have made a mistake and the invoice has already been paid, follow these steps to correct it.
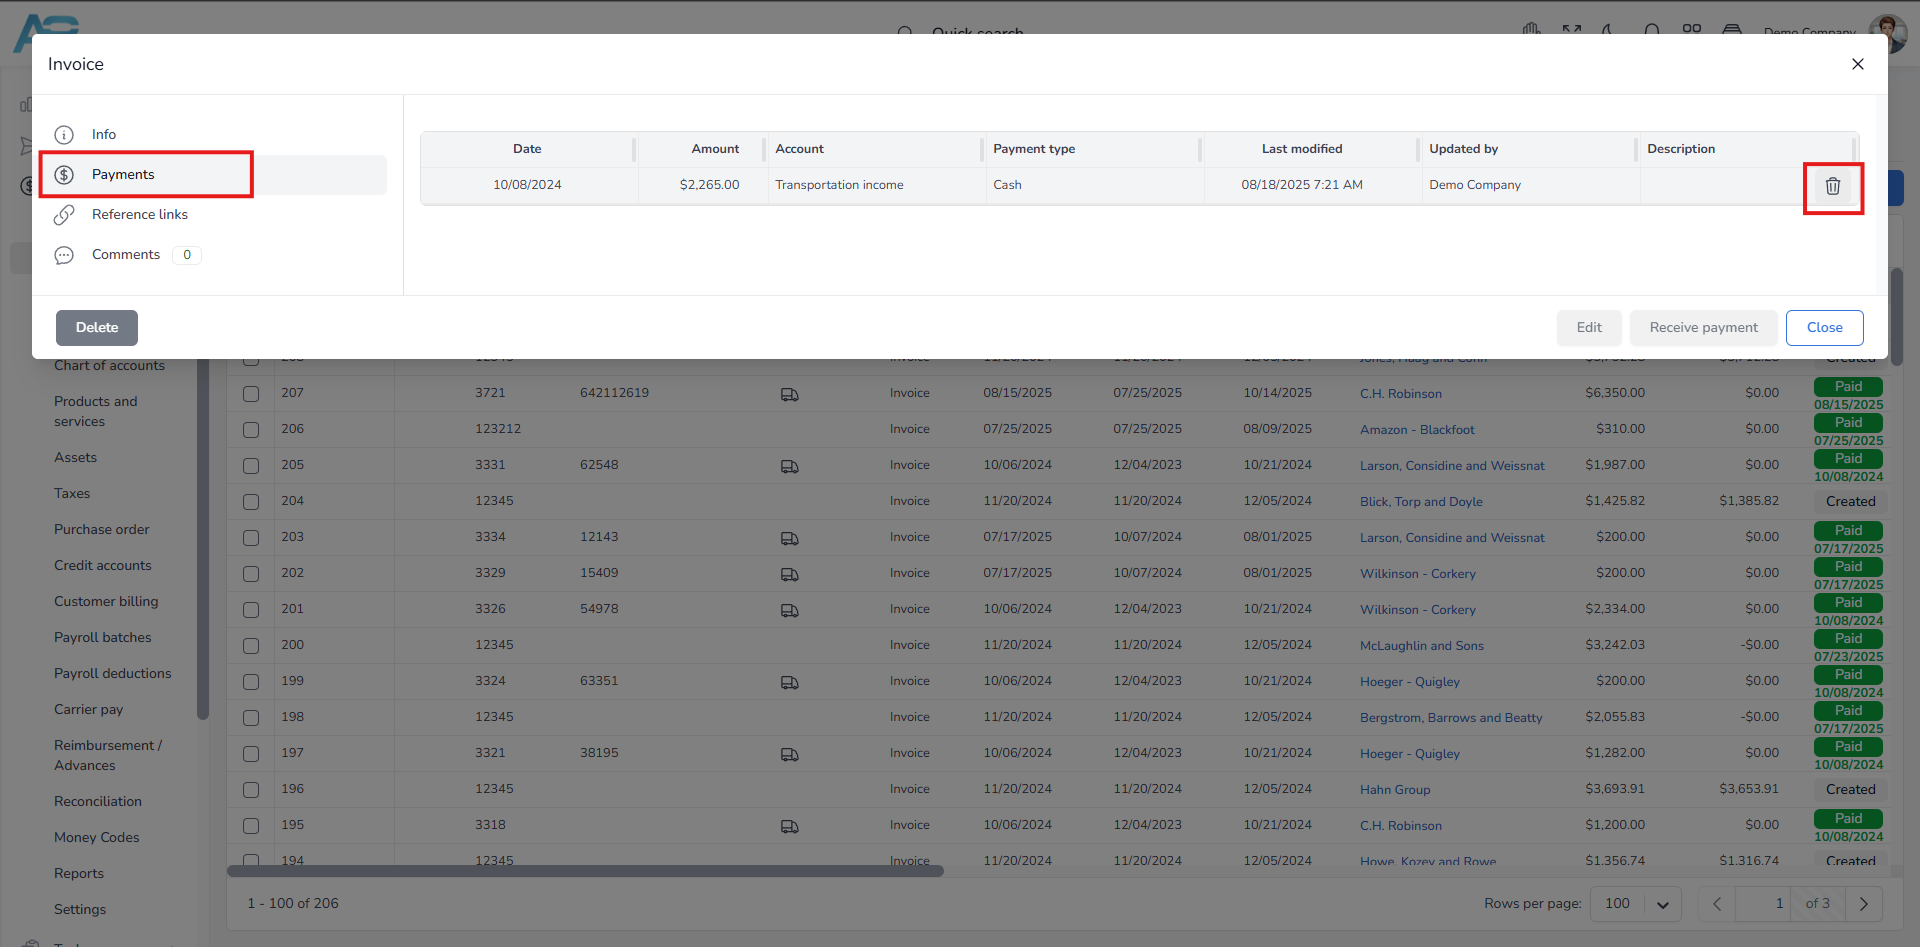
1. From the A/R Income page, hover over the invoice and click the Show details button (eye icon), or click the invoice in the list.
2. In a pop-up window, go to the Payments tab. On the right, hover over the payment, click the Delete button, and then confirm the action.
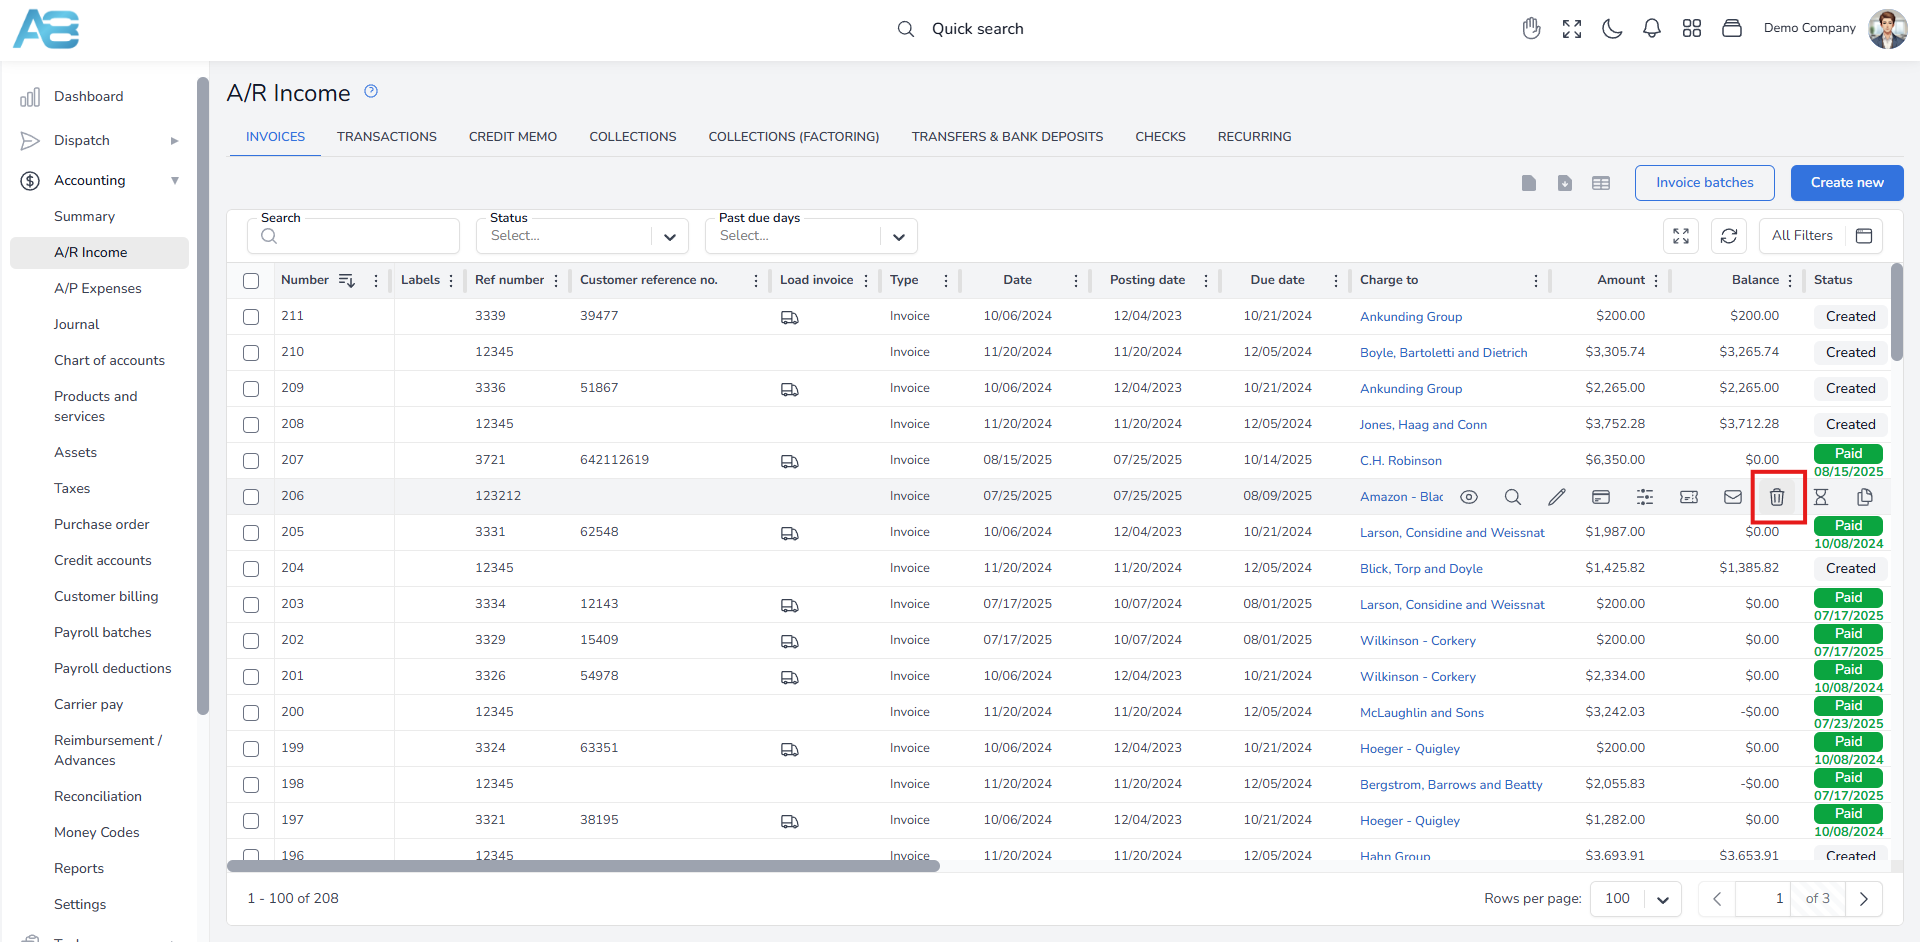
3. Now go back to the A/R Income page, hover over the invoice, and click the Delete button again. The invoice is now returned to the Customer Billing section.
4. At this point, the system will automatically unlock the fields on the Load’s page, allowing you to enter new data. Once you have corrected the data in the load, save your changes.
5. Go to the Customer Billing section, hover over the selected load, and click the Process button.
Once you complete these steps, the invoice will appear on the A/R Income page, where you can continue with the previously explained procedure.
Correcting a batch payment #
When you make a payment for an individual invoice, the transaction is visible and can be deleted directly from the invoice details page under the Payment tab. However, when you process a batch payment, the details will indicate that the transaction is part of that batch, i.e., it is linked to another account. You can easily identify these transactions as they are marked with a green pie chart icon.
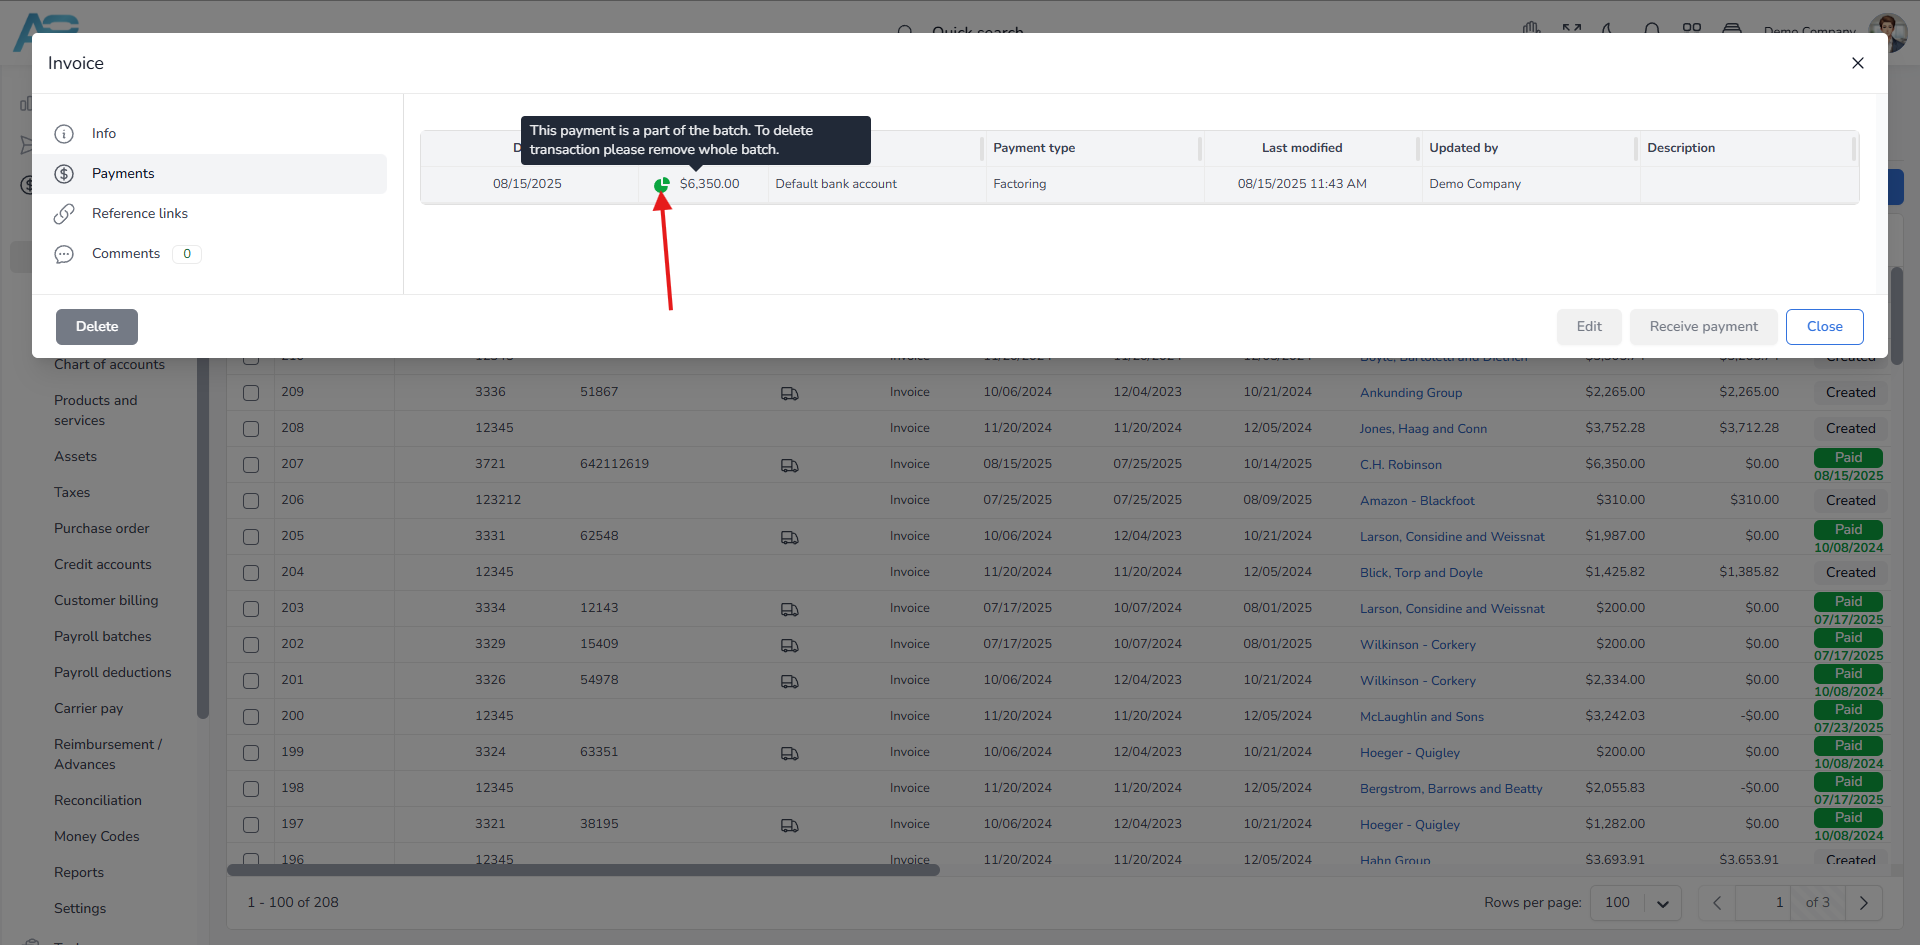
To delete a transaction from a batch payment, you must first remove it from the batch. Start by navigating to the Transactions tab and clicking the relevant batch. A pop-up window will appear; click the Detach button next to the transaction you want to remove. After that, you can delete the transaction from the A/R Income page under the Invoices tab.
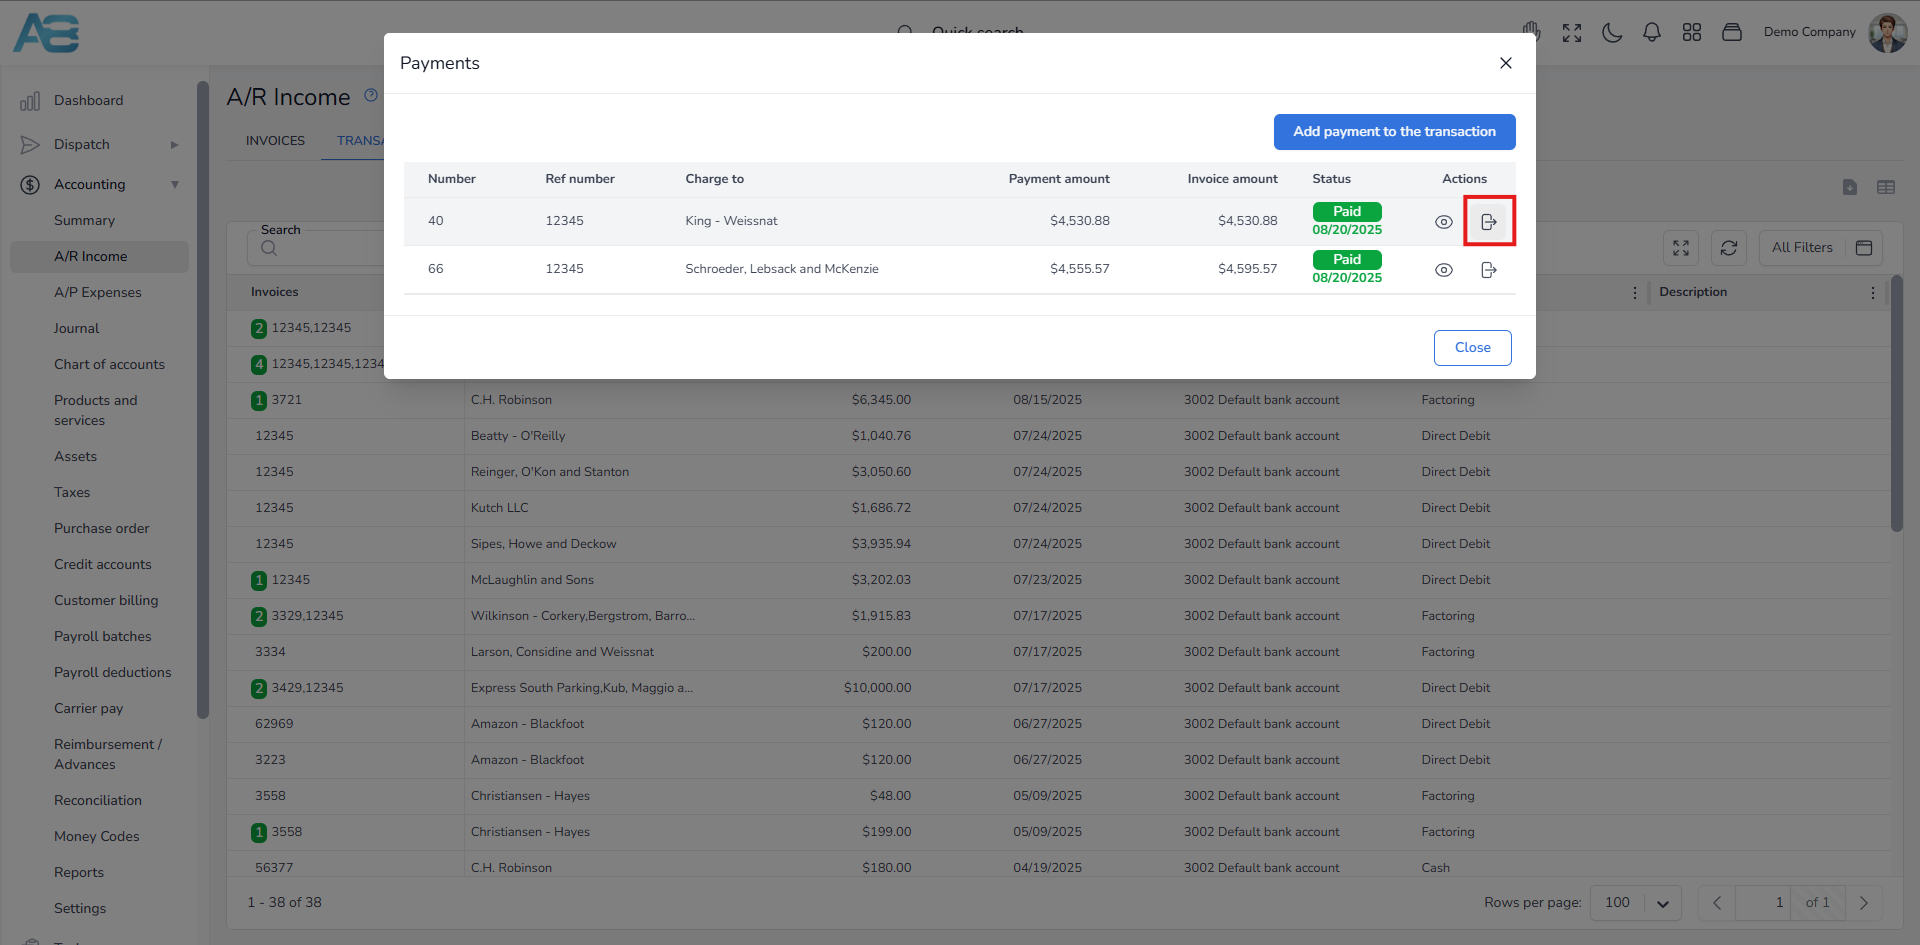
If, by mistake, you add a transaction to the wrong batch, you can correct this by linking the transaction to the right batch. First, navigate to the Transactions tab and click the batch in question. In a pop-up window, click the Detach button next to the transaction you want to remove. After confirming this action, your changes will be saved.
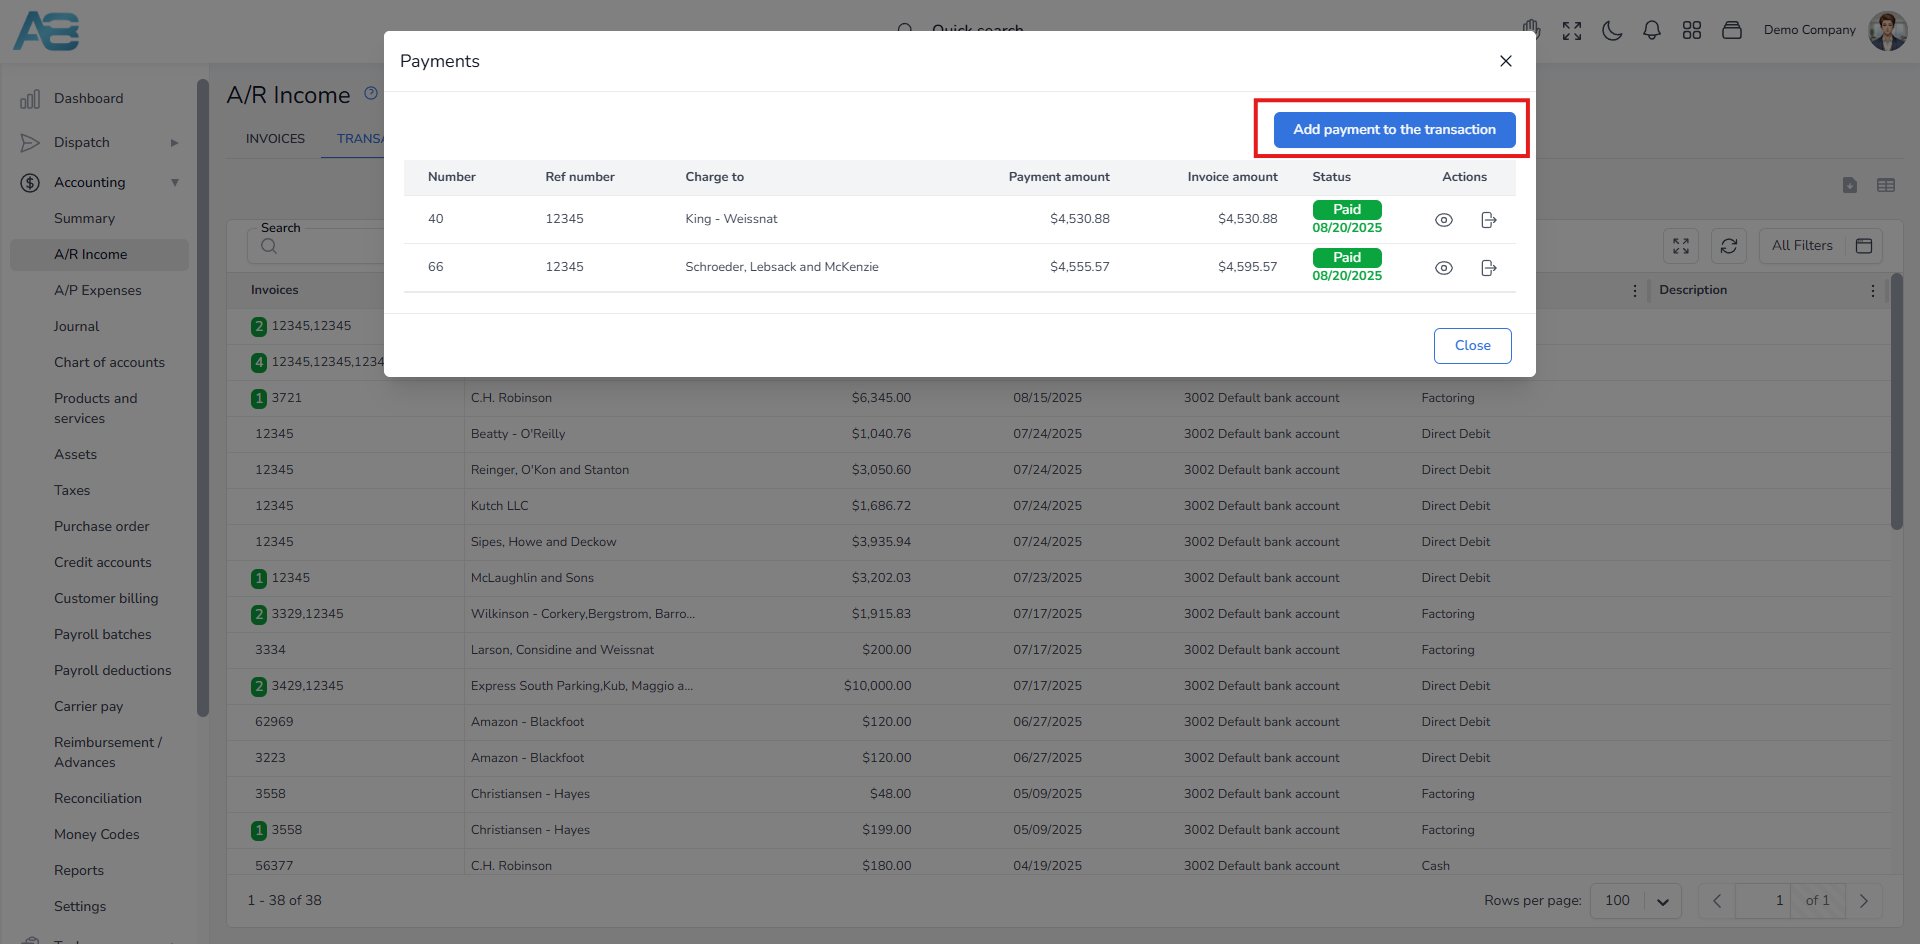
Next, you need to link the removed transaction to the correct batch. To do this, select the appropriate batch from the list. A pop-up window will appear, and you will click the Add payment to the transaction button. A new window will appear, where you can select the previously removed transaction from the list. Finally, click the Save button to complete the process.
Revised invoice procedure – Post invoicing #
If you need to add additional charges (such as an accessorial) or modify an already sent and paid invoice, you should update the invoice details accordingly while keeping the original invoice number for reference. To proceed, follow these steps:
1. First, you need to upload a revised Rate Confirmation. Navigate to the Load’s details page and select the Documents tab. Locate the attached Rate Confirmation.
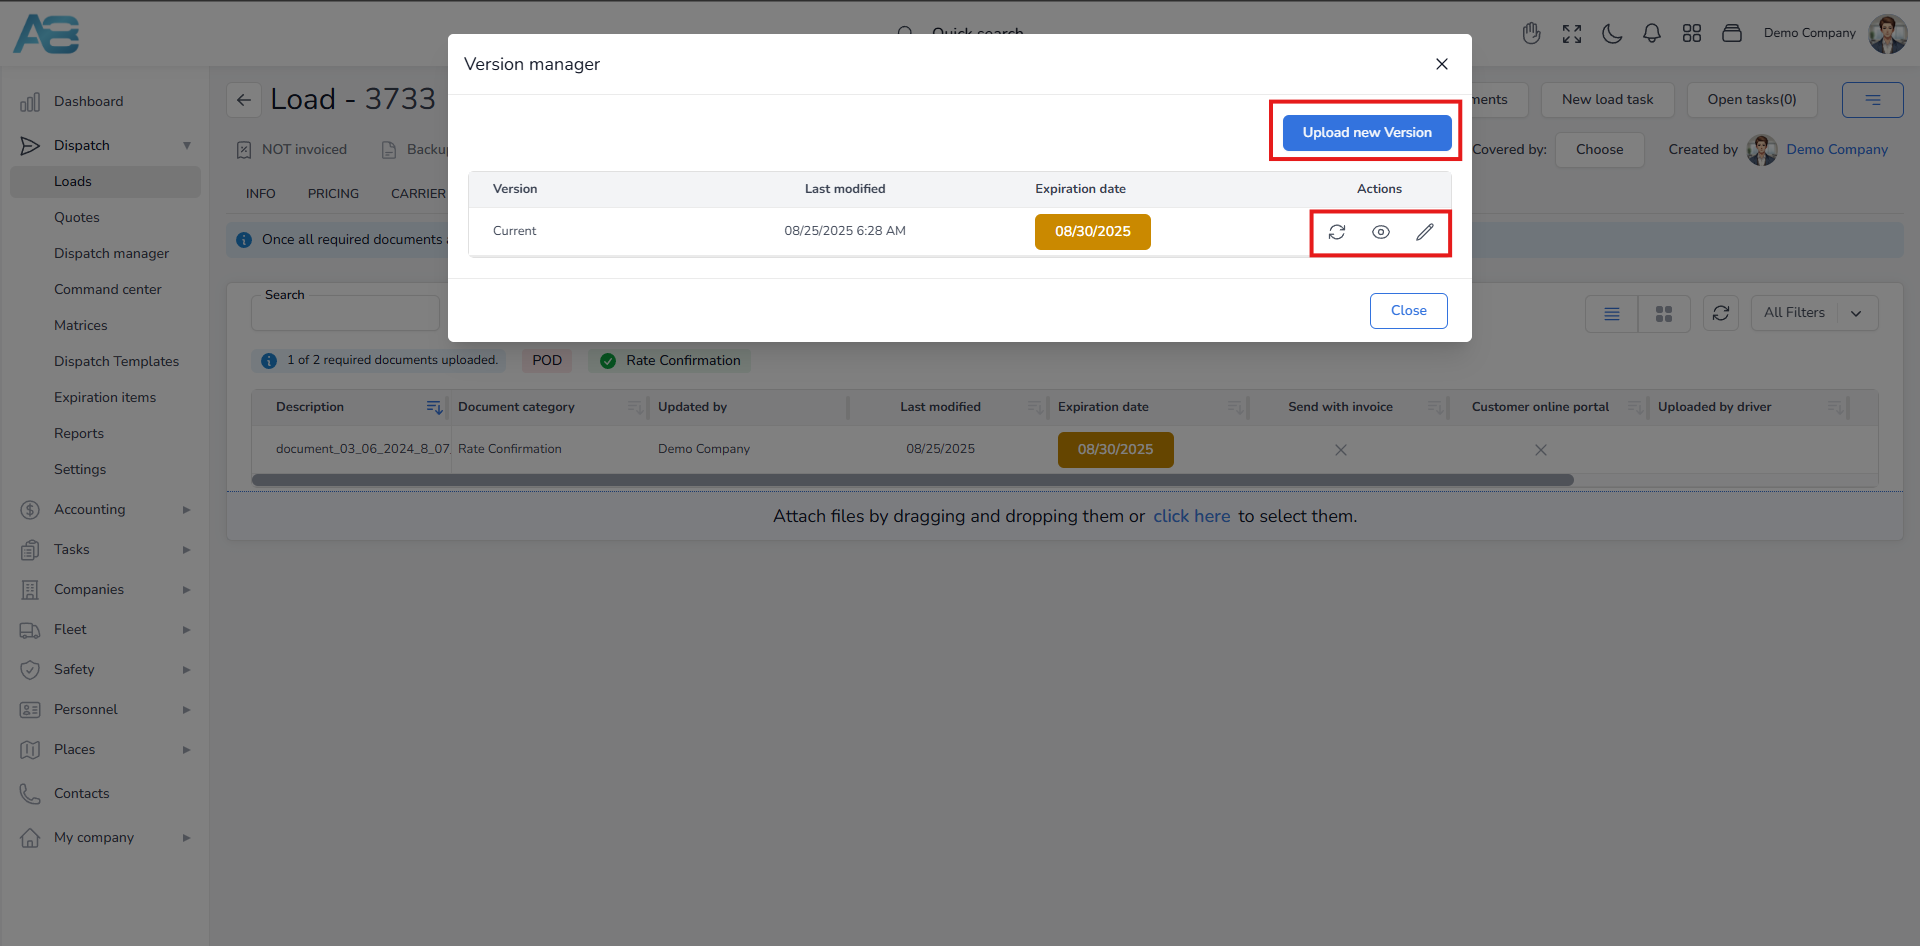
2. Hover over the Rate Confirmation and click the Version Manager button to upload a revised Rate Confirmation.

3. A pop-up window will appear; click the Upload new version button and then upload the new Rate Confirmation file from your computer. Ensure that you add the expiration date, and then click the Upload button to save your changes.
4. Now, you’ll need to make changes to the load in question. Go to the Load’s details page, and under the Pricing tab, find the Accessorials adjustments section. Click the plus button to add a new adjustment. The system will inform you that the load has already been invoiced and that any accessorial adjustments will impact the invoice price. Once you have saved all changes, the system will send an email to the person who created the invoice and to all users previously configured in the Dispatch settings section under the Default email(s) for editing or adding accessorials after the load is invoiced option. This change will also be reflected in the pricing.
5. Proceed to the A/R Income page, where you will find the invoice in Created or Sent status. Repeat the necessary steps to process the invoice, and then send it to the customer or factoring company.
6. Once your factoring company confirms that your invoice has been accepted, you can proceed with receiving payments.
The system has now been updated with all the new information. You can verify this by clicking the invoice and selecting the Payments tab, where both payments will be visible.
Collections for regular invoices #
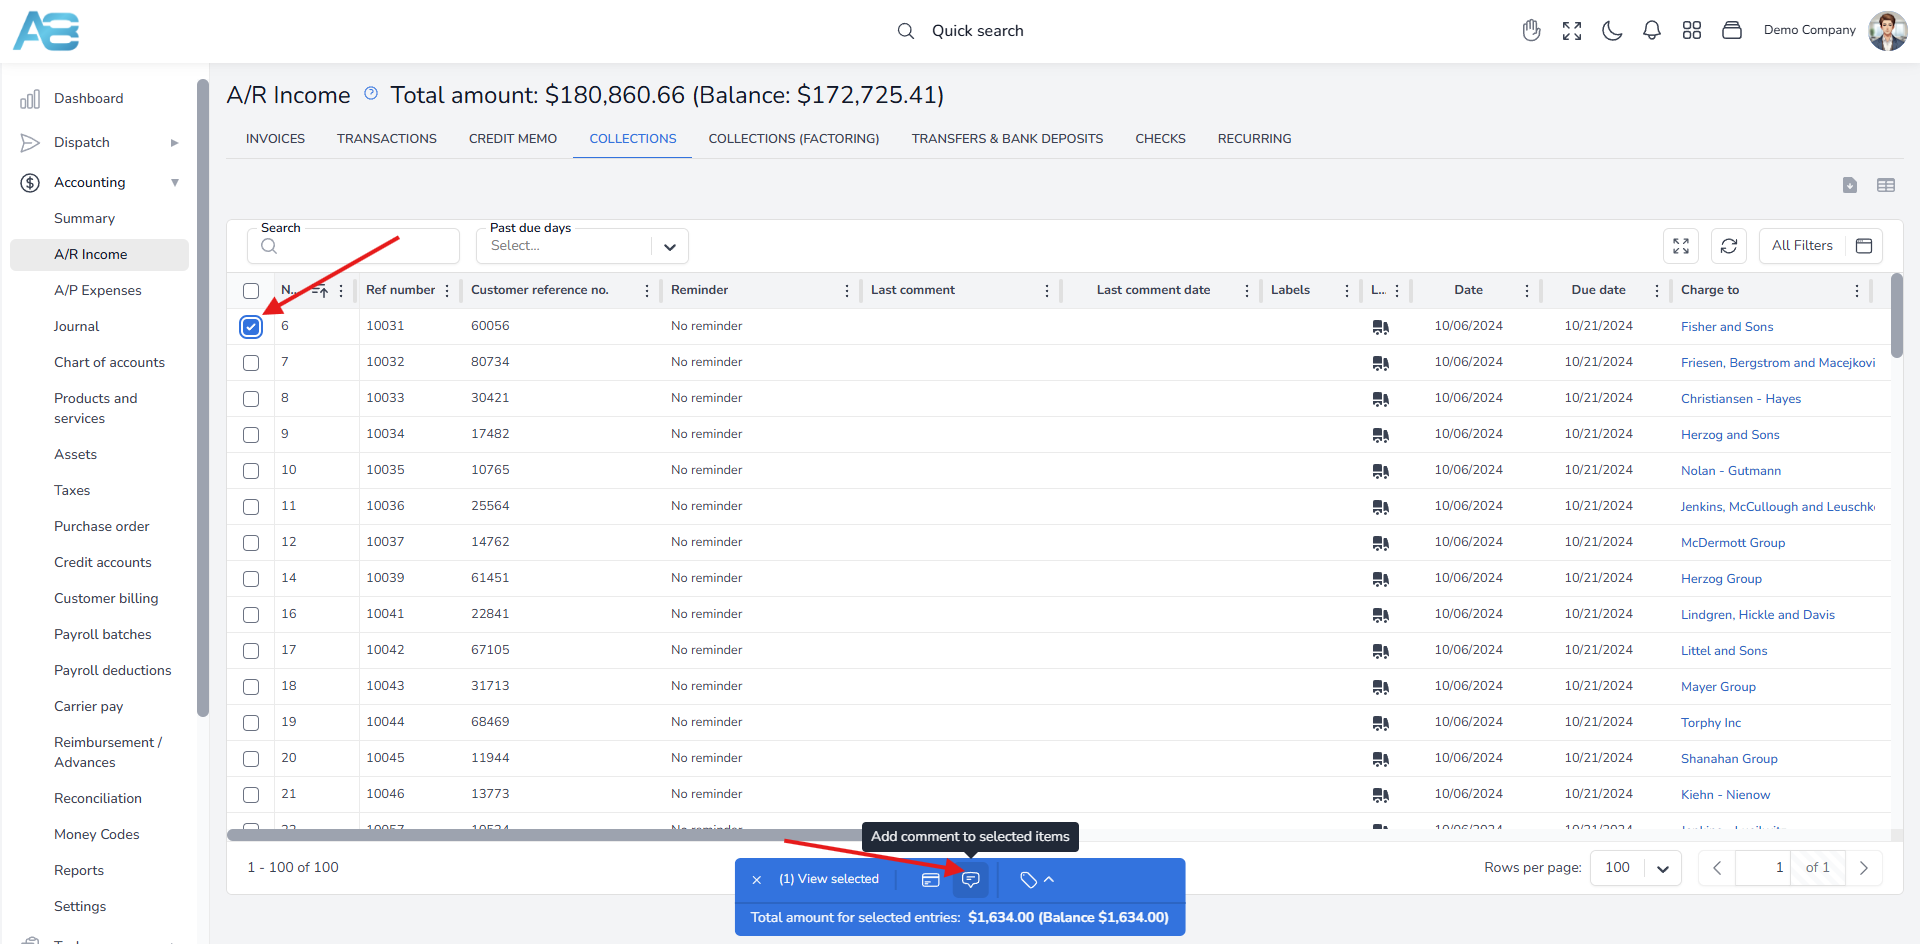
In the Collections tab, you can monitor the status of all invoices that have been sent to customers but remain unpaid. The system also allows you to add comments or set reminders for specific invoices, which will be displayed in the corresponding columns.
To do this, first, select the invoice from the list. A window will appear at the bottom of the page. Click the Add comments to selected items button.
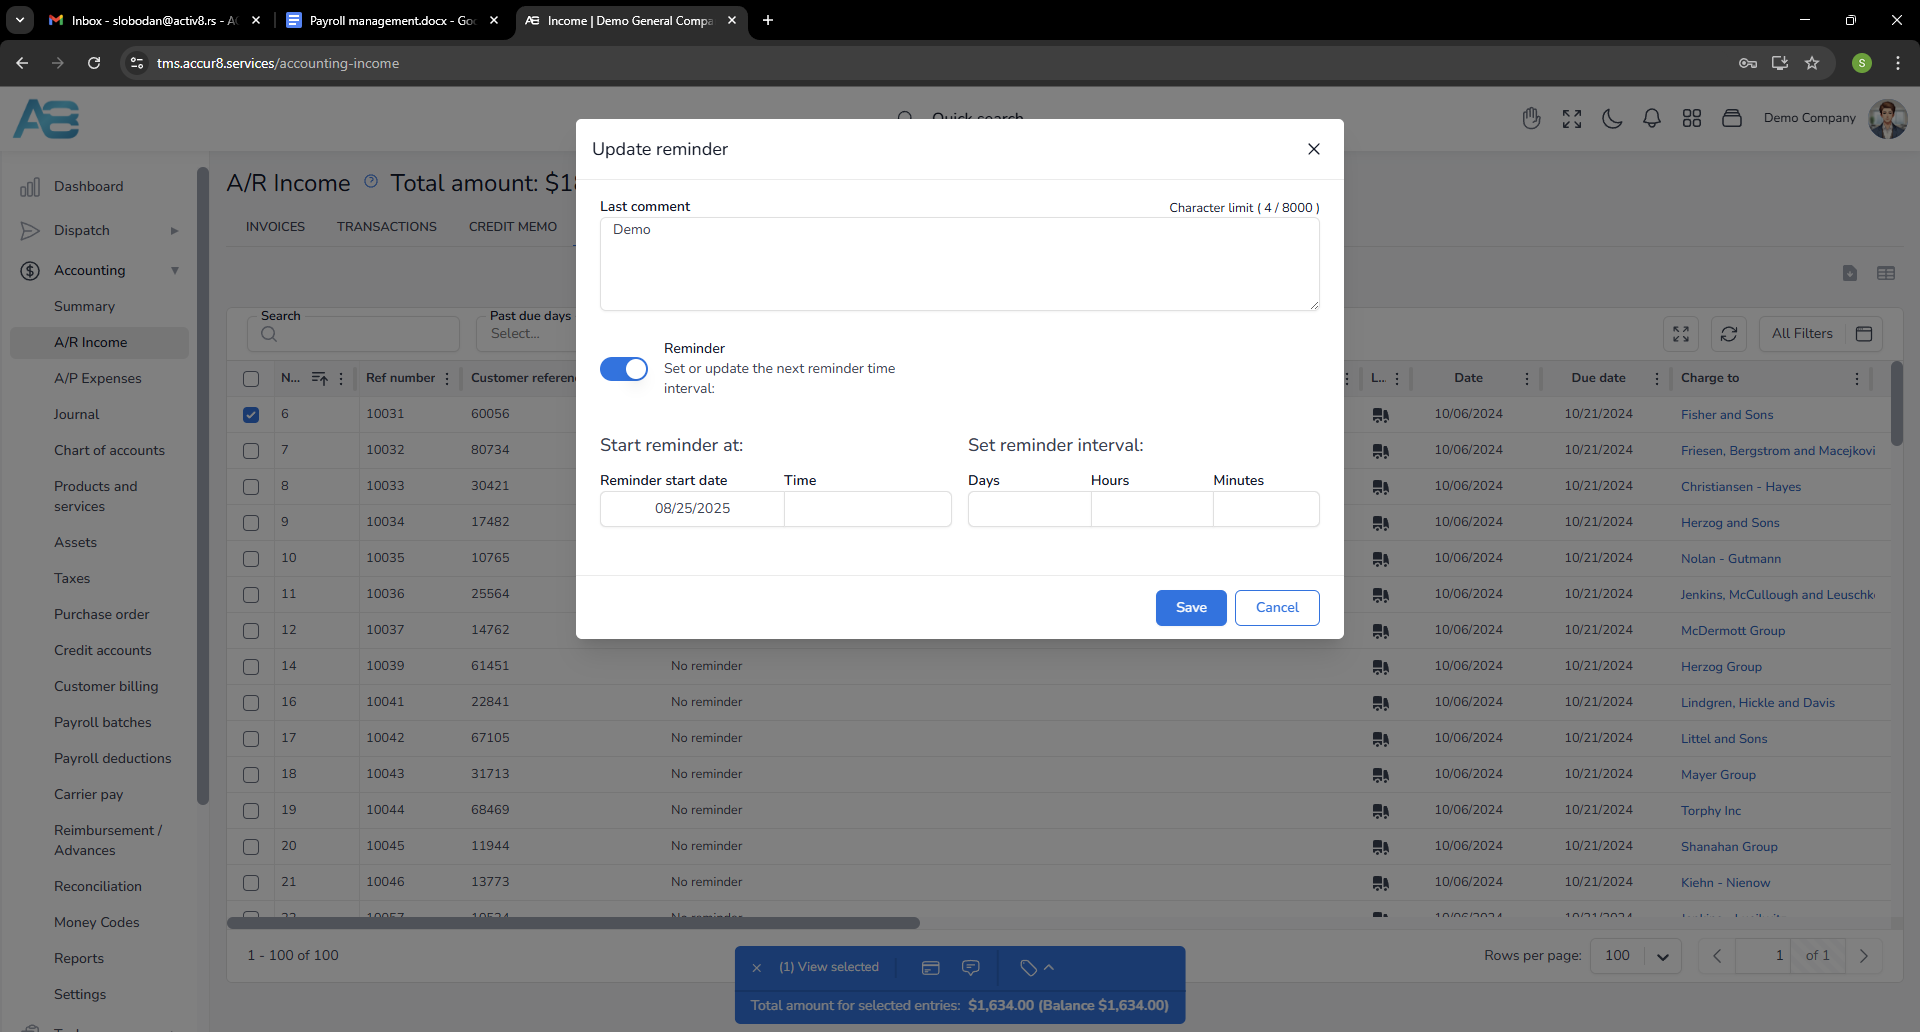
A pop-up window will appear where you can enter your comments in the corresponding field. You can also set a reminder by toggling the Reminder button, which will enable options for selecting a reminder start date and interval.
Note: From this tab, you can also access the Receive Payment option by hovering over the invoice and selecting it.
Collections for factoring invoices #
In the Factoring Collections tab, you can track the status of all invoices sent to the factoring company that remain unpaid.
The system also allows you to add comments or set reminders for specific invoices, which will be displayed in the corresponding columns.
To do this, follow the same steps outlined above under the Collections for regular invoices paragraph.
Note: From this tab, you can also access the Set Factoring Balance option by hovering over the invoice and selecting it.