Recruiting and managing new candidates #
ACCUR8 TMS streamlines driver recruitment with a dedicated feature that simplifies the identification, evaluation, and selection of qualified candidates. By simplifying application procedures and enabling fast, structured, and well-organized candidate assessments, the system improves efficiency across all hiring stages. A key element of this feature is comprehensive candidate profiling based on clearly defined criteria, such as professional experience, required licenses and certifications, and MVR background checks. By reducing complexity and standardizing evaluations, ACCUR8 TMS enables organizations to attract, assess, and onboard the most suitable drivers efficiently and reliably.
Creating Templates #
Before you access this feature, you must first configure a company-level checklist template. This initial, one-time setup defines the default structure for all newly created candidate checklists, allowing you to build it to match your specific onboarding or evaluation process.
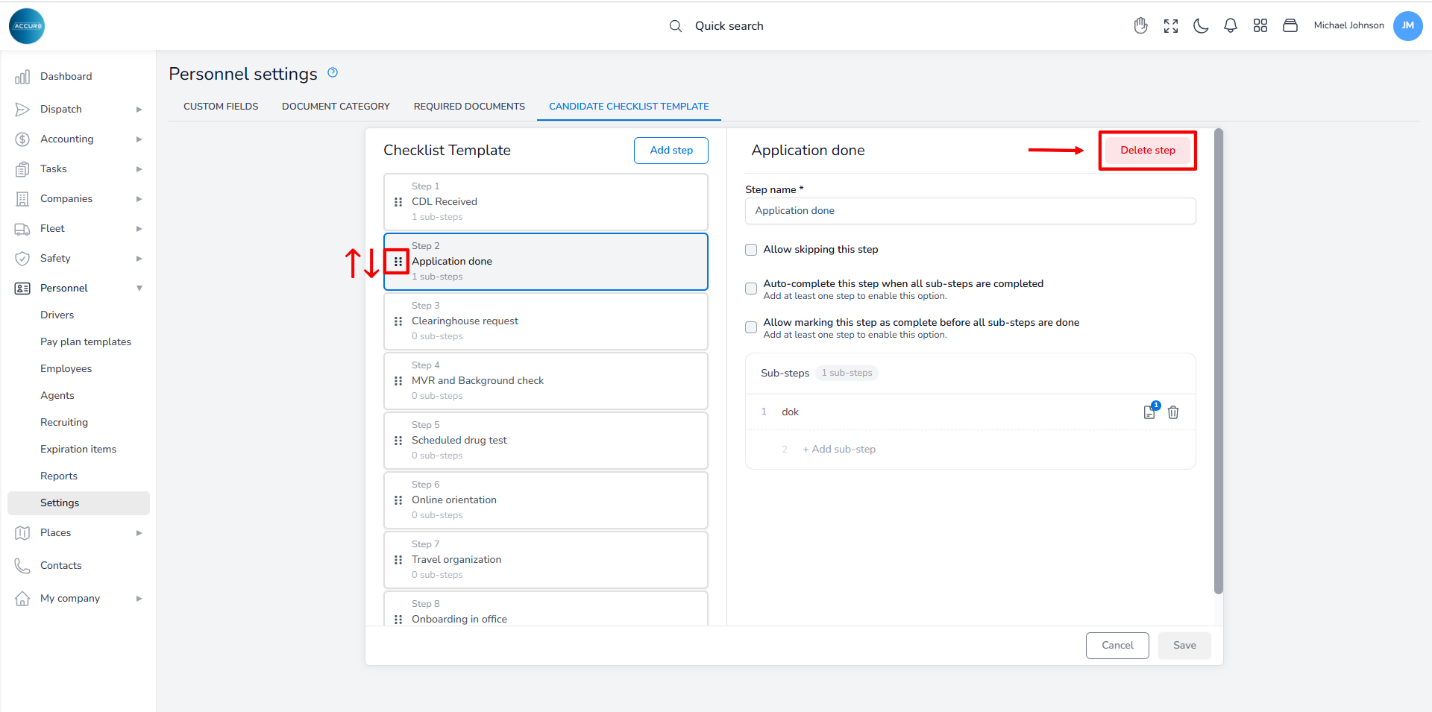
To access and manage the template, go to the Personnel section in the left sidebar, click Settings, then select the Candidate Checklist Template tab. On the left, you will find the Checklist Template section. To create a step, click the Add step button. A new form will appear on the right. Start by assigning a name to your step. You can then optionally add sub-steps, which allow you to attach required documents by clicking the document icon next to each sub-step.
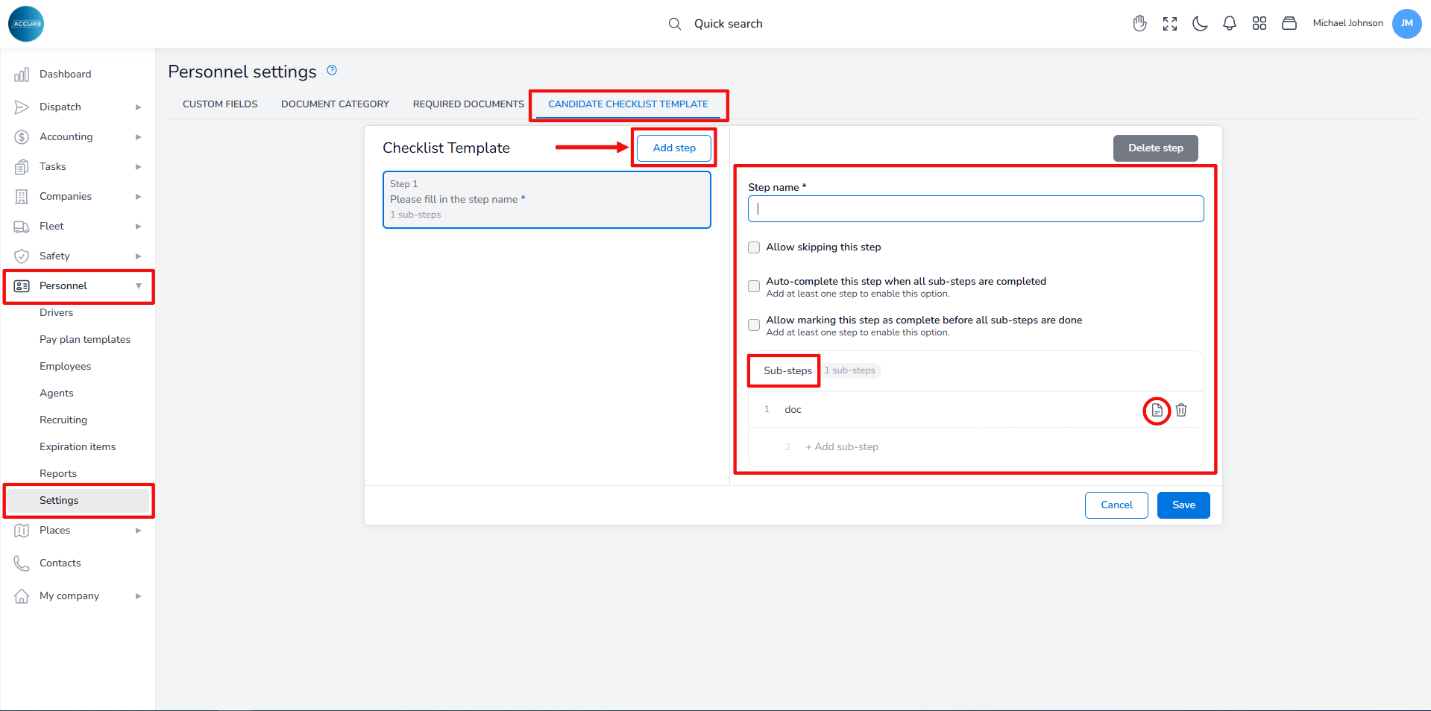
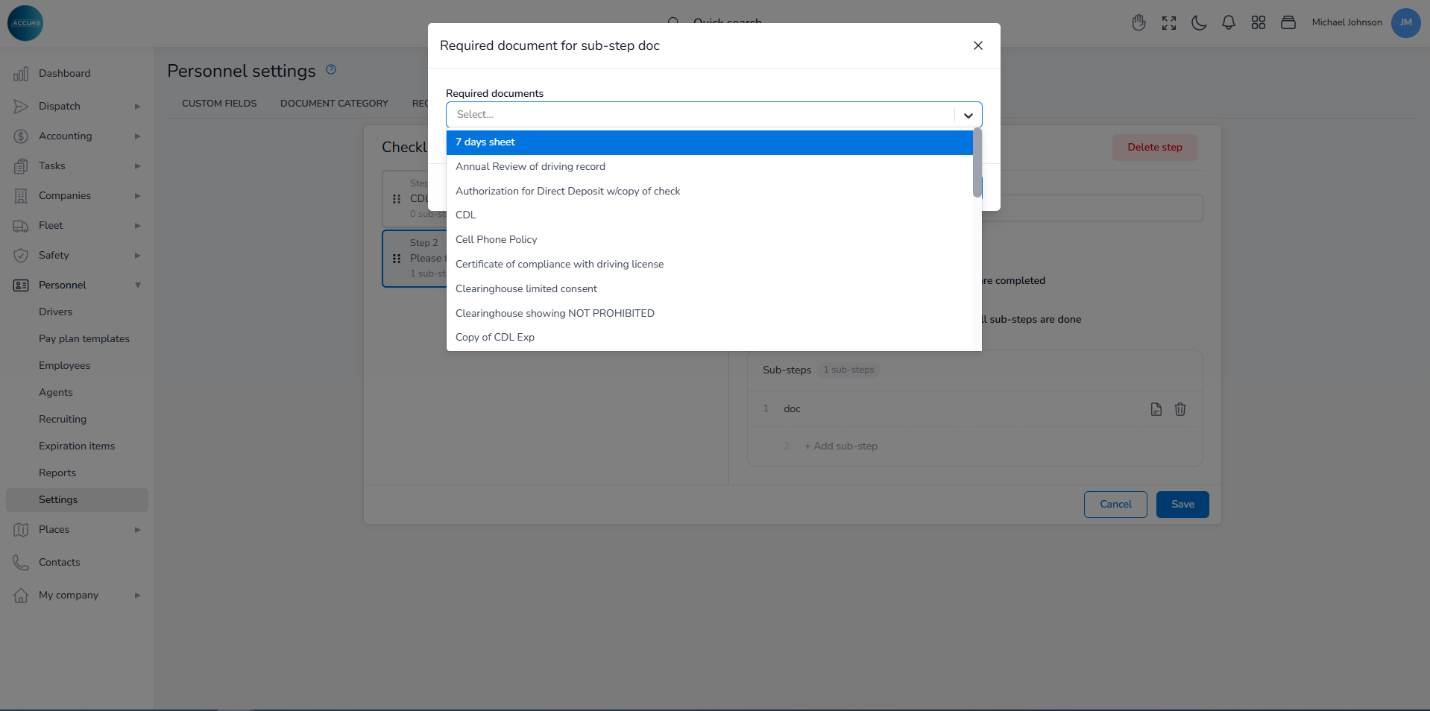
This will open a pop-up window where you will select a document from the drop-down menu. Each main step can include multiple sub-steps.
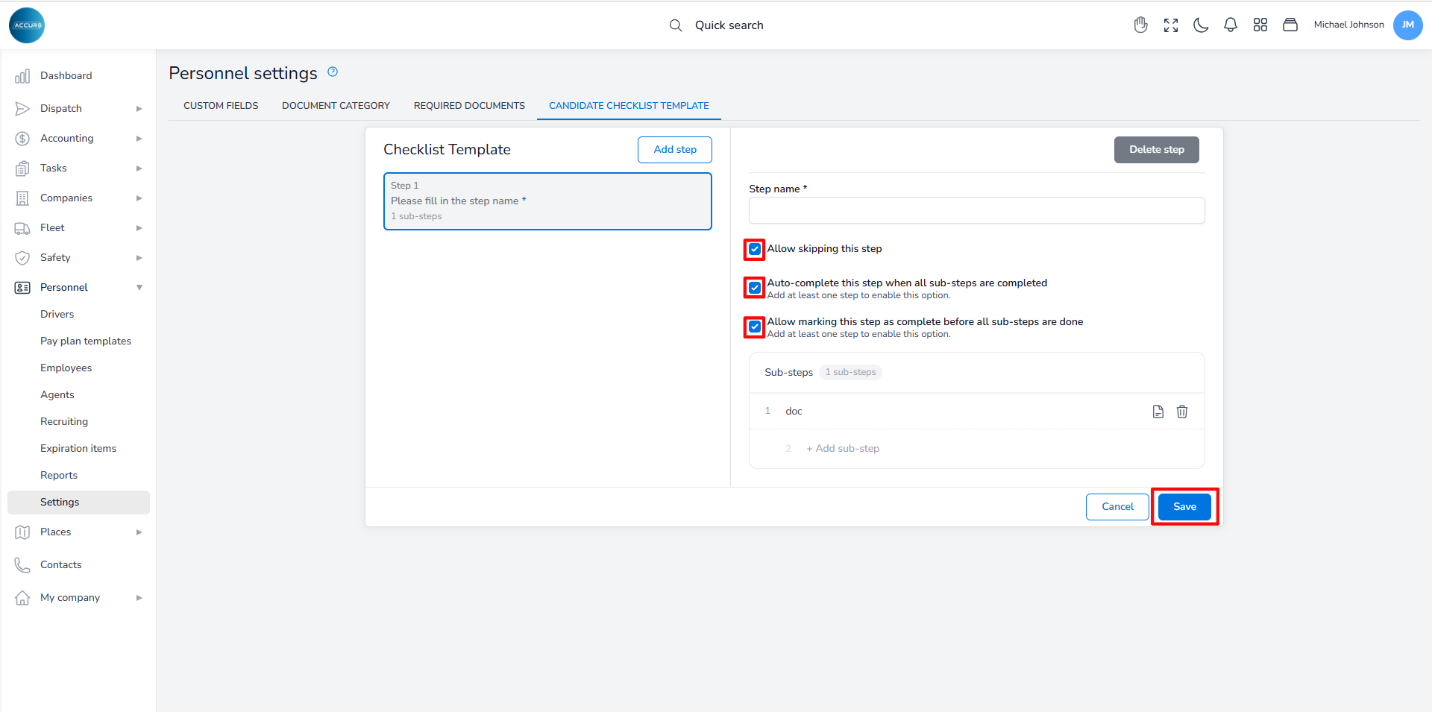
Additional configuration settings allow you to control workflow behavior. You can mark a step as optional by checking the Allow skipping this step option. When you add a sub-step, two more options become available – you can enable automatic completion once all sub-steps are completed, or allow earlier step completion before all sub-steps are done. Finally, save your changes to apply them to the template.
Steps can be easily reorganized by clicking the dots icon on the left of the step and repositioning them within the list. To remove a step, select it, click the Delete step button, and then confirm your action.
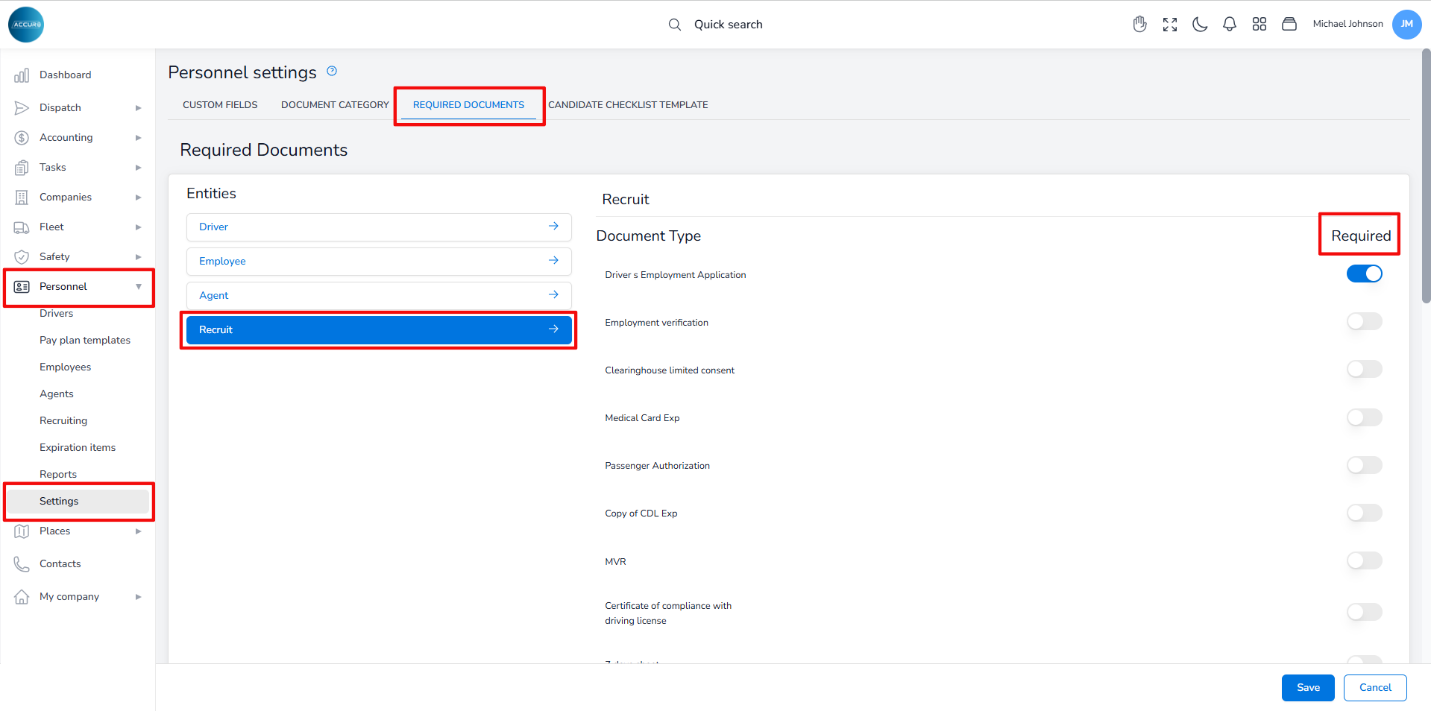
Note: Documents can be added to each checklist sub-step, or you can manage them by navigating to the Settings section, clicking the Required documents tab, and selecting the Recruit option. On the right, various document types will be displayed. Toggle the button next to each document type to indicate whether it is required for new candidates.
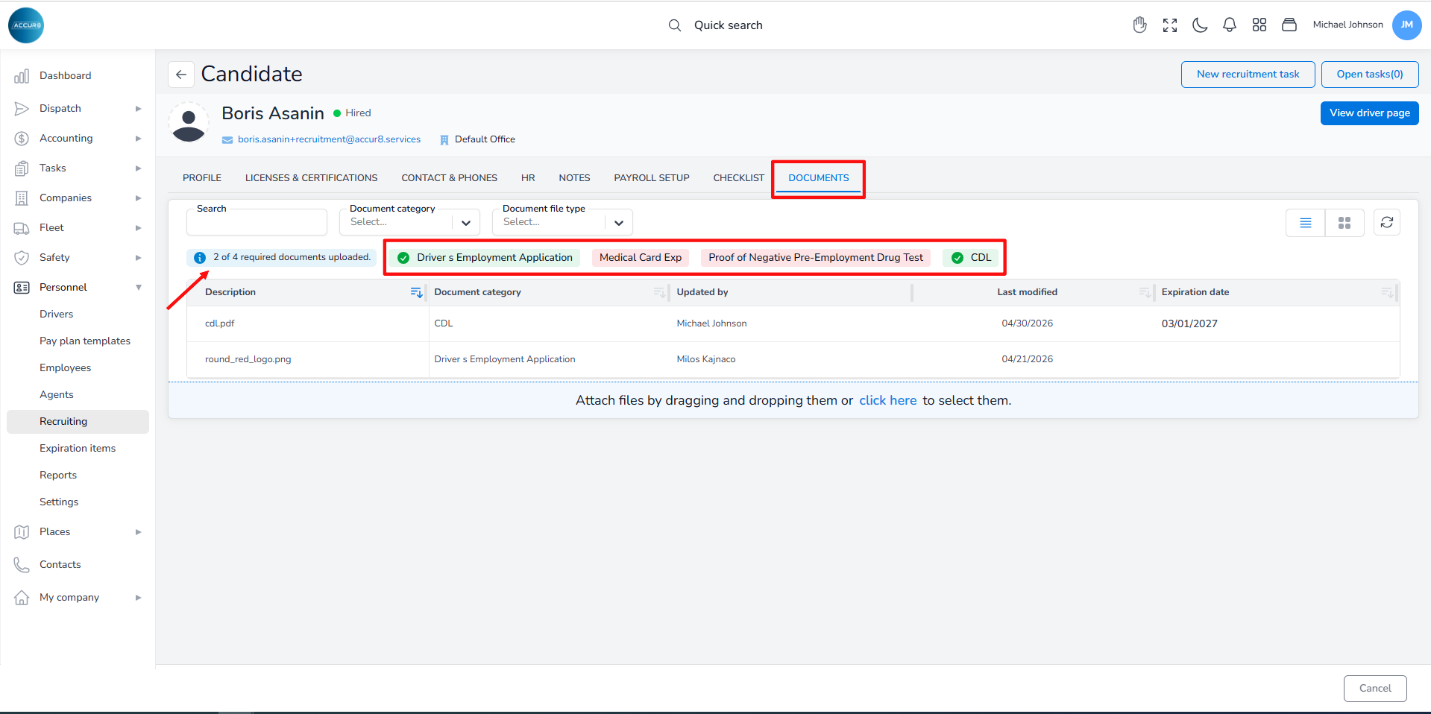
These documents will then appear on the Candidate’s profile, under the Documents tab. Missing documents will be marked in red, and a blue notification will show the number of documents requiring upload.
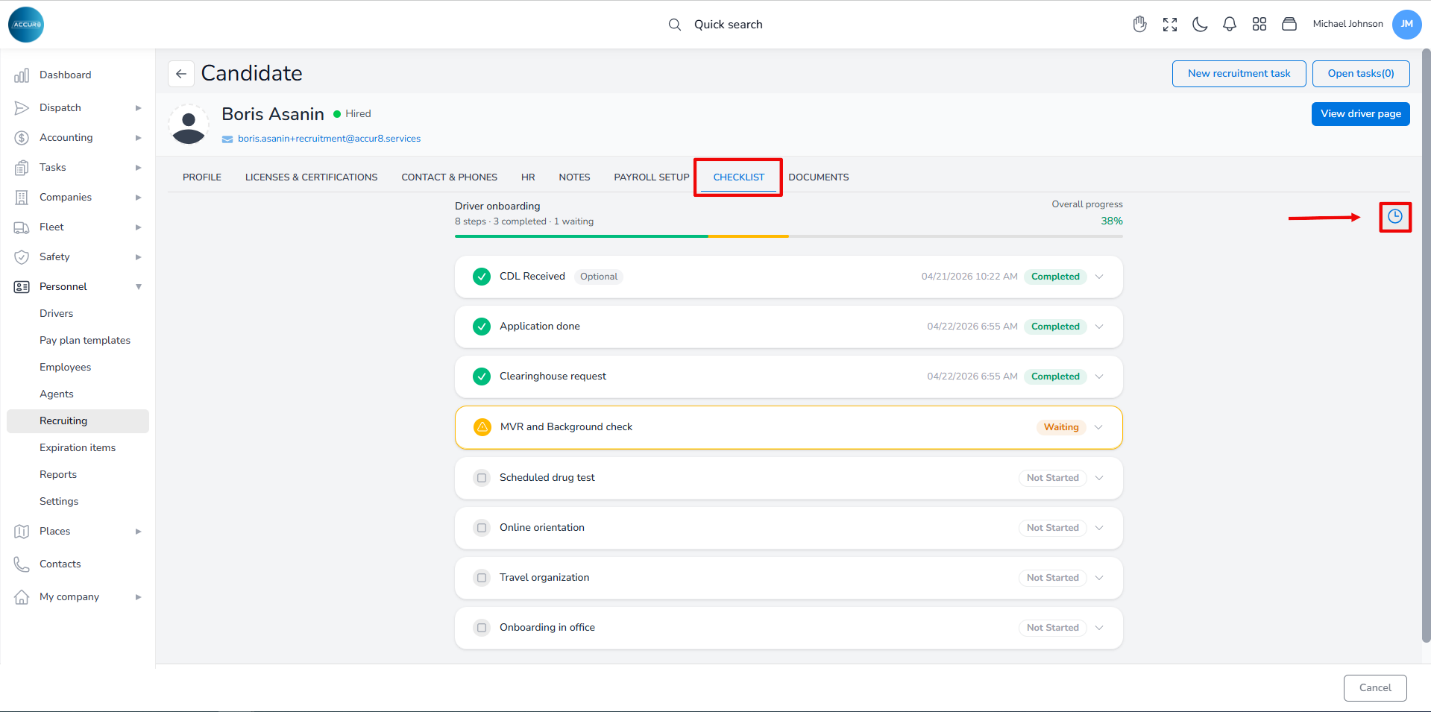
These templates are shared across the company, meaning any updates will automatically apply to all future candidates. However, existing candidates remain linked to the template version that was active at the time their checklist was created. If needed, you can update an existing candidate’s checklist to the latest version by accessing the Checklist tab in their profile and clicking the clock icon in the top-right corner.
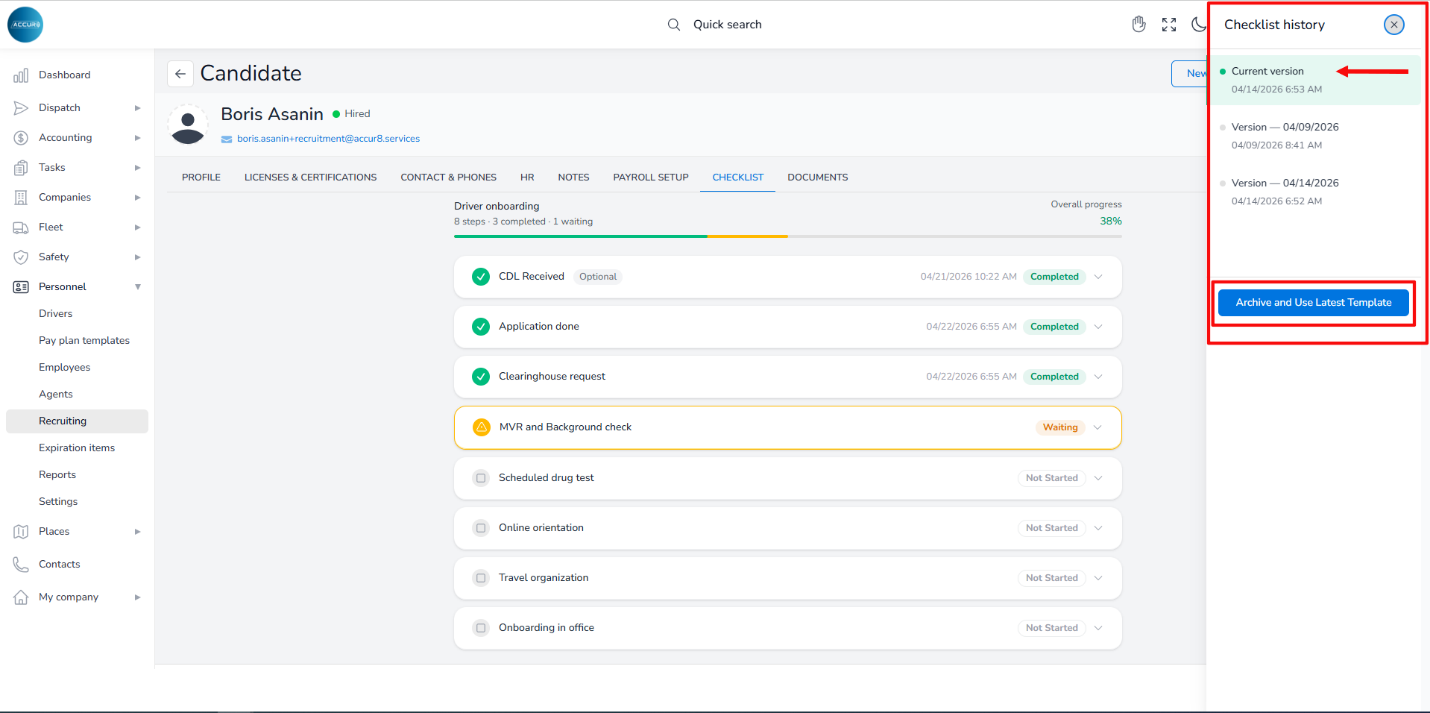
This will open the Checklist History sidebar, where you will see the current version along with all previous versions. By clicking the Archive and use latest template button, the previous version will be read-only, but all associated notes and activity history will remain accessible.
Creating a New Candidate #
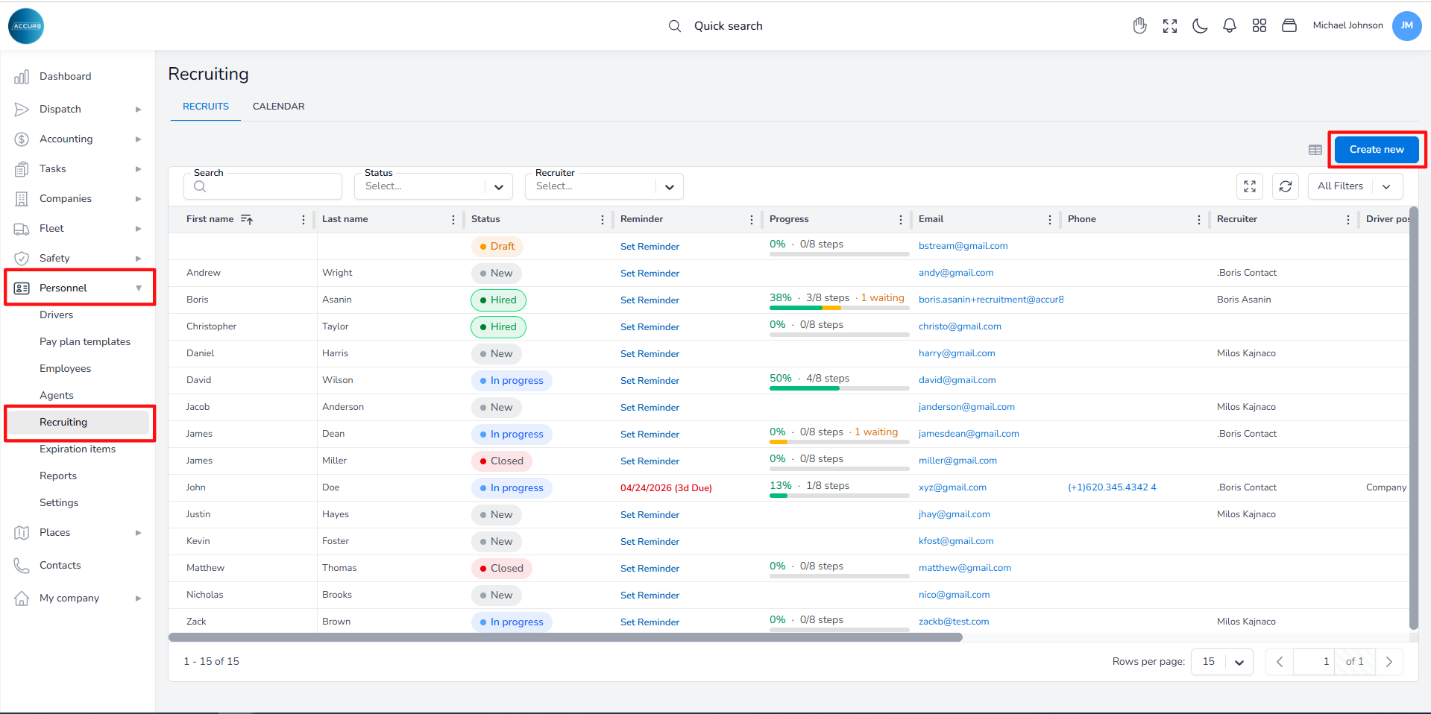
To access this feature, navigate to the left sidebar and click the Personnel section, then select Recruiting. To add a new candidate, click the Create new button at the top-right corner.
A new page will open with several tabs. On the Profile tab, there are three sections. In the Contact Info section, provide the email address, first name, and last name. The system will allow you to create a profile with only an email, first or last name, but it will be a draft, not a complete profile.
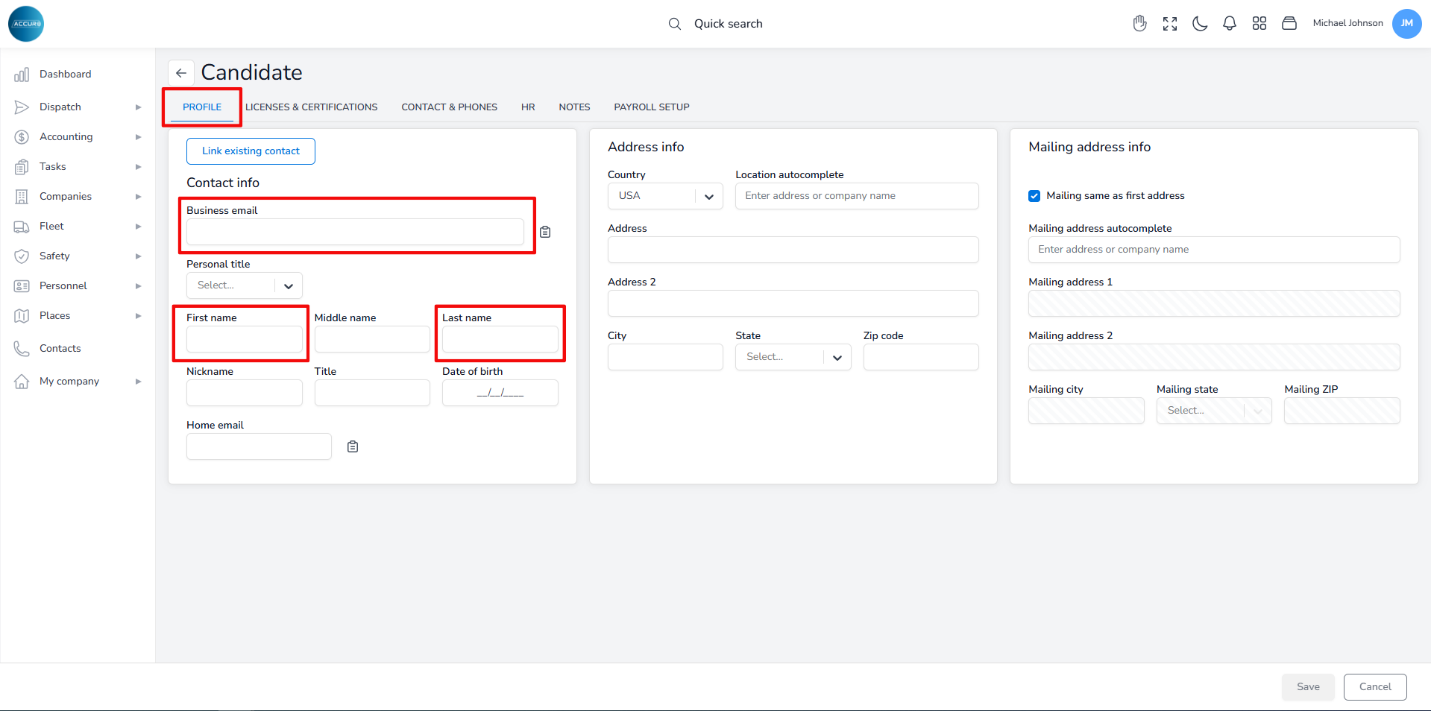
*Please remember that each driver’s email address must be unique*
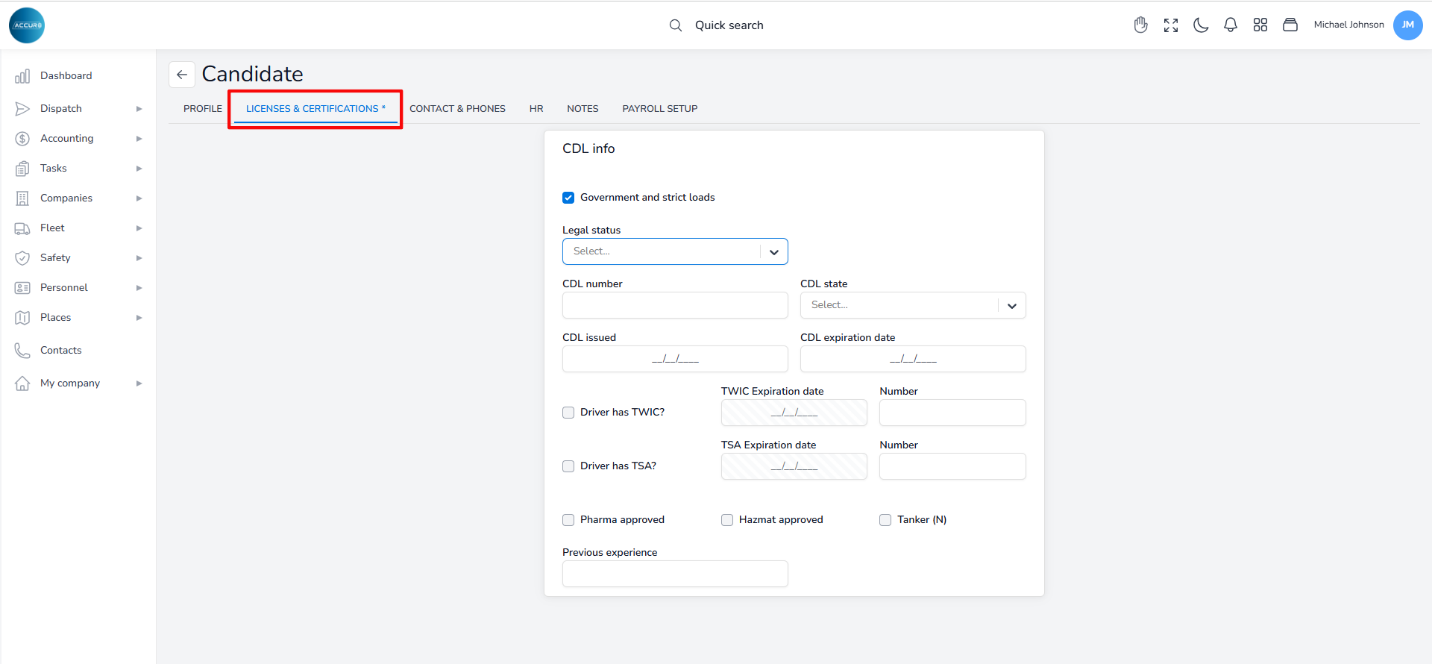
Under the Licences and Certifications tab, enter the driver’s CDL details, such as CDL number and expiration date, and indicate whether the driver has a TWIC or TSA. When you check the Government and Strict Loads checkbox, a Legal Status dropdown menu will appear, allowing you to select the appropriate option.
Next, under the Contact and Phones tab, add the phone number as well as the candidate’s emergency contact.
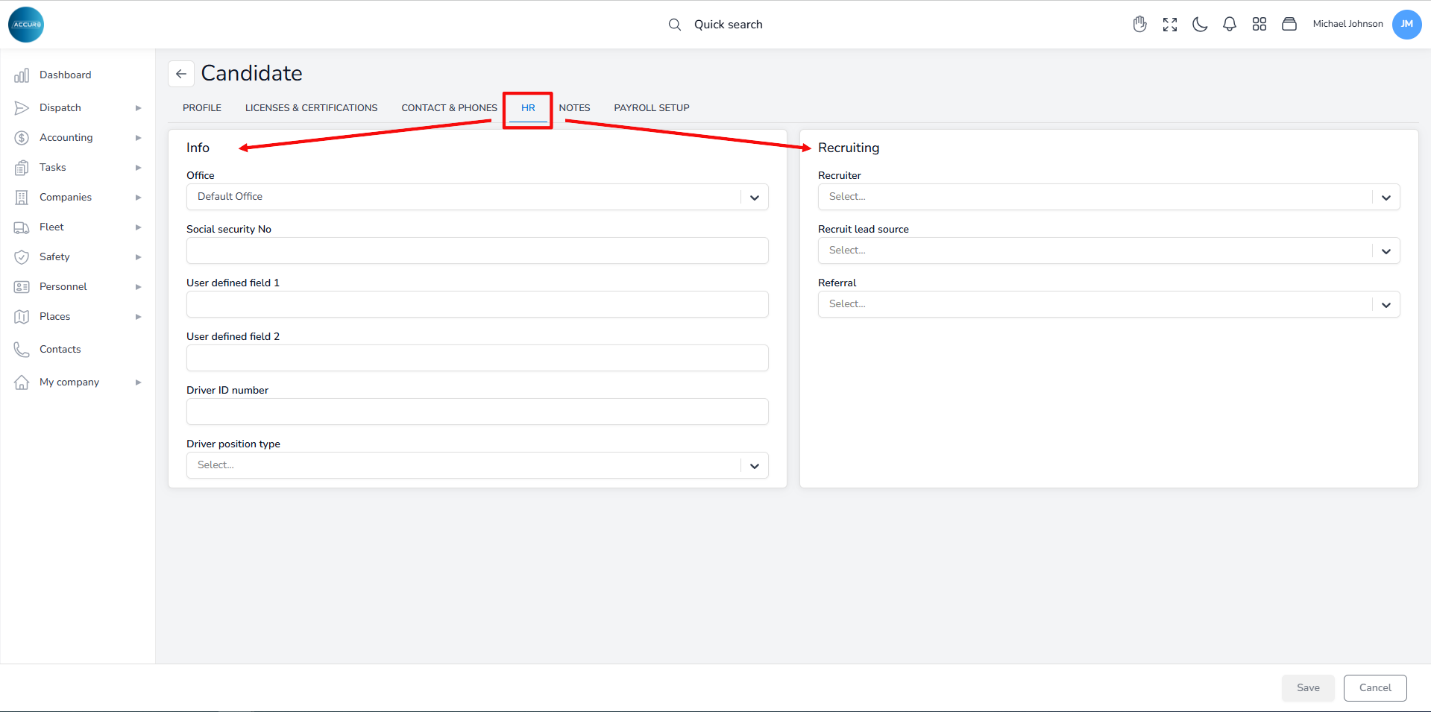
Under the HR tab, there are two sections. In the Info section, you can add the candidate’s additional information, such as the Social Security number and Driver’s ID number. Here, you can also select the Office and Driver Position Type from the corresponding drop-down menus. Use the two User-defined fields to add characteristic information about the candidate. In the Recruiting section, you can select Recruiter, Recruit Lead Source, and Referral from drop-down menus.
The Notes tab allows you to add notes about the candidate.
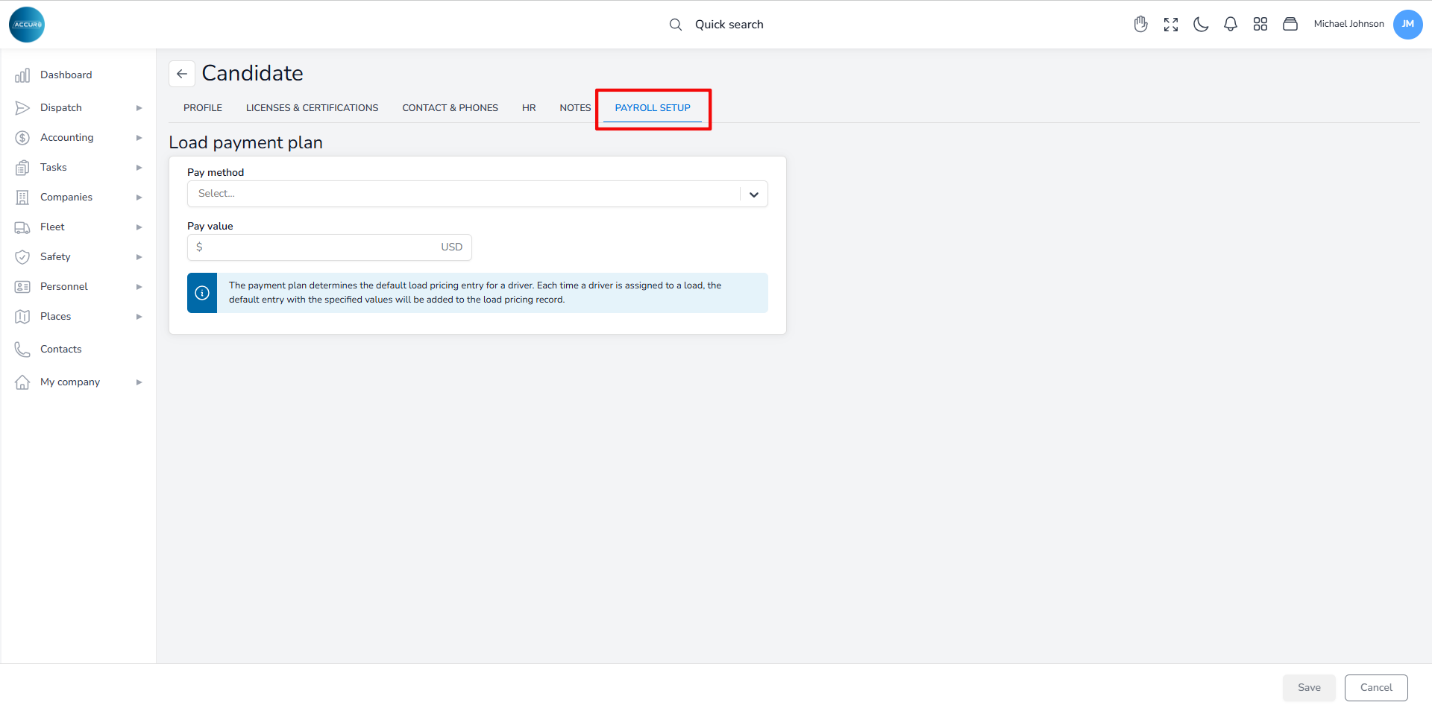
Finally, under the Payroll setup tab, you can add a driver Load payment plan by selecting the appropriate Pay method and entering the Pay value. This payment plan determines the default load pricing entry for the selected driver. Each time the driver is assigned to a load, the default entry with the specified values will be added to the load pricing record. Note that this can also be completed later.
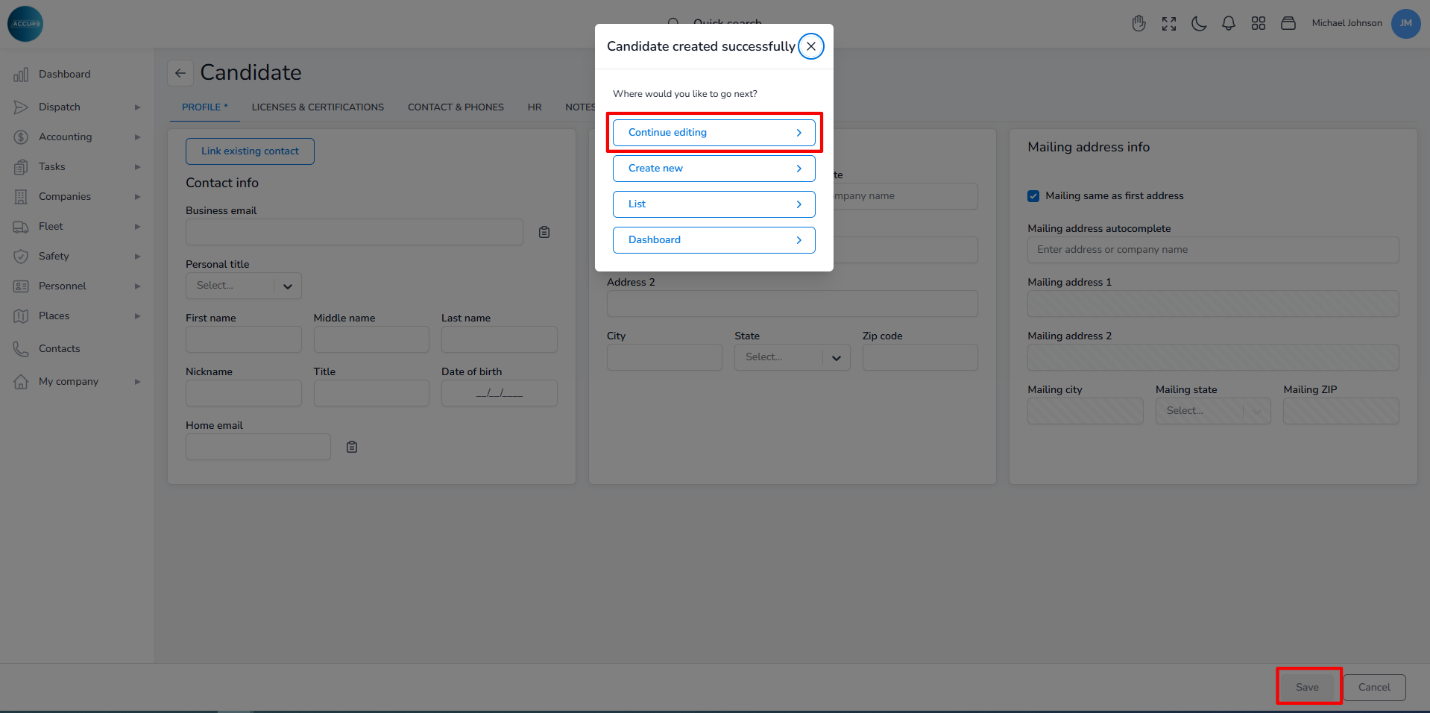
Once you have completed a candidate profile, click the Save button. A pop-up window will appear, prompting you to choose your next step. To proceed to the candidate’s profile page, select the Proceed editing option.
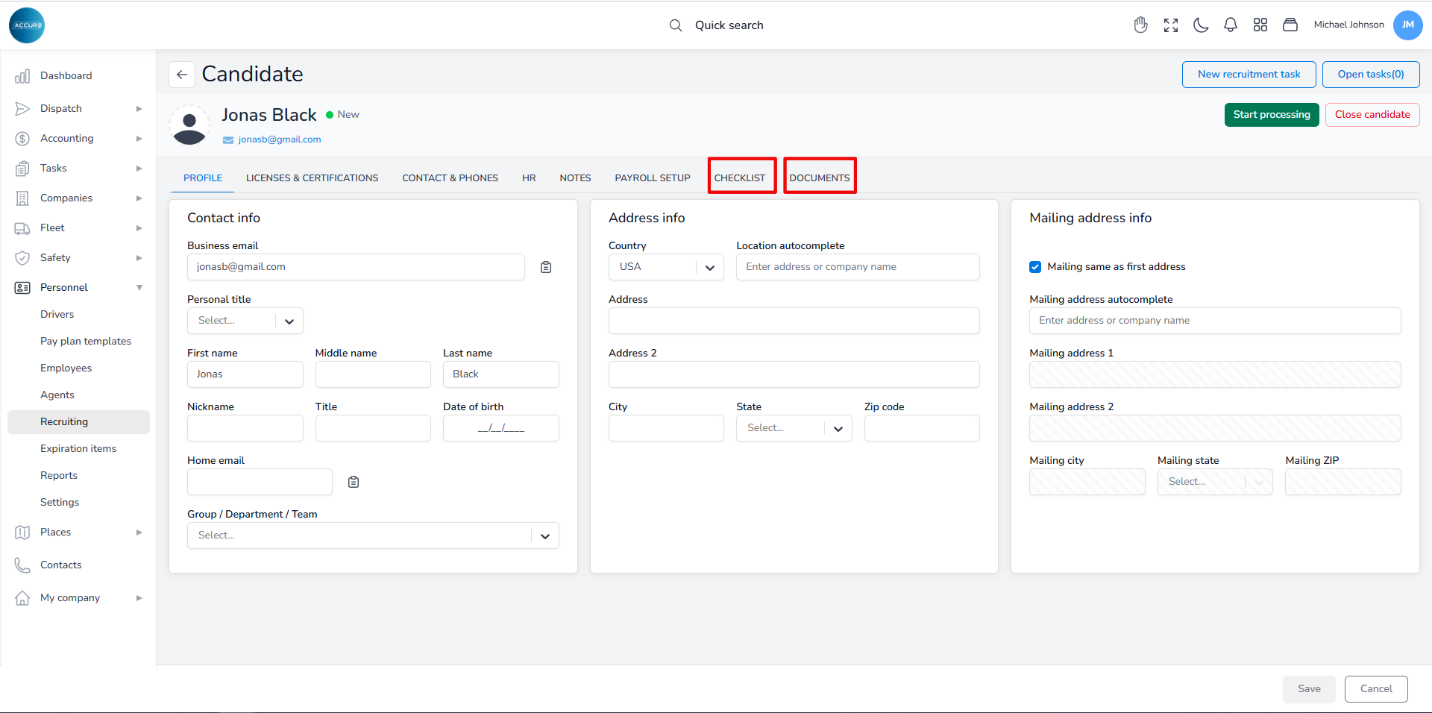
After adding a new candidate to the system, two more tabs will appear on the candidate’s profile page: the Checklist and Documents tab.
Under the Checklist tab, you can manage and track the candidate’s onboarding process. Under the Documents tab, upload the required documents or any other paperwork needed for the candidate.
Also, saving a candidate automatically creates a Contact in the system with the entered candidate’s name, phone, and email. You can find all contacts on the Contacts page.
Using the Checklist Feature #
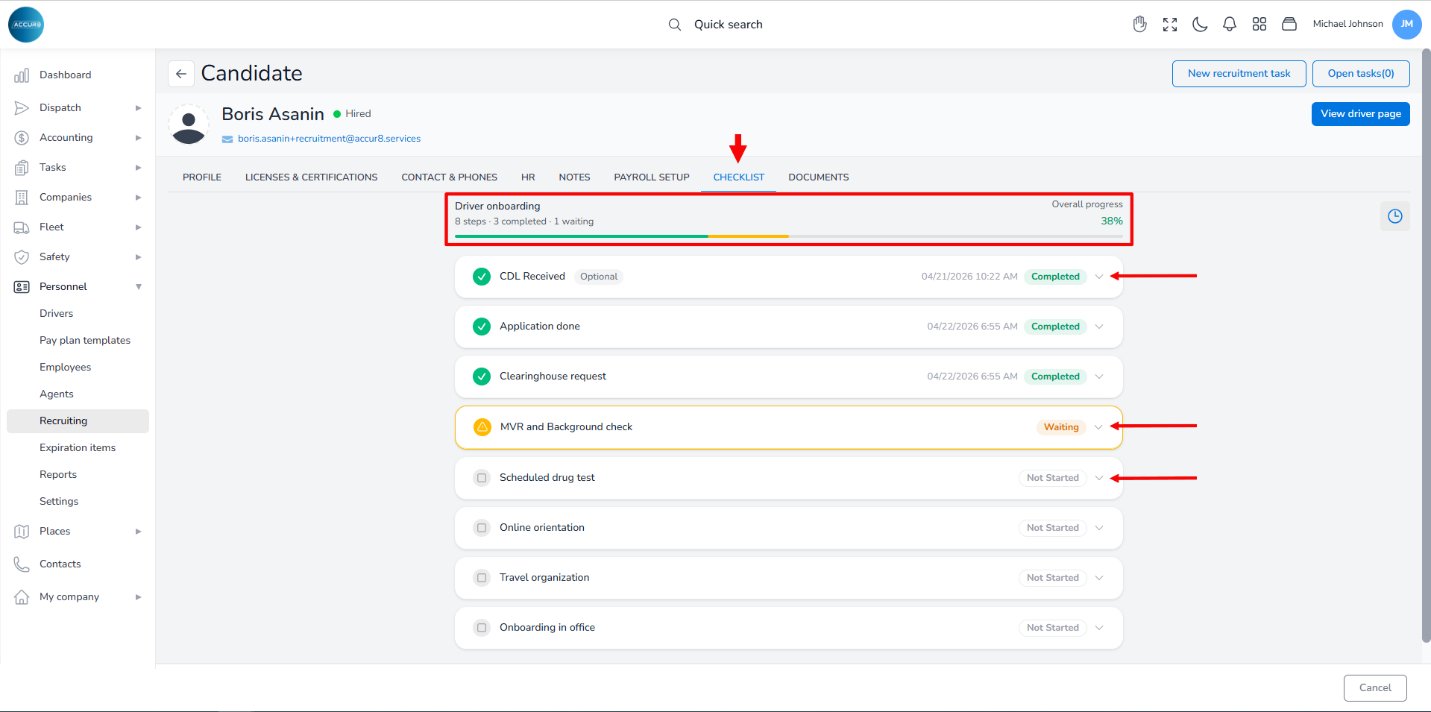
To use the Checklist feature, open a candidate’s profile and navigate to the Checklist tab. Here, you’ll see all steps defined in your company’s template, along with their current status. At the top of the page, a Driver onboarding progress bar provides a quick overview of the candidate’s progress, displaying the total, pending, and completed steps, along with the overall progress percentage.
Each step is listed with its name and status (Not Started, Waiting, or Completed). The header also includes key candidate details: name, phone number, email, and address.
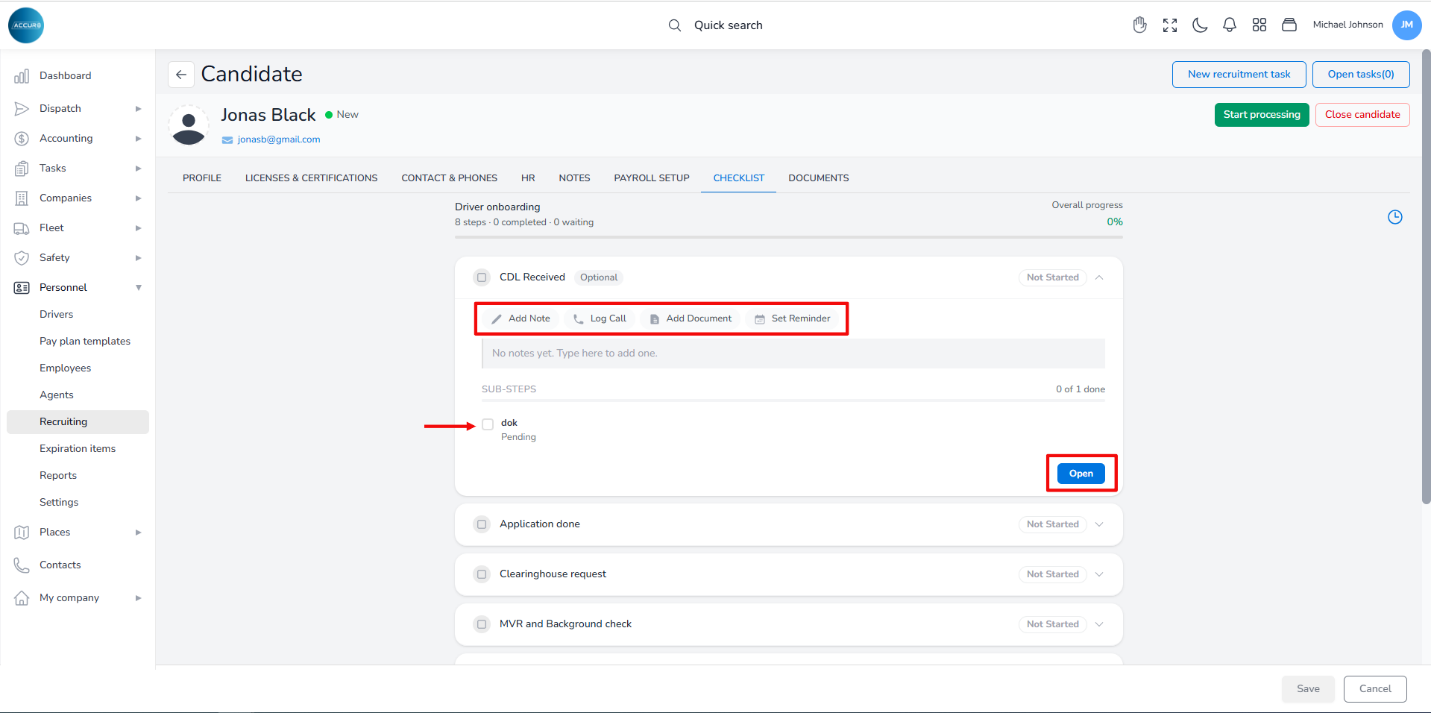
You can expand each checklist step to manage related activities. To start a step completion, click the Open button at the bottom-right corner of the step. Its status will then change to Waiting. Once all required actions for a step are completed, update its status by clicking the Completed button. If a step contains sub-steps, complete them sequentially to ensure proper workflow progression. Within a step, you can add notes, log a call, upload relevant documents, or set a reminder.
Note: A completed step may be reopened as needed.
The system also tracks checklist template versions. If the company template is updated after a candidate profile is created, the candidate remains associated with the original template version. To review or update a checklist version, open the Checklist tab and select the clock icon in the top-right corner. A Checklist History sidebar will open, displaying all available versions and their dates, along with the current version highlighted in green. If necessary, you can transition to the latest template by clicking the Archive and use latest template button, ensuring alignment with the most recent onboarding standards.
Note: The previous template version will be read-only, but all associated notes and activity history will remain accessible.
Processing a candidate #
Each candidate goes through five statuses: Draft, New, In progress, Hired, and Closed. These statuses are visible on the Recruiting list, under the Status column.
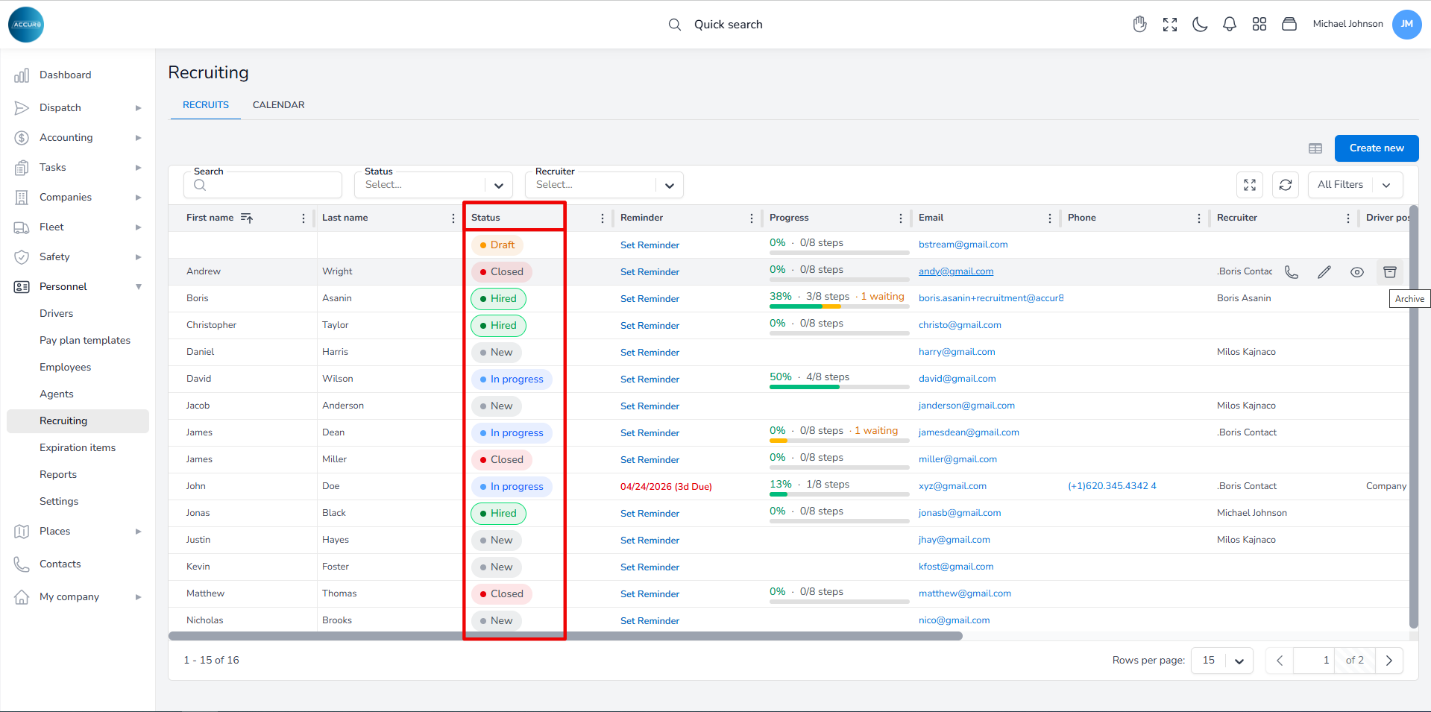
Initially, a candidate’s status in the system is set to New (or Draft if the profile includes only a first or last name). This status indicates that the profile has been created but not yet processed, as it awaits completion of the required onboarding steps.
To start processing a candidate, open their profile and click the Start processing button in the top-right corner.
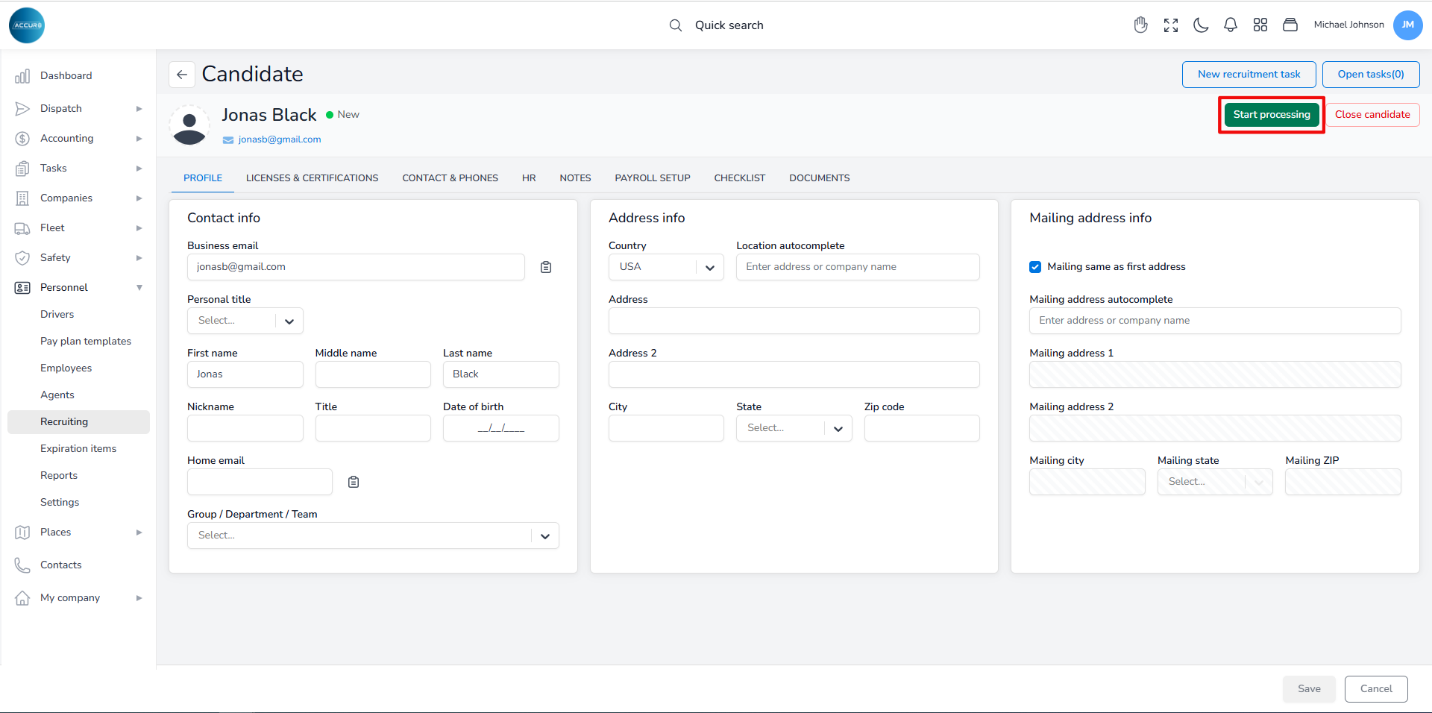
A pop-up window will appear asking you to assign yourself as the recruiter for the candidate. If you are a recruiter, click the Yes, assign me button; if not, click the Skip button. The candidate’s status will then change to In Progress.
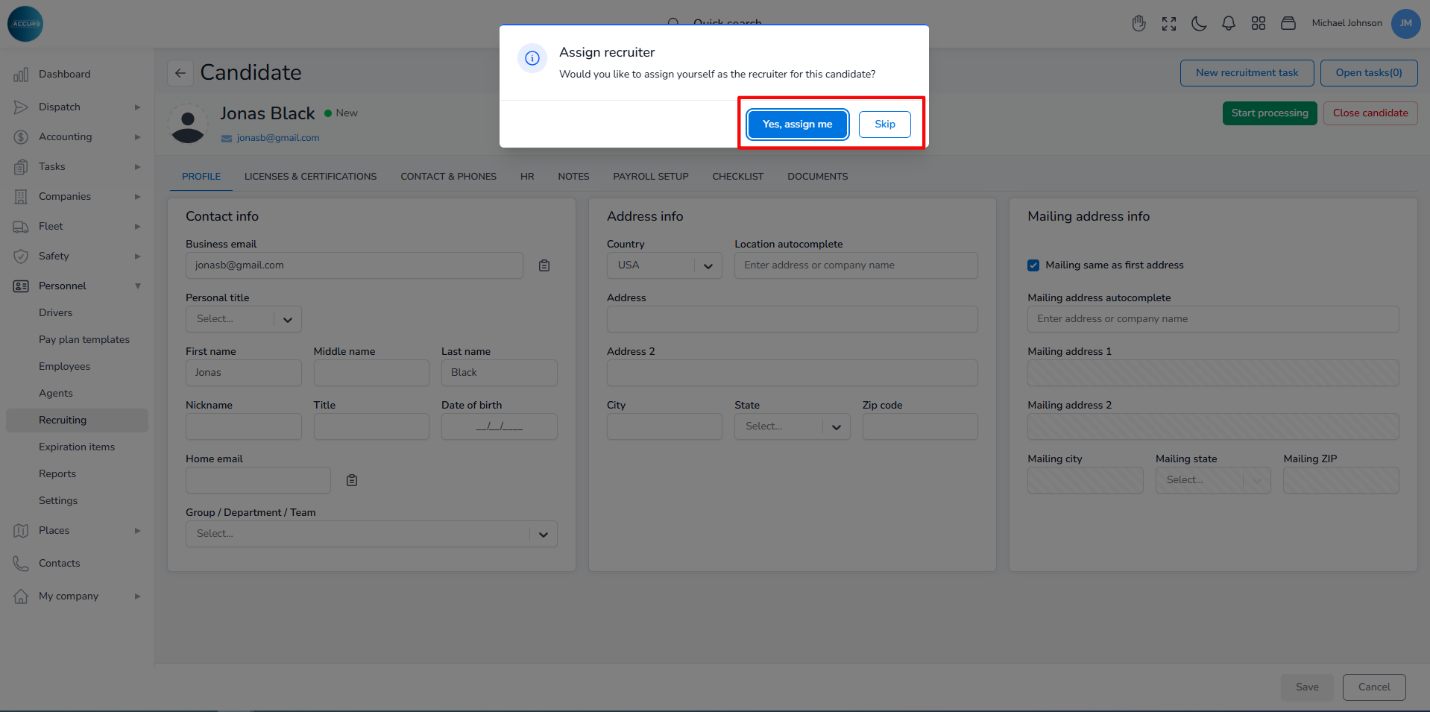
Note: The system will automatically start the process if you open any of the checklist steps.
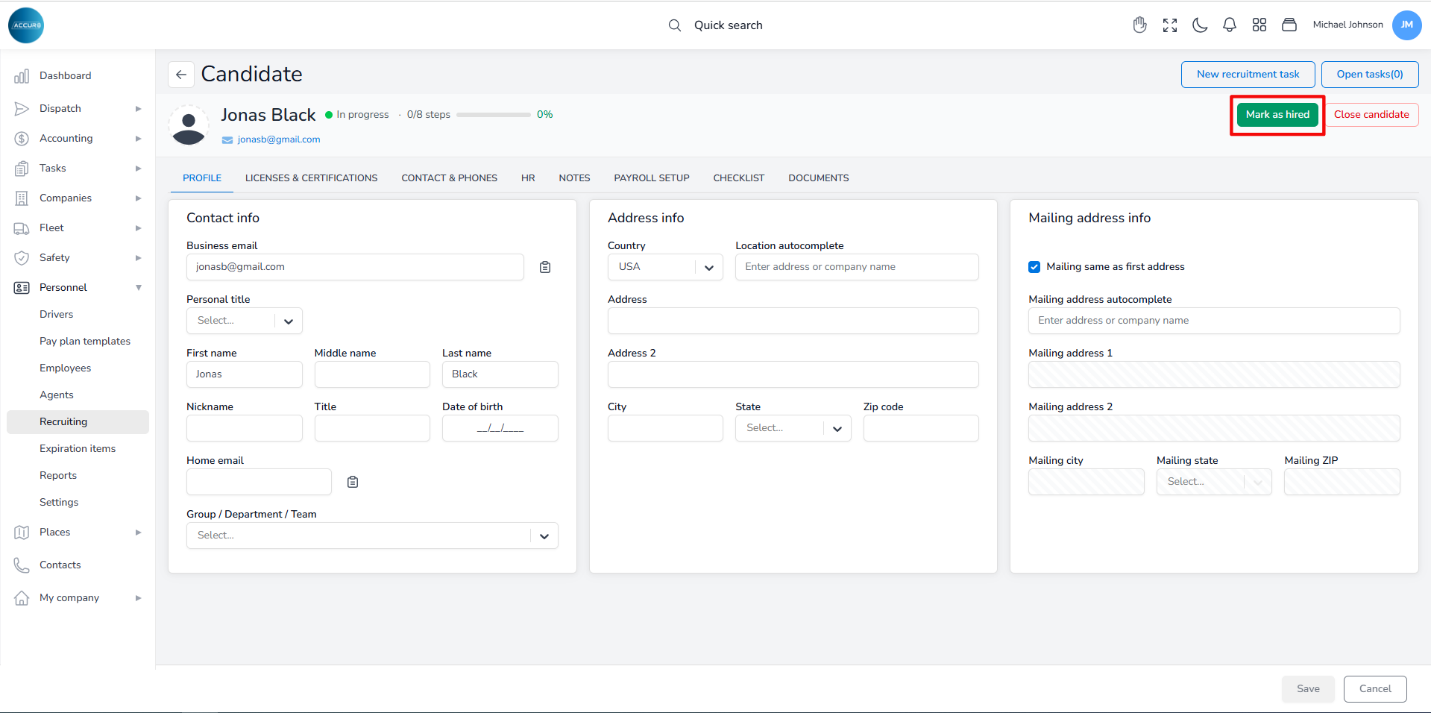
After uploading all mandatory documents, you can proceed with the hiring process. To do so, click the Mark as hired button in the top-right corner of the candidate’s profile page.
A dialog box will appear, prompting you to provide key hiring details. These include mandatory fields such as Hire date, Employment type, and Driver position type, as well as optional fields like Contract end date, Contract number, and any additional Notes relevant to the hire.
You also have the option to send documents directly via email by checking the appropriate checkbox. This allows you to include files from the Documents tab and send them to one or multiple recipients by entering their email addresses.
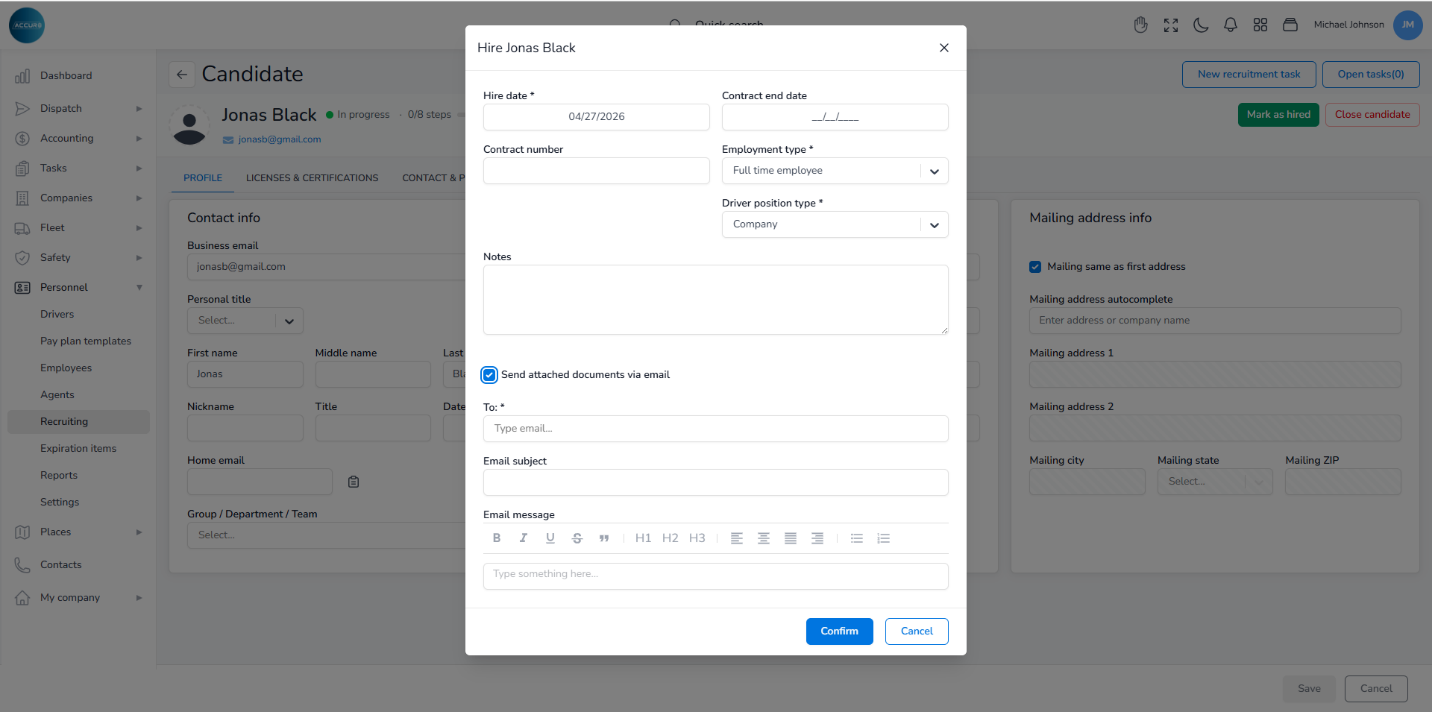
Once all necessary information has been entered, click Confirm to proceed. The candidate’s status will then change to Hired. The entered details will automatically populate the driver’s profile. At this point, the candidate transitions into an active Driver and will be listed on the Drivers page within the Personnel section.
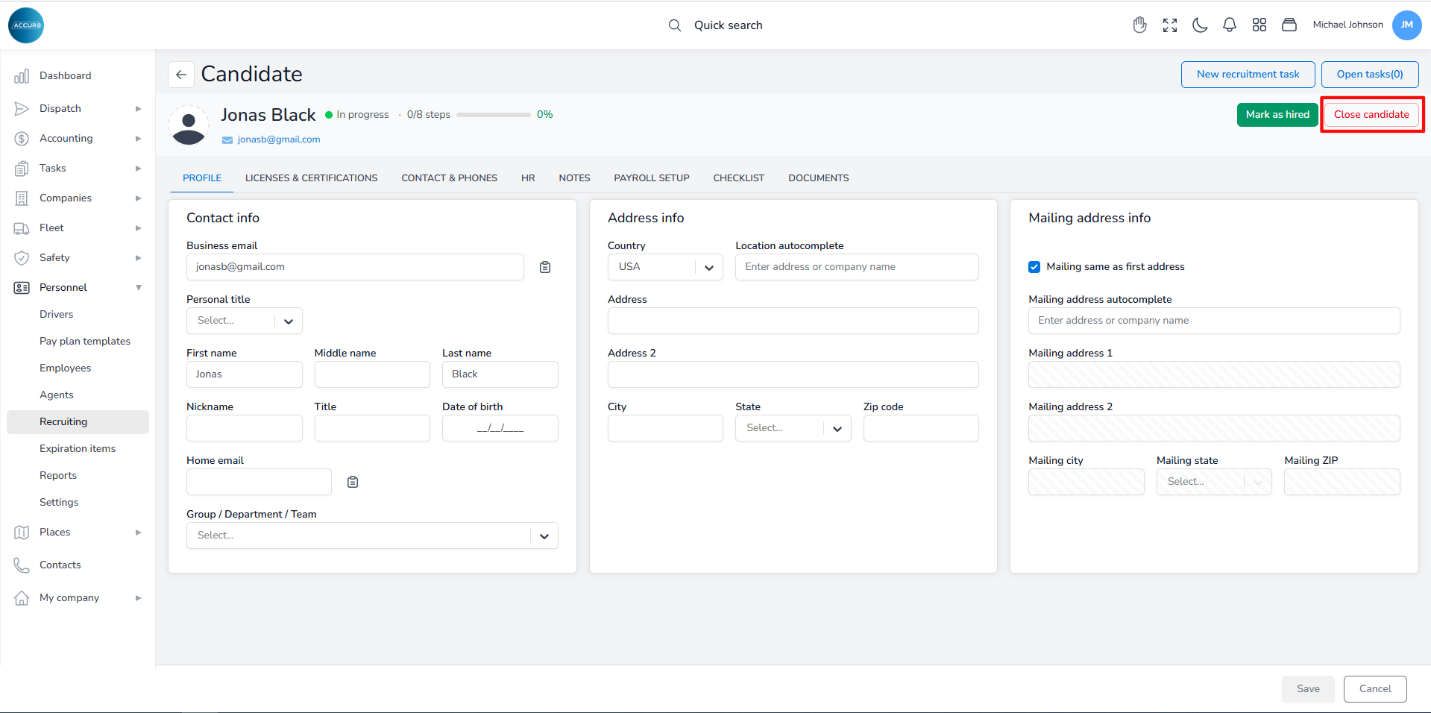
If a candidate is not hired, close their profile by clicking the Close candidate button in the top-right corner. This action opens a dialog box, prompting you to provide details explaining the decision.
Within this form, select an appropriate Close reason* from the predefined list. You may also include additional context in the Close reason notes field to explain the decision further. If needed, enable the Set reminder option to schedule a follow-up for this candidate. When this option is checked, additional fields will appear, allowing you to set a reminder date and time and add some notes.
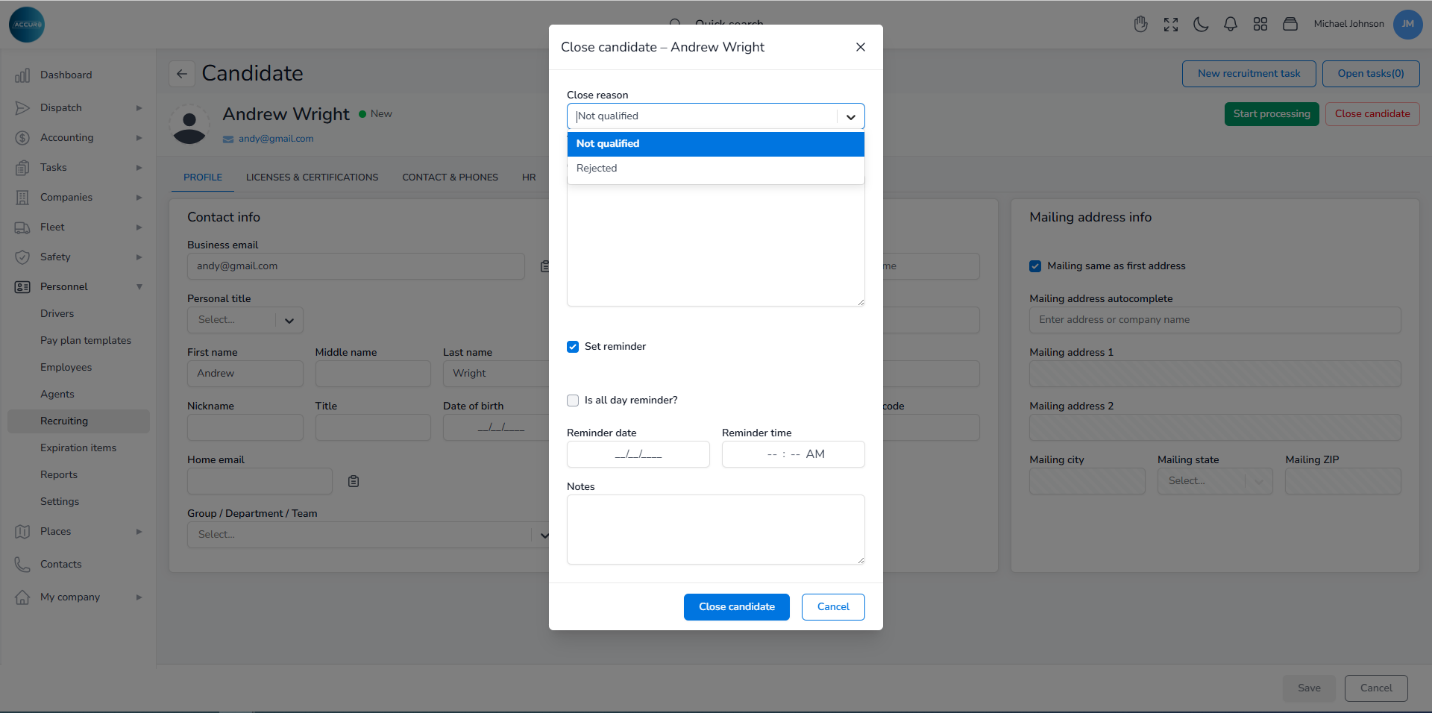
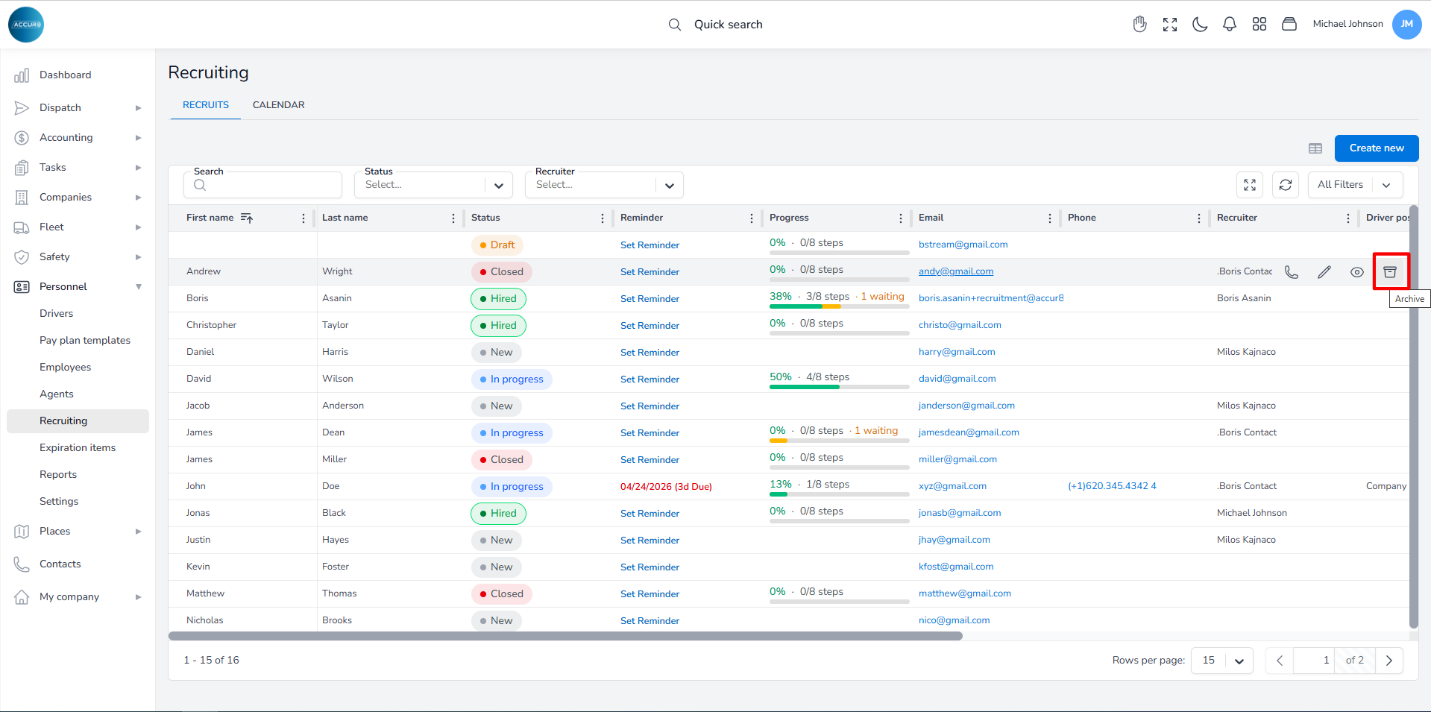
After completing the required fields, click the Close candidate button to confirm the action. The candidate’s status will then be updated to Closed. If the Close reason notes are added, they will be visible on the Candidate’s page, under the Notes tab. To remove a closed candidate from the main Recruiting list, hover over it and click the Archive button.
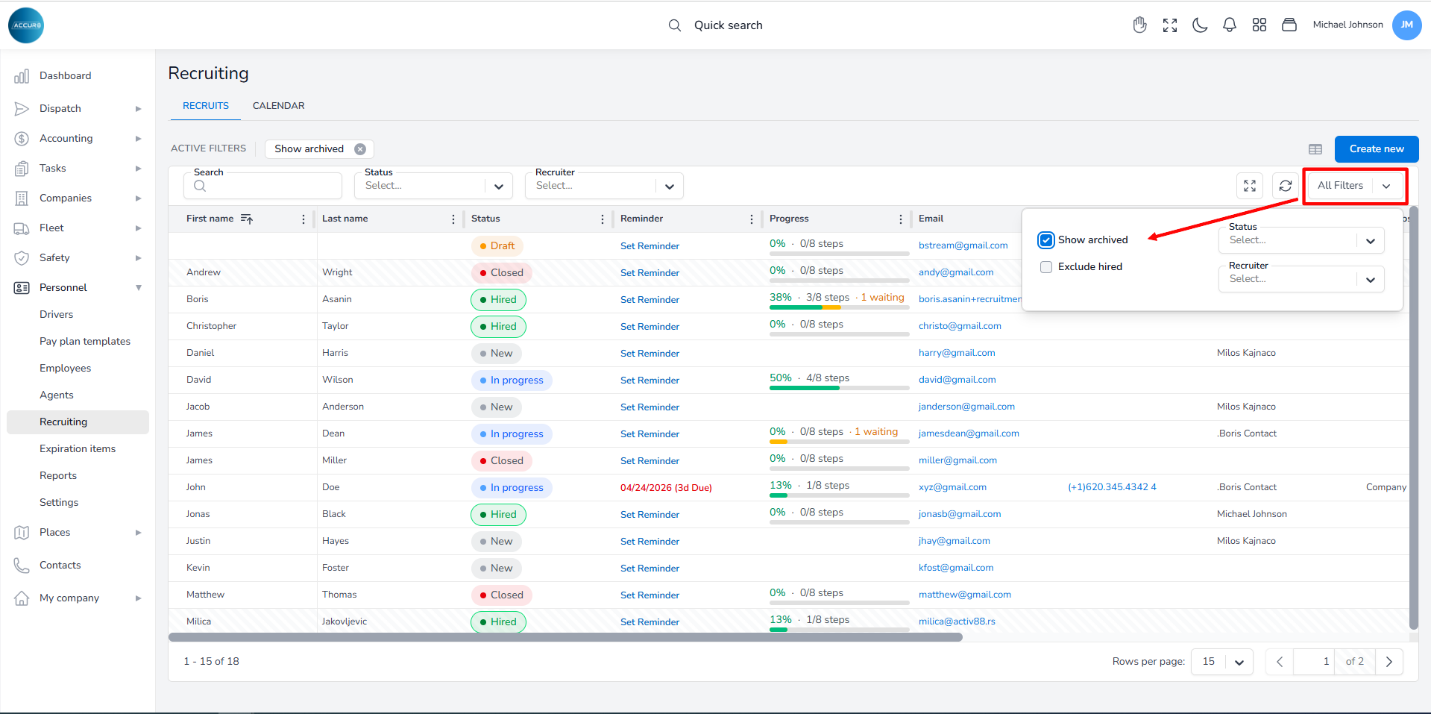
Archived candidates remain accessible at any time by checking the Show archived option within the All-Filters menu at the top-right corner of the Recruiting list page.
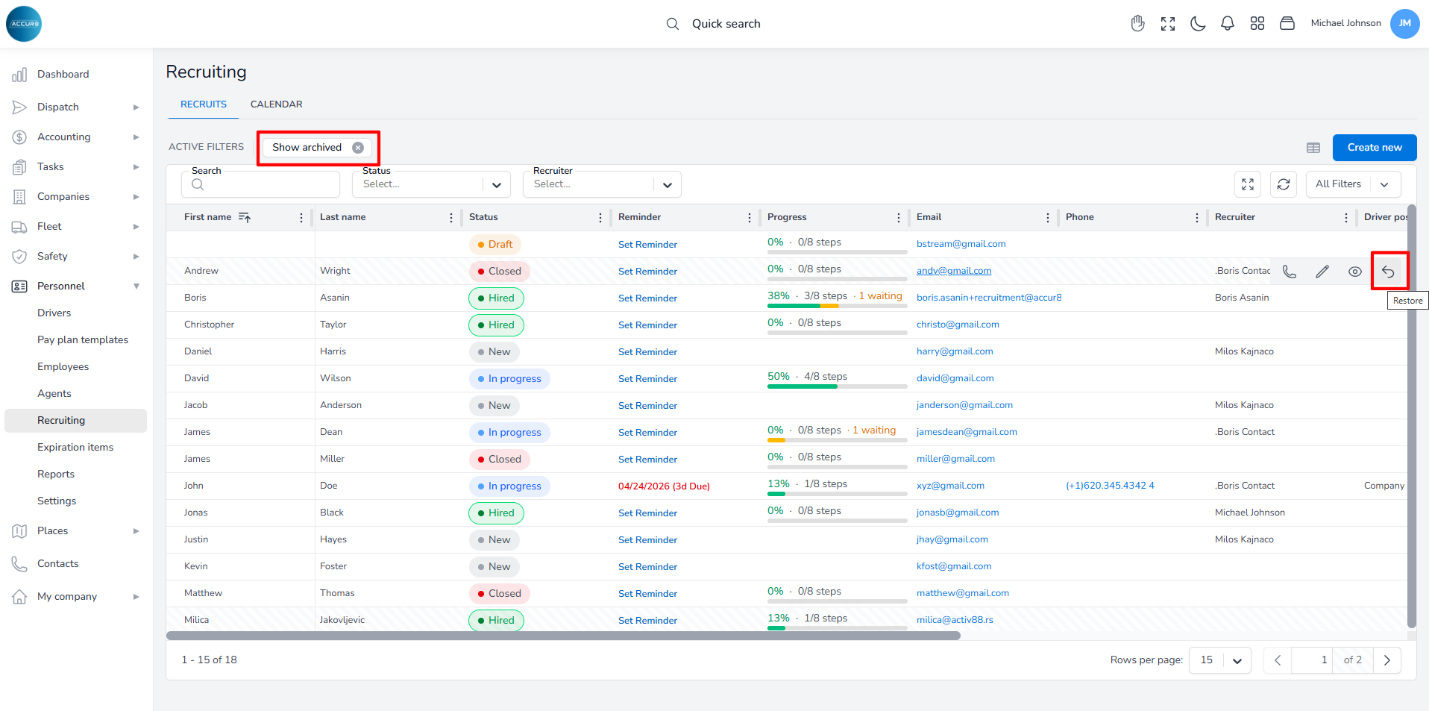
Keep in mind that archived candidates must be restored to the Recruiting list before the Reopen Candidate option becomes available on their profile page.
*Note: The Close reason list is managed by an admin. To add or edit reasons, navigate to the Personnel section on the left sidebar and select Settings. Click the Custom Fields tab, then select the Candidate Close Reason option. On the right, click the Create button.
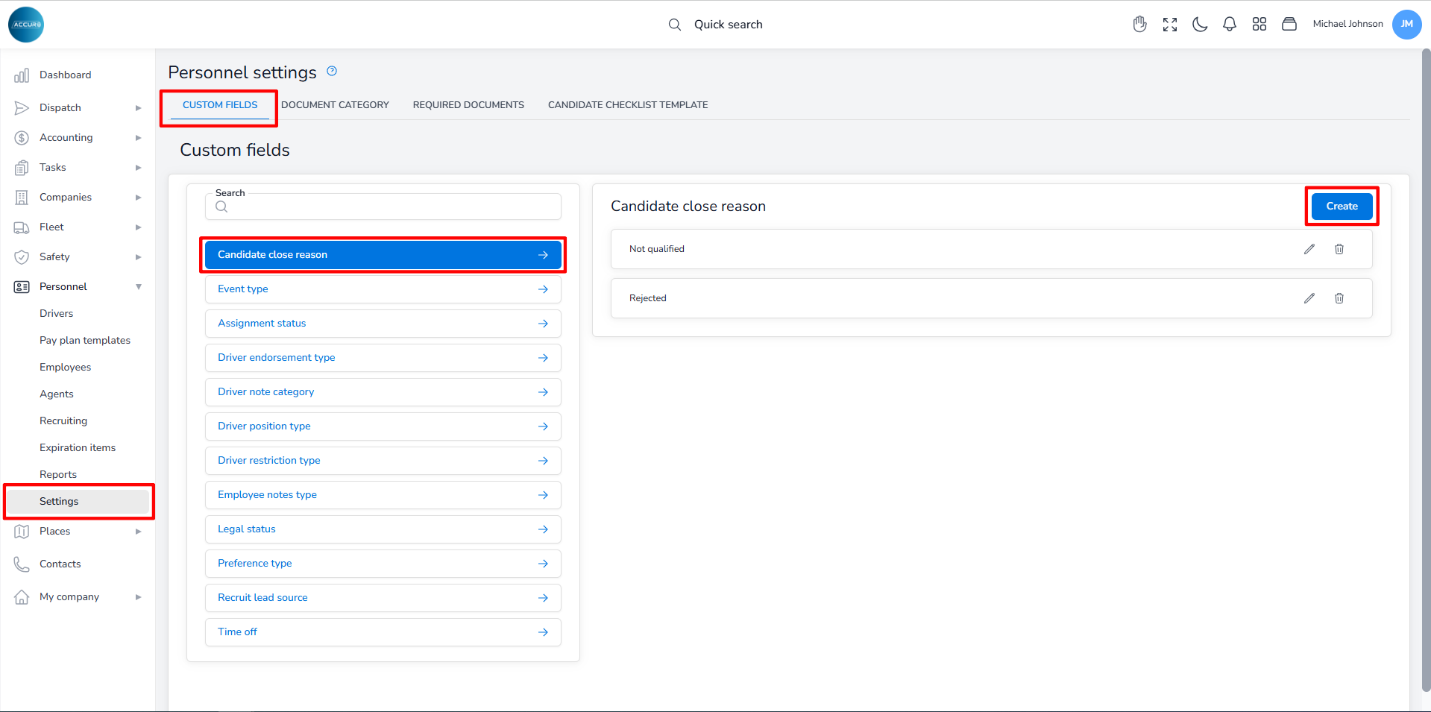
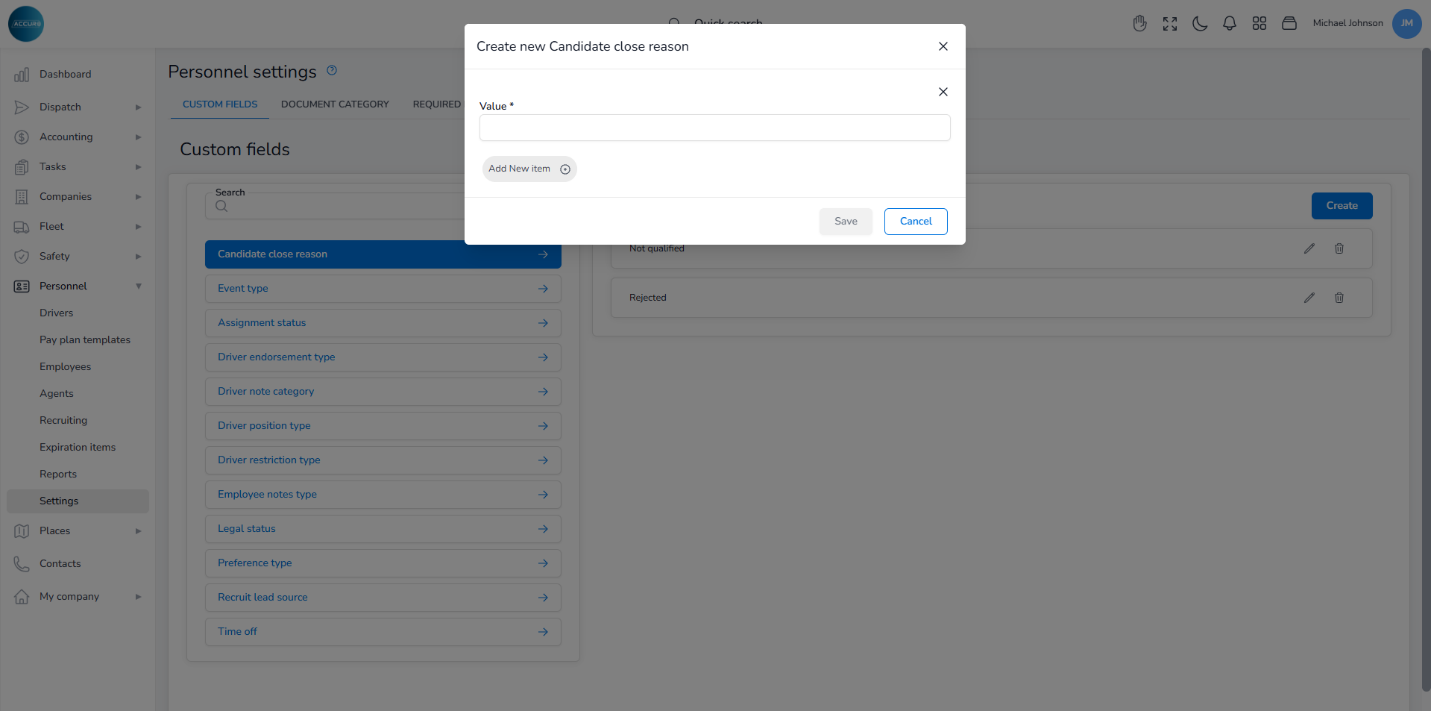
A dialog box will appear where you can add multiple reasons and save your list. You can access this option right from the Close candidate form by using a shortcut under the Close reason field.
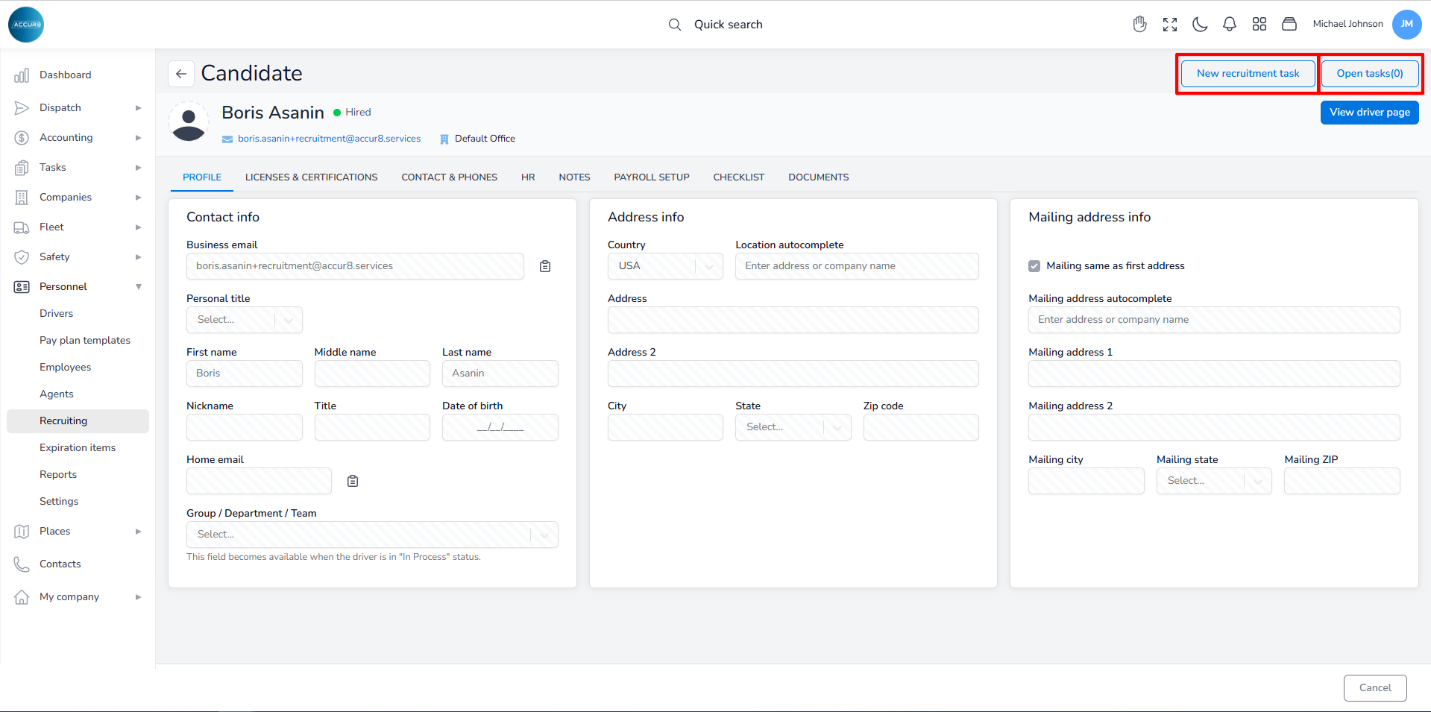
At the top-right corner of the candidate’s page, you can find other options, such as the New recruitment task option for creating a task related to the candidate and the Open tasks option, which displays all previously created tasks linked to the candidate.
Recruits List and Calendar Overview #
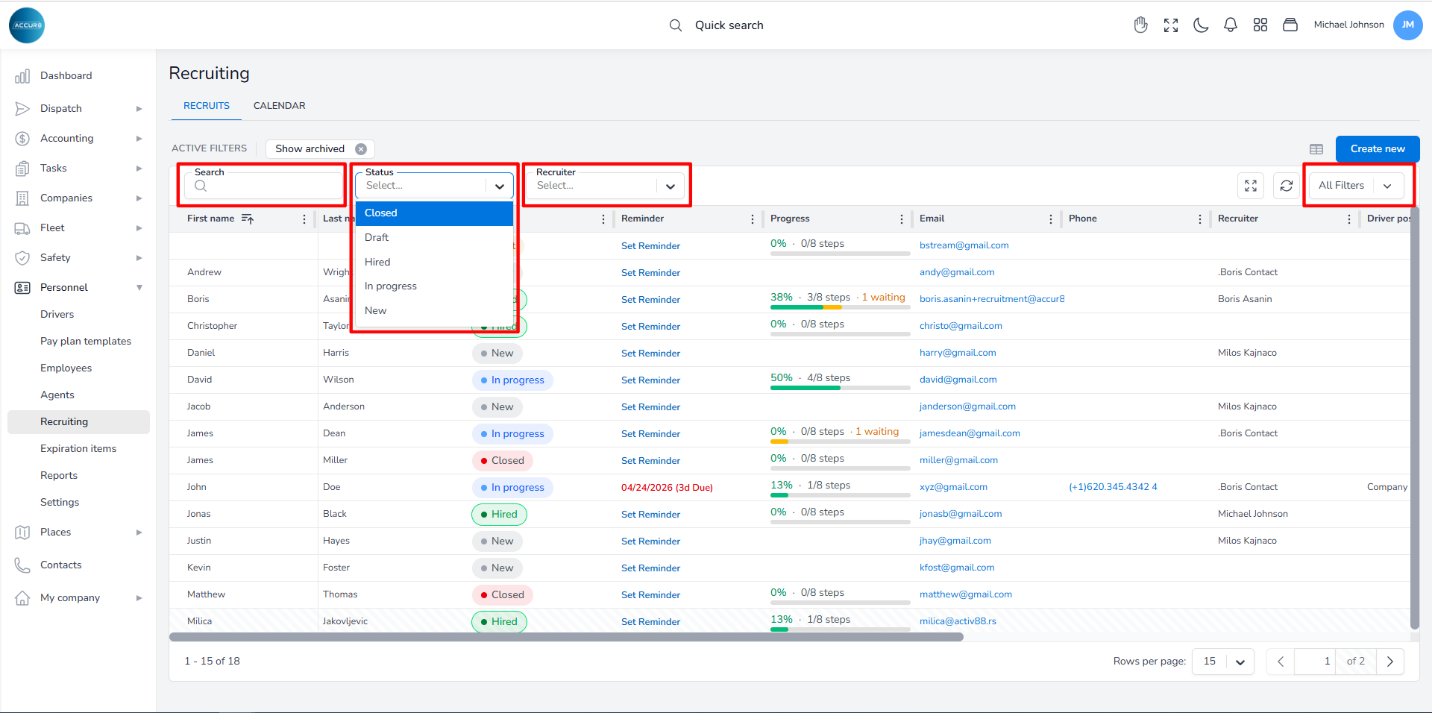
The Recruits List provides a centralized overview of all candidates within the system. To access it, navigate to the Personnel section on the left sidebar, then select Recruiting.
Each column in the Recruiting list provides key information, including:
- Candidate name and current status — Draft, New, In Progress, Hired, or Closed.
- Reminder — shows upcoming reminder information, with overdue items clearly marked in red. It also allows users to set new reminders.
- Progress bar — displays checklist completion and highlights any pending steps.
- Essential details such as email, phone number, recruitment source, and associated dates.
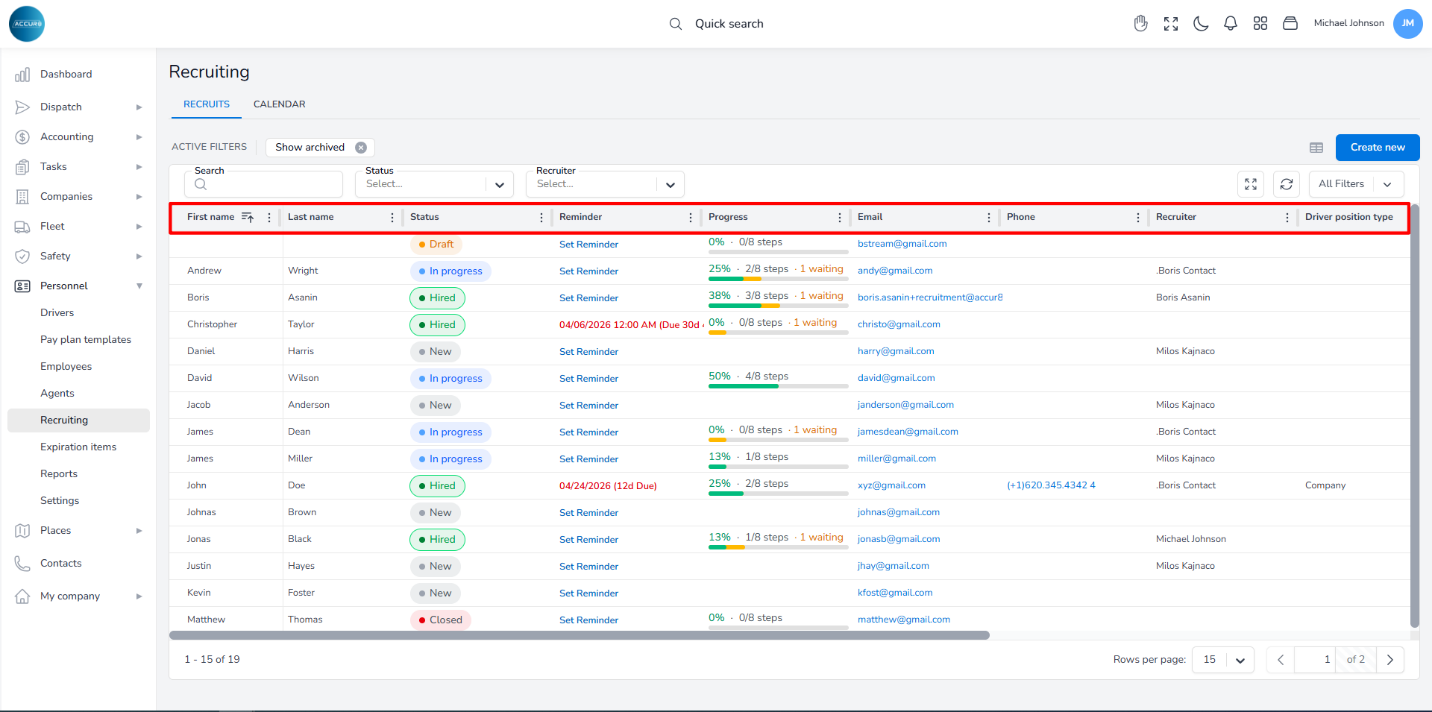
You can search for any candidate in the system using the Search bar in the upper-left corner. You can filter your search by selecting a Status or Recruiter from the corresponding fields next to the Search bar, or by using the All-filters option in the top-right corner of the screen. For example, enabling the Show archived option will include closed candidates in your results.
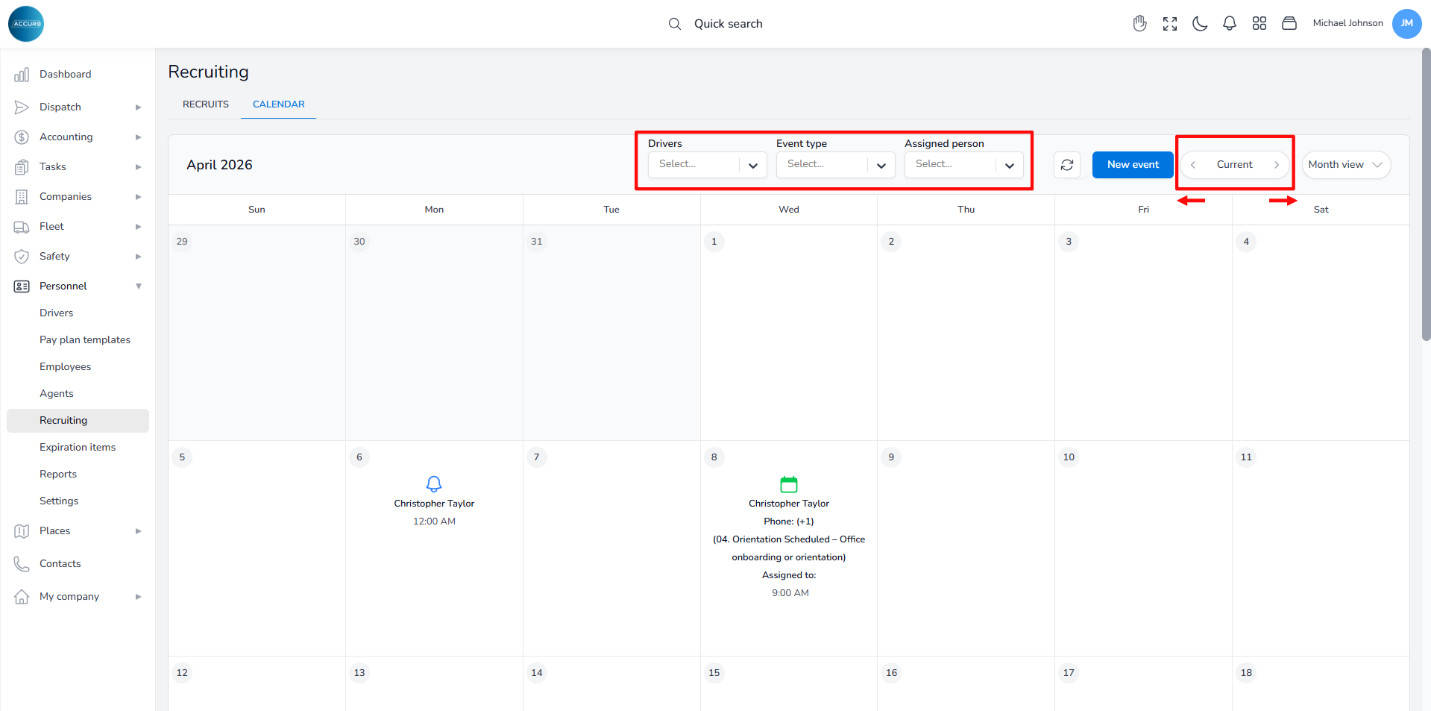
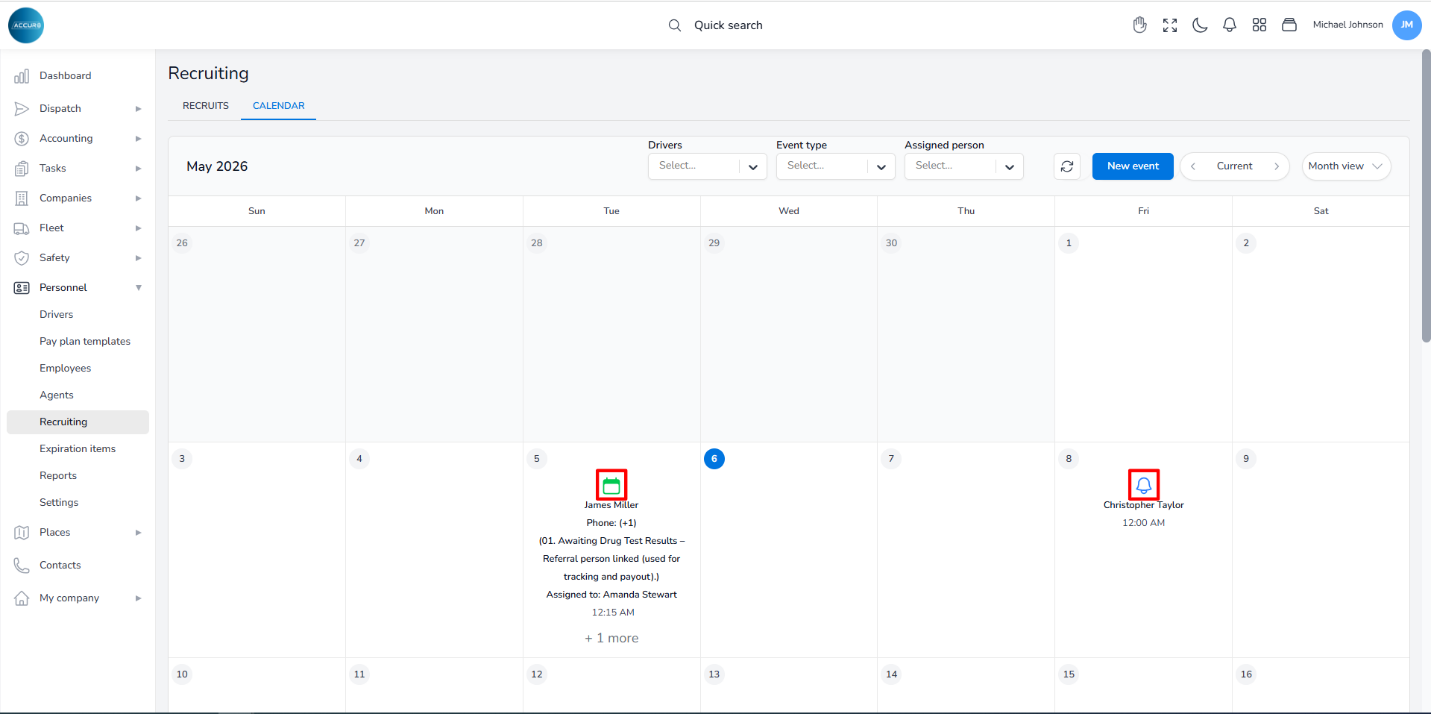
The Calendar tab provides an overview of all reminders and scheduled activities, organized by date. Each entry includes key details such as the candidate’s name, contact information, event type, notes, assigned personnel, and scheduled time.
Visual indicators help distinguish between different types of entries:
- The bell icon represents reminders associated with a candidate.
- The calendar icon indicates scheduled events, such as Orientation sessions.
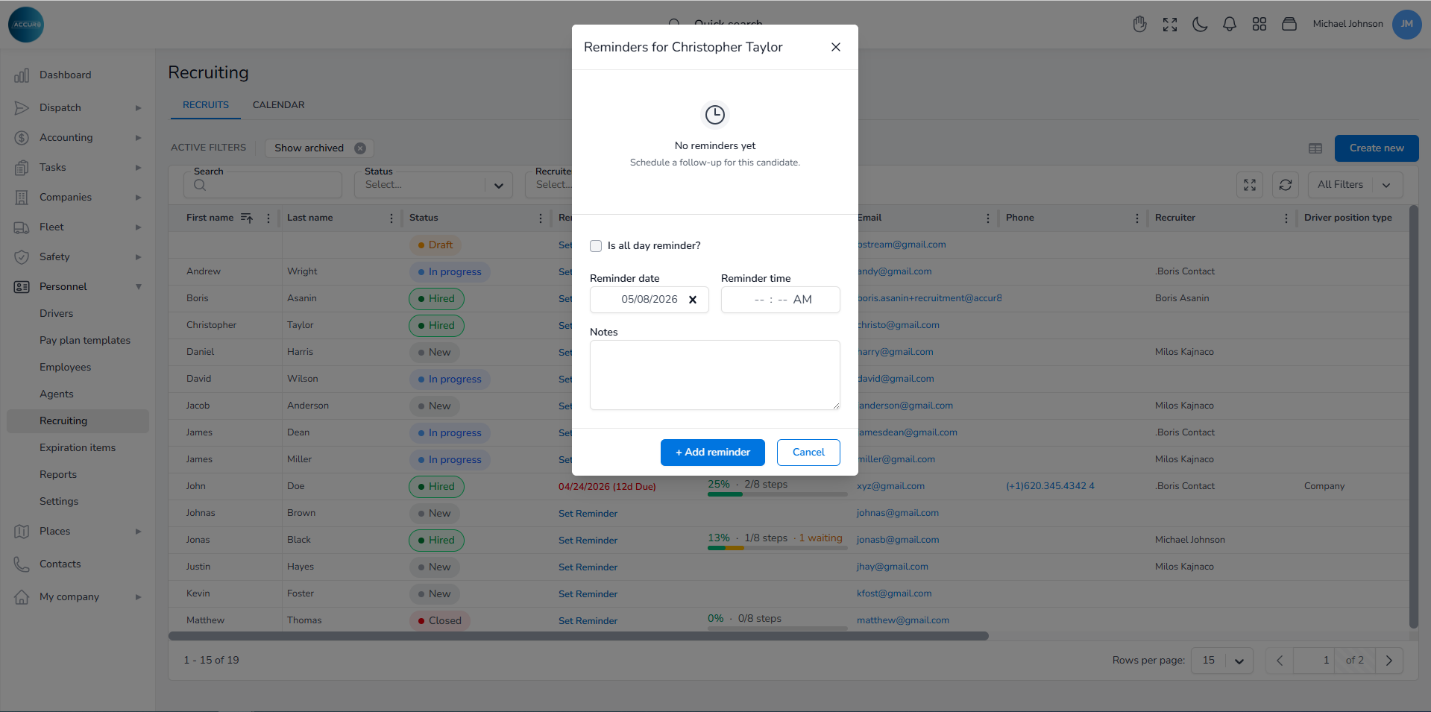
To set a reminder, click the Set reminder button in the Recruiting list under the selected candidate’s Reminder column. A pop-up window will appear, allowing you to add a reminder date and time, along with some notes.
To schedule a new event, click the New event button on the Calendar tab in the upper-right corner. A dialog box will open, allowing you to create a new event by filling in the form. You can choose whether this event is for a Driver or a Candidate. Once you’ve made your selection from the corresponding drop-down menu, choose the Event type and add the Start date and time. These fields are required. Optional fields include Assigned Person, End Date and Time, and Notes.
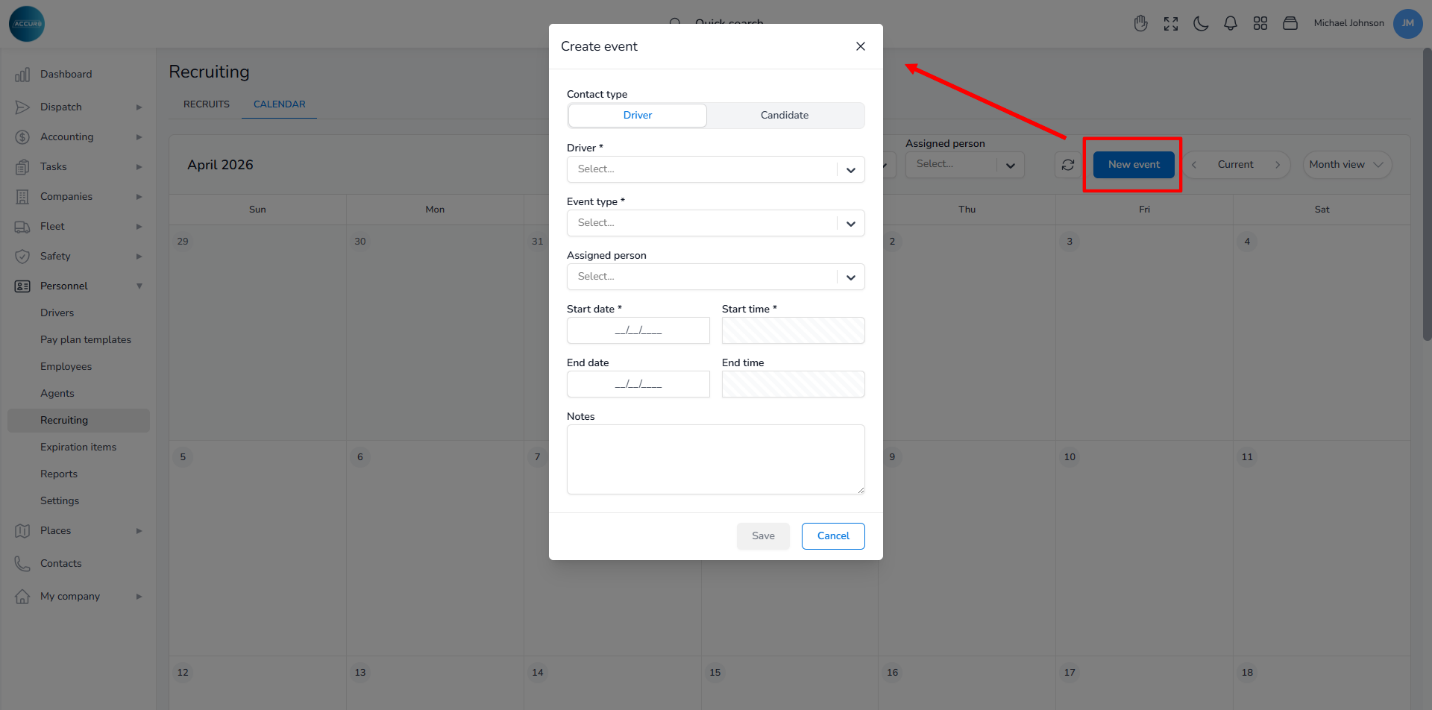
Filtering options at the top of the page allow you to refine the view by Driver, Event Type, or Assigned Person, ensuring quick access to relevant information. Use the arrows within the Current field at the top-right to navigate between months. Clicking the Current field itself will instantly return you to the present date.